8 Tips for Capturing Fall Colors

Autumn is here and it is a glorious season! I wanted to share some tips for capturing all things fall. With its crisp air and golden foliage, autumn is the perfect time to get out on the trails or take a drive through nature with your camera.  The light and colors of fall offer so many opportunities regardless of weather. Here are some technical and creative tips to consider while you capture the season. 

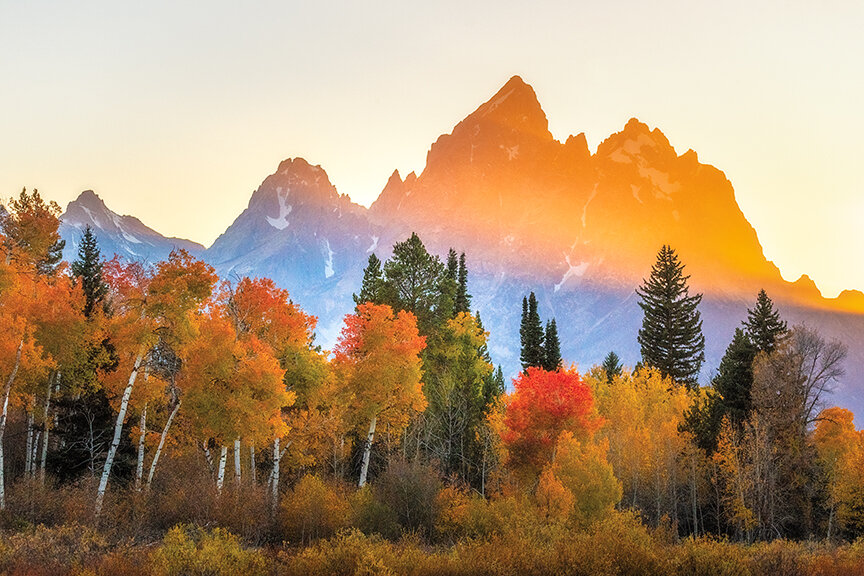
1) Emphasize Color -  Obviously the first thing that comes to mind when we think of autumn is color. The autumn colors of yellow, orange and gold shine in sunlight and contrast so beautifully with a vibrant blue sky. When photographing the color, it can be effective to isolate the golden color and fill the frame with the beautiful fall colors. Or mix the golden colors with blue of skies or water to create stunning depth and striking contrast. 

The warmth of the orange trees contrast with the cool tones of the mountains and blue sky in Grand Teton National Park.

The warmth of the orange trees contrast with the cool tones of the mountains and blue sky in Grand Teton National Park.

The mix of yellow, orange and red drew my eye right into this scene.

The mix of yellow, orange and red drew my eye right into this scene.

2) Get out in Golden Hour  - The golden hour light adds a beautiful warmth to all scenes but the way it makes autumn colors glow is just magical. Get out early for sunrise or at the end of day for sunset. A benefit is that during this season, the sunrise is getting later in the morning and sunset earlier in the evenings. 

The setting sun lights the tips of the Tetons and illuminates the fall foliage in the foreground.

The setting sun lights the tips of the Tetons and illuminates the fall foliage in the foreground.

3) Grab a Telephoto Lens - A telephoto lens is a perfect choice for capturing details and intimate landscapes. Longer focal lengths can bring you closer to far away scenes or they can isolate details that get lost in the grander scene. A macro lens is also great for capturing details of closer subjects. 

Captured from the parking lot at Oxbow Bend in Grand Teton National Park, a 260mm focal length with my Sigma 150-600 allowed me to isolate this beautiful hillside of fall color.

Captured from the parking lot at Oxbow Bend in Grand Teton National Park, a 260mm focal length with my Sigma 150-600 allowed me to isolate this beautiful hillside of fall color.

4) Consider Abstract - Consider using a slow shutter speed and intentional camera movement to create abstract images of the fall trees and foliage. Experiment with various focal lengths and with faster and slower movement for different looks. Use a vertical movement with trees. Try zoom blur for an intriguing look. For zoom blur, try a 1 second shutter speed starting at one focal length and twist through the focal lengths while the shutter is open. 

Intentional Camera Movement in a grove of Aspens in Wyoming. A 1 second shutter speed with very slow movement created this painterly effect while maintaining some detail of the scene.

Intentional Camera Movement in a grove of Aspens in Wyoming. A 1 second shutter speed with very slow movement created this painterly effect while maintaining some detail of the scene.

5) Bring A Polarizing Filter - I always keep a polarizing filter in my bag and I love it in the fall. A polarizer will cut glare and enhance the vibrance of the fall colors and blue sky. Be careful with wide angle lenses as the polarizing effect is inconsistent across the frame with wide angles. 

6) Embrace a Mix of Seasons - The full glow of autumn is stunning but the clash of the seasons can also create wonderfully compelling images. Whether this is a golden tree glowing amongst a sea of green or an early snow that provides a mix of autumn and winter, embrace the atmosphere. 

Immediately following peak fall color one year, a stunning snowfall clung to the trees. I used a 200mm focal length to isolate the details and clashing of winter and fall.

Immediately following peak fall color one year, a stunning snowfall clung to the trees. I used a 200mm focal length to isolate the details and clashing of winter and fall.

A single tree glows with gold amongst the green

A single tree glows with gold amongst the green

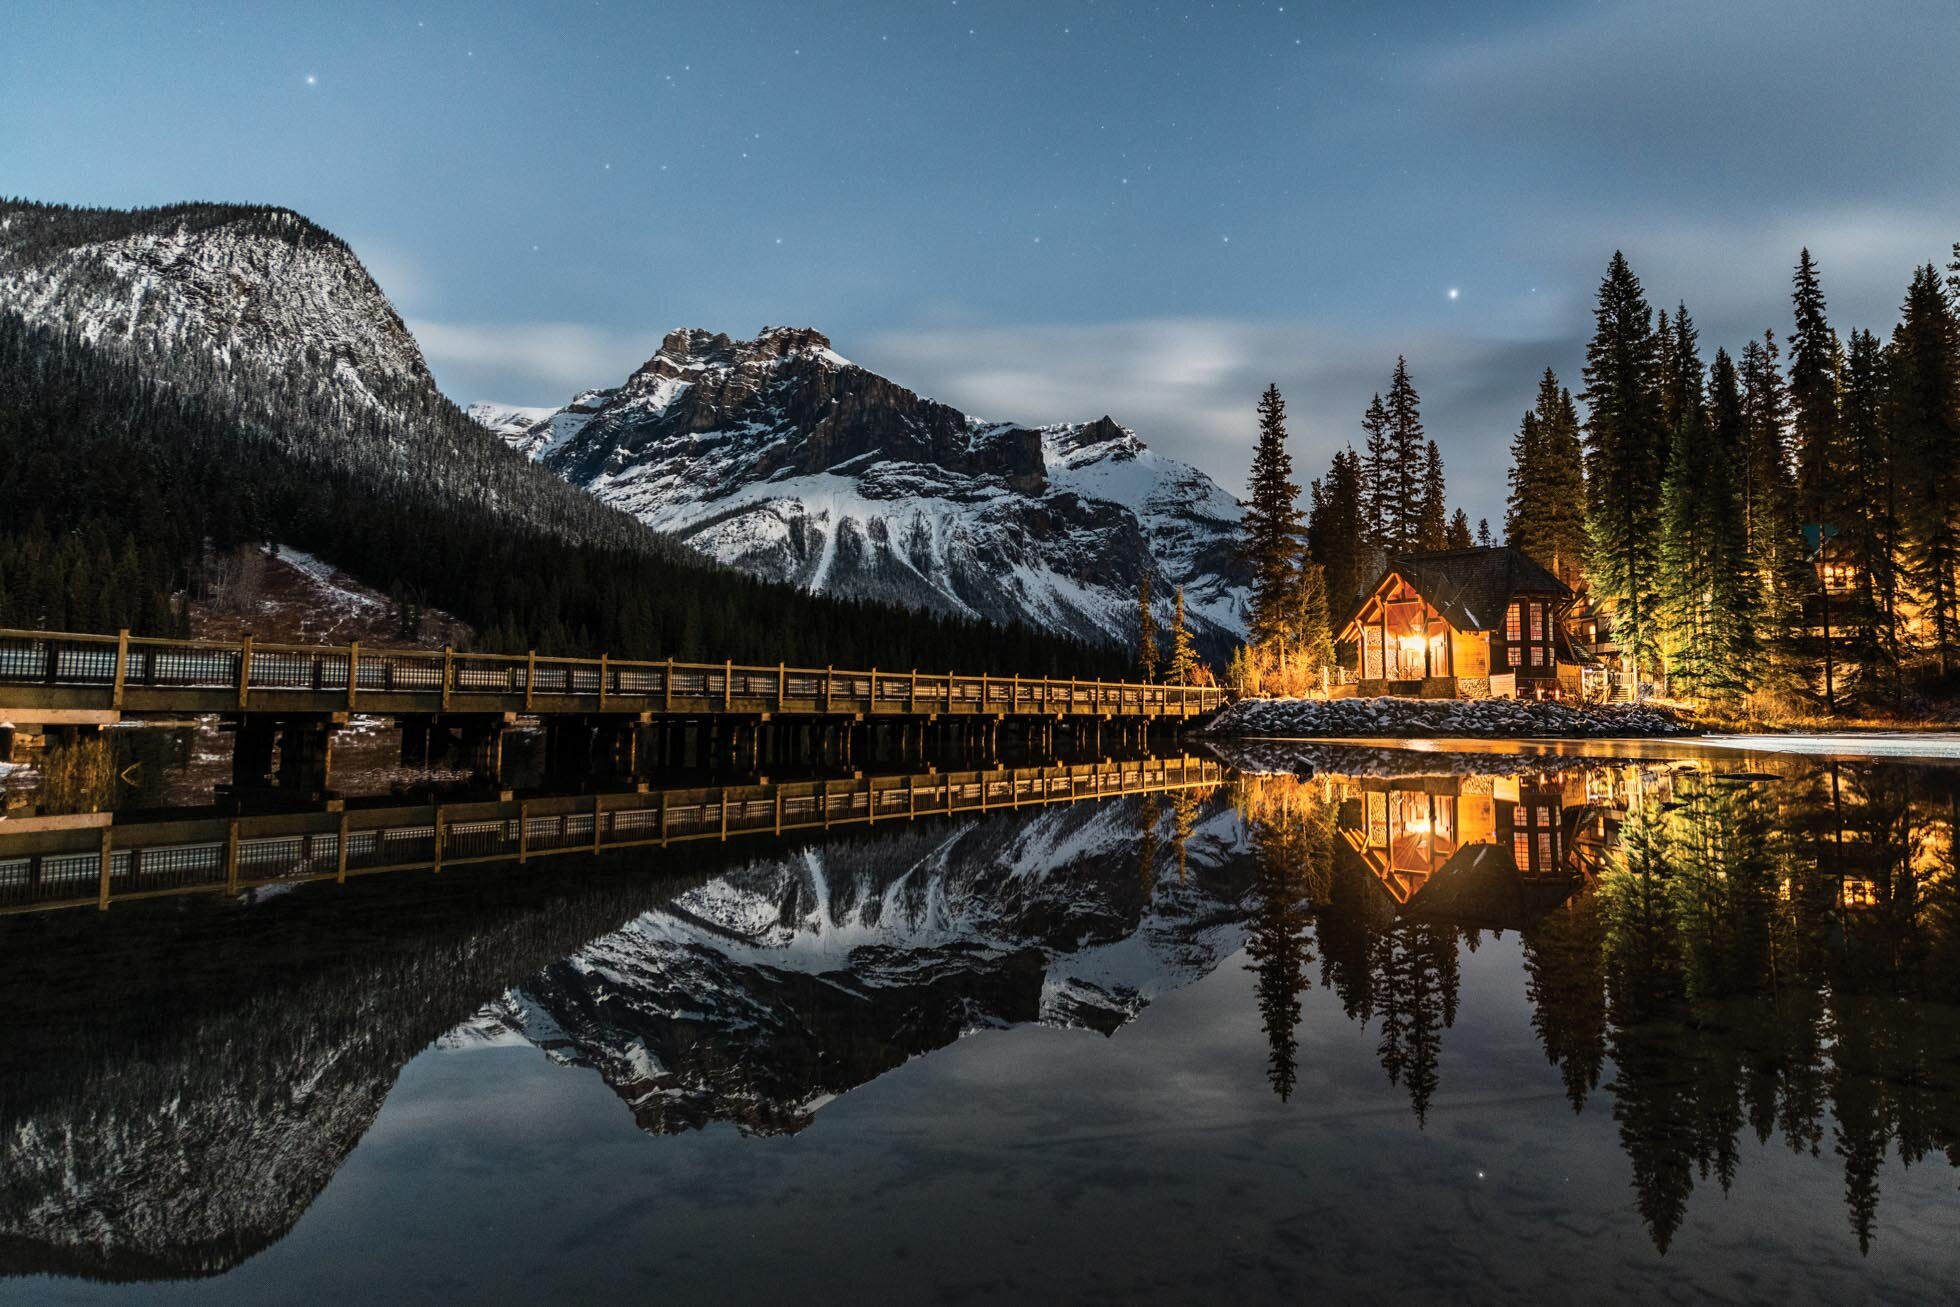
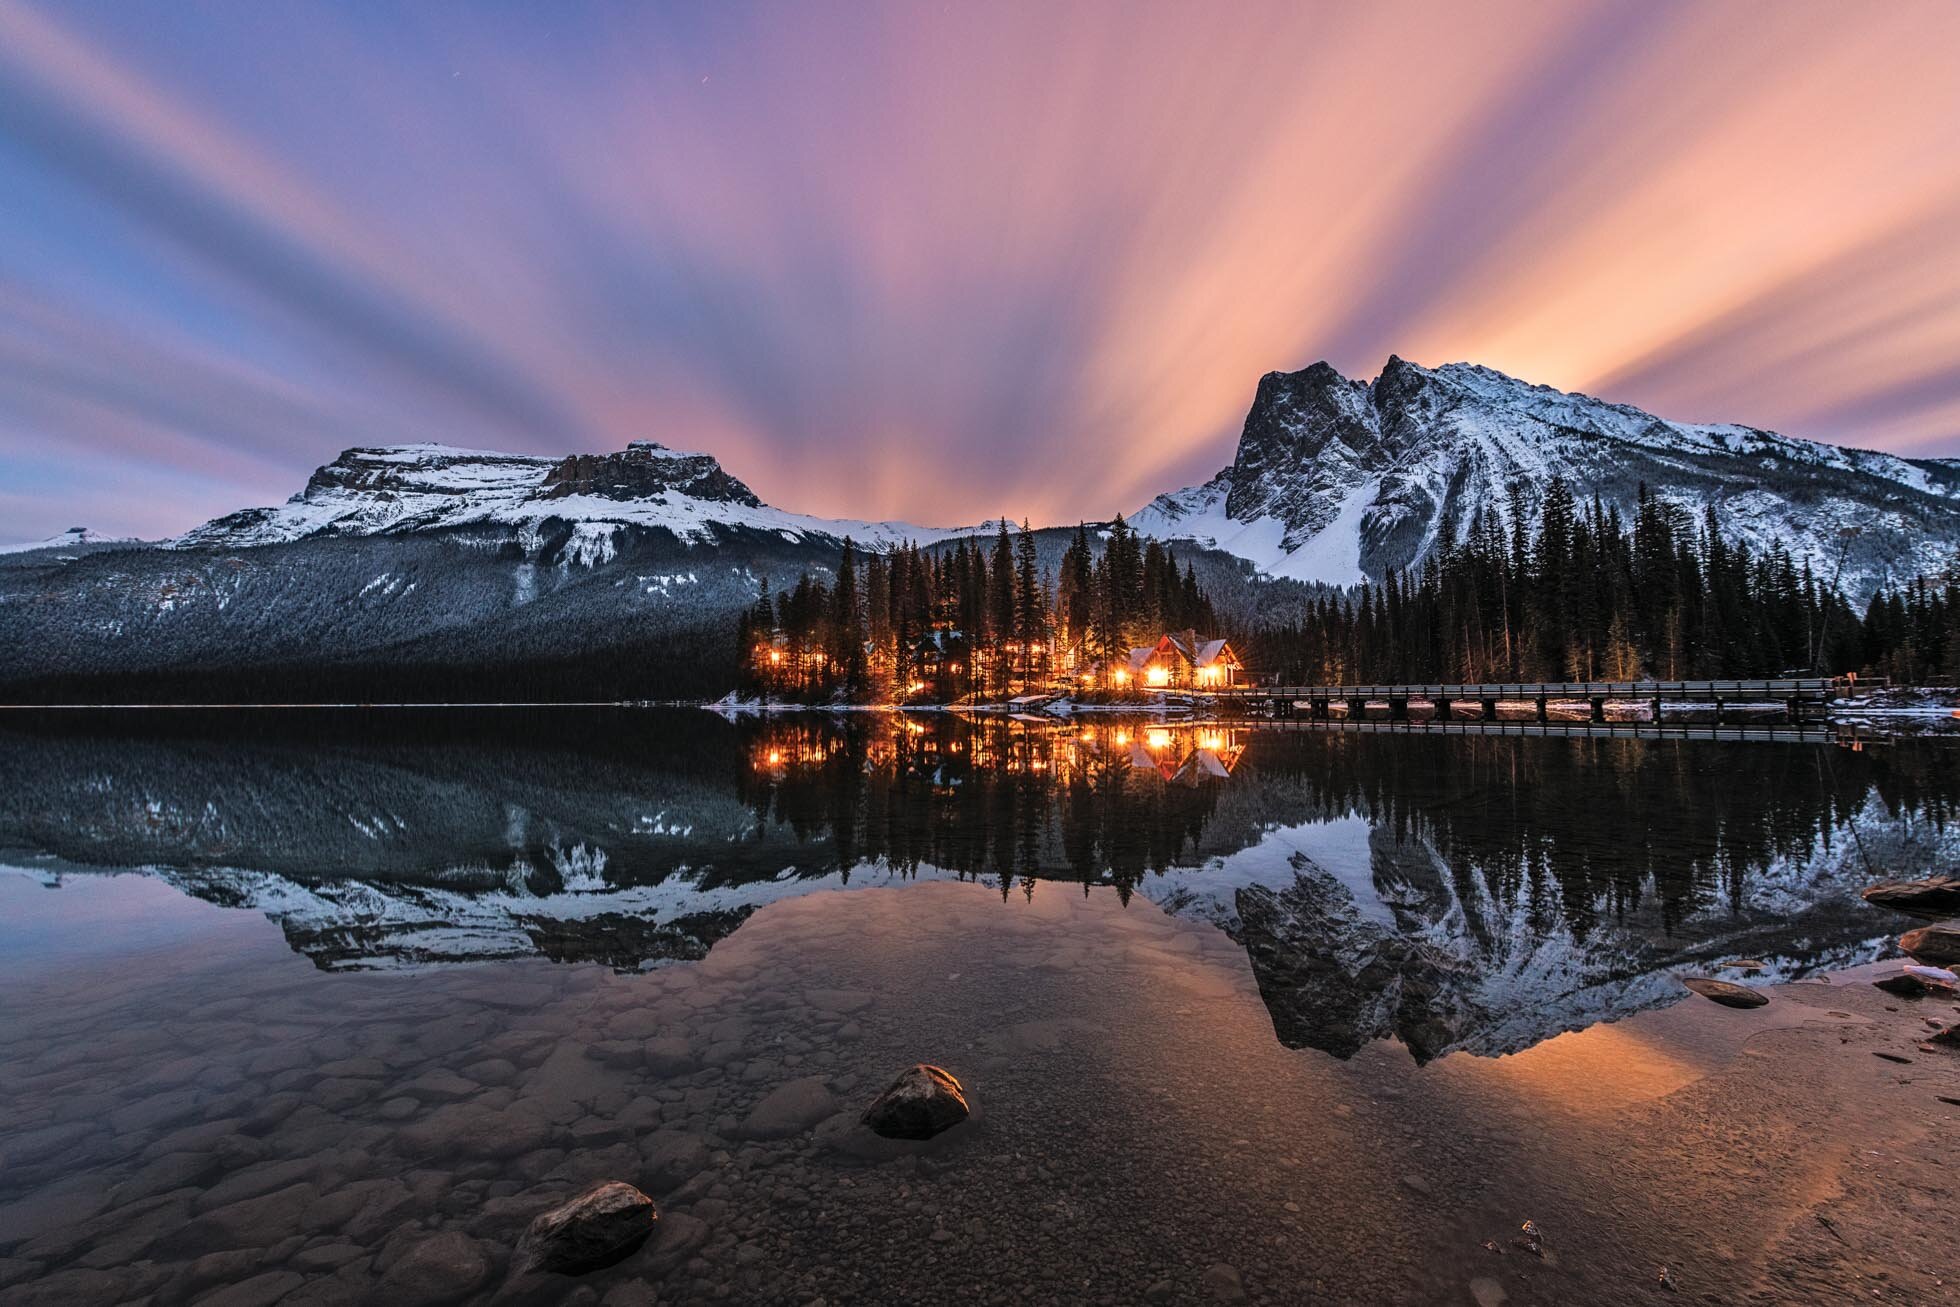
7) Look for Reflections - Reflections are a favorite of mine to look for in all seasons, but especially in the fall. Colorful foliage reflecting in the water of lakes and ponds adds additional color and pop to any autumn scene. Look for reflections on days with minimal wind. Early mornings or late evening are the best time to find calm waters.

Fall colors reflect in the Snake River at Oxbow Bend in Grand Teton National Park Sept 2020.

Fall colors reflect in the Snake River at Oxbow Bend in Grand Teton National Park Sept 2020.

8) All Weather brings unique opportunities! Sunny days offer beautiful blue skies to contrast with the golden color. The sun brings out the glow of autumn colors. Consider closing down your aperture to create a sunburst through the trees or in the sky. 

The sun shines through the East Woods at Morton Arboretum on a perfect autumn day.

The sun shines through the East Woods at Morton Arboretum on a perfect autumn day.

Stormy weather creates incredible atmosphere and dark storm clouds create a beautiful contrast with the warmth of red, yellow and orange fall foliage. 

The stormy clouds create a dramatic atmosphere behind the Tetons as they contrast with the warmth of the golden trees and grasses in the foreground.

The stormy clouds create a dramatic atmosphere behind the Tetons as they contrast with the warmth of the golden trees and grasses in the foreground.

Overcast weather may hinder grand landscape opportunities but is an excellent opportunity to seek out waterfalls, rivers or streams for long exposure photography. The lack of bright sun eliminates dappled highlights and the soft lighting allows you to push vibrance of the fall colors in post processing. I always have a polarizer and a 6 stop ND filter with me when I shoot waterfalls and rushing water.  I shared about one of my favorite tools, the X4 CPL by Breakthrough Photography, in this blog post

A slow shutter speed captured the soft flow of the waterfall and a polarizer cuts the glare on the foreground leaves.

A slow shutter speed captured the soft flow of the waterfall and a polarizer cuts the glare on the foreground leaves.

Hope these tips help you take advantage of the beauty of autumn. It is a wonderful time of year to get out and photograph all the days have to offer!


Kristen Ryan is an award winning and published landscape and fine art photographer and educator residing in the Midwest suburbs of Chicago. All images are available for purchase in the Fine Art Store or by request. Kristen leads ladies landscape photography retreats in the TetonsChicago, and the Canadian Rockies, offers private mentoring and teaches an online landscape photography workshop, The World Around You.

6 MORE Tips for Capturing Reflections

In my last post, I shared 5 tips for capturing beautiful reflections in landscape imagery. Some of my very favorite landscape images are ones that include reflections. For that reason, I wanted to share some more tips with you this week! 

1) Create Symmetry - In landscape photography, it is often recommended to avoid a centered horizon in creating a strong composition. However, when capturing reflections, a centered horizon can be a great choice for composing an image with beautiful symmetry. This is especially the case with a simple scene that isolates the subject and its reflection.  When the top and bottom of the scene appear identically, the centered horizon yields a pleasing sense of balance in the frame.

A minimal scene of clouds and trees reflecting in Emerald Lake.

A minimal scene of clouds and trees reflecting in Emerald Lake.

An example of a more complex scene with multiple elements that are mirrored in the waters of Emerald Lake.

An example of a more complex scene with multiple elements that are mirrored in the waters of Emerald Lake.

2) Think Abstract - Sometimes a reflection can lend itself well to an abstract. Fill the frame with subjects with interesting textures, lines or repetitive shapes.

This image is a scene in Jasper National Park at sunrise. I was drawn to the textures and repetition of these trees and I used my telephoto lens to create an abstract of just the trees and their reflection.

This image is a scene in Jasper National Park at sunrise. I was drawn to the textures and repetition of these trees and I used my telephoto lens to create an abstract of just the trees and their reflection.

This abstract captured the reflection of tree trunks in the pond beyond our home as the snow fell last month.

This abstract captured the reflection of tree trunks in the pond beyond our home as the snow fell last month.

3) Avoid Distractions - As you frame your shot, be aware of distractions that might get in the way of your clear and compelling reflection. This can mean items in the water that distract the eye from the reflection such as algae, rocks or sticks.  It is also important to check that your positioning captures the reflection without cutting it off. For example, make sure your trees or mountains are reflected fully without the shoreline cutting off the tops of them. 

This scene at Oxbow Bend requires that you watch your position so that the full top of Mt. Moran is reflected in the Snake River below.

This scene at Oxbow Bend requires that you watch your position so that the full top of Mt. Moran is reflected in the Snake River below.

In this scene in Grand Teton National Park, I carefully set myself up so that the reflection of the Grand Teton would not be impacted by the rocks in the foreground.

In this scene in Grand Teton National Park, I carefully set myself up so that the reflection of the Grand Teton would not be impacted by the rocks in the foreground.

4)  Frame your reflection - Look for framing elements to add more depth to your reflection images. However, be aware of tip #3 and don’t cut off the important parts of your reflection. Use the framing elements to add depth but avoid distracting the eye away from the reflection that is your main focal point. 

In this image, I wanted to frame Mt. Moran and its reflection in the water below. I was very careful to position myself to comfortably frame the subject and while not cutting off the reflection with the foreground foliage.

In this image, I wanted to frame Mt. Moran and its reflection in the water below. I was very careful to position myself to comfortably frame the subject and while not cutting off the reflection with the foreground foliage.

5) Ripples are Ok!  Generally we look for the clearest reflections and the stillest water. Reflections feel like a mirror when the water is the stillest. But don’t shy away when there are some ripples in the water. They can add some interest to your image and make it unique.

It can be hard to get a clear reflection in the very large Jackson Lake so I was excited to see it on this crisp autumn morning. As you can see, there are ripples in the water but capturing this with a faster shutter speed allowed the ripples to cre…

It can be hard to get a clear reflection in the very large Jackson Lake so I was excited to see it on this crisp autumn morning. As you can see, there are ripples in the water but capturing this with a faster shutter speed allowed the ripples to create an interesting texture while still getting a great reflection.

6) Have patience! Sometimes you may visit a spot that often gets reflections but when you arrive the water is full of waves. In some situations, you may be out of luck, but sometimes if you stay long enough, the reflection will appear during breaks in the wind. 

On this stormy and windy afternoon, there was just a short window in which I was able to capture the reflection of the mountains in the water.

On this stormy and windy afternoon, there was just a short window in which I was able to capture the reflection of the mountains in the water.

Hope these tips will help you next time you are out searching for reflections.


Kristen Ryan is an award winning and published landscape and fine art photographer and educator residing in the Midwest suburbs of Chicago. All images are available for purchase in the Fine Art Store or by request. Kristen leads ladies landscape photography retreats in the TetonsChicago, and the Canadian Rockies, offers private mentoring and teaches an online landscape photography workshop, The World Around You.

5 Tips for Capturing Beautiful Reflections

One of the most compelling elements you can include in landscape imagery is a strong reflection. Reflections add interest, often create symmetry and help to add depth in a simple scene. Reflections are a great way to capture a more intriguing image when the skies are uncooperative, such as full overcast or completely clear. 

Calm waters in Emerald Lake in Yoho National Park as the sun sets and moon rises.

Calm waters in Emerald Lake in Yoho National Park as the sun sets and moon rises.

You can find reflections in any water source that is still such as a pond, lake, calm area of a river, a puddle, or even the wet sand along the shore. Reflections of mountains, trees, city buildings and skies are all compelling subjects to find reflections of in your scenery. 

Some tips for finding and capturing the best reflections and most compelling images: 

1) Find Calm Water ~Calm water is a necessity for the clearest reflections. Smaller and shallower bodies of water will often be easiest to find calm water though even larger and deeper lakes can be calm enough for clear reflections if you catch them at the right times. Early morning or later evening will often be the best times for finding calm water. Check your weather forecast and choose days and times with low wind. 

Pretty calm waters at Oxbow Bend in Grand Teton National Park. The 10 second exposure smoothed the water a bit.

Pretty calm waters at Oxbow Bend in Grand Teton National Park. The 10 second exposure smoothed the water a bit.

2) Consider the light ~ The best reflections will be captured when the light is behind you and a bit to the right or left. With that in mind, be aware of how the sun can cast a shadow of your body into the scene. Unless you are going for a shadow self portrait, then go right ahead 😊

Calm waters in the Snake River with the sunrise light behind me.

Calm waters in the Snake River with the sunrise light behind me.

Calm morning waters at Lake Marmo at Morton Arboretum with the sun behind me.

Calm morning waters at Lake Marmo at Morton Arboretum with the sun behind me.

3) Find the best perspective ~ Sometimes the the reflection is obvious in the scene but other times the best reflection can take a little exploring angle and perspective. Get low and see if you can get more reflection than at eye level. It’s also important to consider how you are composing the scene to avoid chopping your main subject AND its reflection in an awkward way. Be sure to leave comfortable space above the subject and below its reflection. 

The reflection of the sky and clouds in the wet sand and very shallow waters at Cannon Beach in Oregon is enhanced by my low perspective very close to the sand. Getting low also helps to add depth in the image.

The reflection of the sky and clouds in the wet sand and very shallow waters at Cannon Beach in Oregon is enhanced by my low perspective very close to the sand. Getting low also helps to add depth in the image.

4) Consider using a Graduated Neutral Density filter - The reflection is often much darker than the subject above. A graduated neutral density filter can reduce the exposure of the top of the frame to neutralize the dynamic range so you can better expose the shadowed reflection. This is especially the true in a situation where the sun is setting behind your subject and not illuminating the reflection such as in the Teton images above.

5) Experiment with long exposures ~ If the water is a bit rippled and the reflection is lacking, shooting a long exposure will smooth the water and sometimes bring out a hint of reflection as well. 

This sunset at Oxbow Bend had an incredibly beautiful reflection for evening. The water was nice and calm. This is a situation where a GND could help to decrease exposure on the sky a few stops and allow the foreground to be exposed brighter without…

This sunset at Oxbow Bend had an incredibly beautiful reflection for evening. The water was nice and calm. This is a situation where a GND could help to decrease exposure on the sky a few stops and allow the foreground to be exposed brighter without overexposing the sky.

In this scene, the water was extremely choppy from the wind in the late afternoon on a blustery November day. The 30 second exposure brought out some reflection of the mountain in Bow Lake.

In this scene, the water was extremely choppy from the wind in the late afternoon on a blustery November day. The 30 second exposure brought out some reflection of the mountain in Bow Lake.

I hope these tips help you capture stunning reflections in your local scenery and in your travels. If you’re looking to purchase filters for creative effects including long exposures, my go to filters are from Breakthrough Photography *. They are great quality and do not add a color cast.


Kristen Ryan is an award winning and published landscape and fine art photographer and educator residing in the Midwest suburbs of Chicago. All images are available for purchase in the Fine Art Store or by request. Kristen leads ladies landscape photography retreats in the TetonsChicago, and the Canadian Rockies, offers private mentoring and teaches an online landscape photography workshop, The World Around You.

*Affiliate Link