
Welcome to my blog! Thank you for clicking into my little corner of the online world where I share my landscape passion through my images and tips for other landscape photographers! Sign up for my newsletter and get your free ebook with 25 Tips for Impactful Landscape Photography.
Links to Check Out!
Listen to my conversation with Brenda Patrella on the Outdoor Photography Podcast from October 4, 2022
Check out my podcast episode over on InFocus Women - with Sarina Jackson and Steph Vella
Listen to my conversation with Allison Jacobs on “The Creative Frame” podcast.
Read Kristen’s article, “The Allure of Nature”, in the December, 2020 issue of Outdoor Photographer.
Listen to Kristen & Matt Payne’s conversation on the F Stop Collaborate & Listen podcast aired January 6, 2021.


Kase Magnetic Filters
Shortly before leaving for Spain in late March I received a package with the Kase Magnetic Revolution ND Kit on my doorstep! I had heard great things about these filters and I was so excited to bring these filters along on my trip. Although this trip was family (not photography) focused, I knew I would be capturing the sights and experiences of our trip and hopefully even get out for a couple sunrises or sunsets.
The Revolution Kit is perfect for me as it includes all of the filters that I use in my work. This kit includes a circular polarizer, 3 stop ND filer, 6 stop ND filter, 10 stop ND filter, and the ring for the filters to attach to the lens. All of these come in a compact filter case. An added bonus that I am really excited about is a magnetic front lens cap. This is a great addition because it means I can cover up and protect the filter when I’m taking a break or moving to a new spot. In the past, I have always had to remove the filter to put on a lens cap.

Case and magnetic lens cap
Another thing I love about these filters is that in addition to the written label on the filter ring to distinguish between the filters, they are also color coded, making it so much easier to grab the filter that I want to use. The 3 stop ND filter is Blue, 6 stop is yellow, the 10 stop is red, and the polarizer ring is silver. For someone whose eyesight is diminishing with age, it is extra helpful to have a way to differentiate the filters without having to try to read the fine print, especially in low light! When trying to grab the right filter as the light is quickly fading or changing, being able to easily identify the one I need means that I don’t miss the shot fumbling with gear.

Color coded filters inside the case
Most importantly, in addition to being easy to use, their quality is fantastic. The color is neutral so they don’t add a color cast to my images. Also, with this magnetic set, there is a magnetic inlaid ring hidden inside the lens screw thread to improve and minimize vignetting.
I used the filters singularly and stacked during my trip to Spain and was so happy with the results.

30 seconds with the 10 stop neutral density filter in Malaga, Spain

.6 second exposure with the 6 stop Neutral Density filter and using intentional camera movement

Using the circular polarizer to reduce glare and enhance the colors on this gorgeous sunny day in Ronda, Spain
These filters are incredibly easy to stack when you want to use a polarizer and ND filter or to stack more than one ND filter to block more light like in this image below where I stacked the 10 stop and 3 stop neutral density filters to get a 3 minute exposure of these clouds.
After Spain, I traveled to South Carolina in mid April to host my Magic in Hilton Head ladies retreat. This filter kit was a dream to use while on the beaches of Hilton Head Island.
1/2 second exposure with the 6 stop ND filter

1/2 second exposure with the 6 stop ND filter
I cannot recommend this filter set enough. Have questions? Don’t hesitate to reach out to me. I’m happy to share any information I can.
Kristen Ryan is an award winning and published landscape photographer and educator residing in the Midwest suburbs of Chicago. All images are available for purchase in the Fine Art Store or by request. Kristen leads ladies landscape photography retreats in the Tetons, Glacier NP, Hilton Head, Chicago, and the Canadian Rockies, offers private mentoring .
Why It Is Ok (& Often Good) To Take A Break
As artists, we experience highs and lows, peaks of creativity and valleys where our inspiration is lacking. This is not surprising as nothing in life can run infinitely at full throttle. It is unrealistic to expect ourselves to feel inspired, creative and productive 365 days a year. And yet so often we can really beat ourselves up during these lows or ‘creative ruts’ as they are often called.

During the last couple years as we have endured a global pandemic and tumultuous times, I have heard many friends and students lament their lack of inspiration and motivation to to pick up their camera and create. This is completely understandable. Personally, I have gone through periods where my photography has been a meditation and positive focus during stressful days but other times, my energy felt depleted and I just didn’t have it in me to get out and shoot or engage in my photography business related activities. I’d have a mile long list of ideas that I’d end up shoving aside because grabbing my coffee and a book, in which to escape, felt more manageable. And sometimes, life was too busy regardless what I felt like doing.
Whether photography is a hobby or a business, we all have busy lives and priorities outside of our photography that place demands on us physically, mentally and emotionally. When those demands pile up and zap our energy, it can take a toll on our creativity. We can’t expect to feel inspired, motivated and creative when we are worn out. This is true whether we are in the midst of a pandemic or not!
In my case, I face the demands of mothering 4 pre teen and teenage children and taking care of the household chores that go along with them. Not to mention taxi driver! Photography as my career means I have many tasks on my plate that do not involve going out to shoot or edit my images. You may have similar demands or perhaps you have another career or take care of younger children or older parents. Health issues and home projects can require a lot of time and create significant stress. The list can go on and on as to things that can zap your physical and mental energy.
I would encourage you to give yourself a break when you aren’t feeling inspired. While it may feel disappointing and frustrating, try to give yourself grace and recognize that this is part of the creative process and trust that your inspiration will come back. Sometimes we need to tend to other parts of life and that really is ok. Giving yourself permission to leave the camera in the bag while you take care of other things can be the best thing you can do for yourself AND your photography. Quite often when I check off the other tasks on my to-do list that are weighing on me or I spend time engaging in some necessary self-care, I find myself feeling lighter and freer to get back to my photography.
Beyond the fact that it is sometimes necessary to give ourselves permission to tend to other aspects of life, breaks are good for us. Practice and consistency are useful and important to achieving excellence in most things in life. But taking breaks and giving ourselves rest time is also important. Liken this to a rest day in your workout routine, taking a weekend off work to spend with family, children running around at recess to give their brains a break during a school day. When we work hard at something, it is not only ok but also important to rest those muscles, whether intellectual, creative, or physical.
If photography is your business, then of course you can’t afford as long of a break, but a small break can leave you feeling more creative, motivated and productive. So if either the creating or business aspects have you feeling bogged down, consider the idea that a break could be the way to greater productivity rather than less.

The 2023 Capture Magic Ladies Retreats are open for registration! 1 spot is left for the Summer Magic in the Tetons Retreat and a couple spots left for the April Magic in Hilton Head Retreat! A waitlist is available for the sold out retreats!
Kristen Ryan is an award winning and published landscape photographer and educator residing in the Midwest suburbs of Chicago. All images are available for purchase in the Fine Art Store or by request. Kristen leads ladies landscape photography retreats in the Tetons, Glacier NP, Hilton Head, Chicago, and the Canadian Rockies, offers private mentoring . New online educational materials are coming soon!
4 Ways To Use Shutter Speed For Creative Seascapes
There is something truly magical about the ocean! The movement and sound of the waves crashing along the shore is mesmerizing. The ocean is one of my favorite subjects to photograph because getting creative with shutter speed can keep me experimenting for hours.
There are 4 ways I used shutter speed to create different effects with my seascapes!
1) Fast Shutter Speed - Sometimes the texture of the crashing or cresting waves grabs my eye and instead of softening the water, I want to emphasize the texture and power of the ocean by freezing the movement with a fast shutter speed.

1/2000s shutter speed to freeze the motion of the crashing wave. Photographed at 360mm with the Sigma 150-600mm Contemporary Lens.
2. Slow Shutter - One of my favorite shutter speed choices with ocean waves is in the range of .4 seconds to 2 seconds. In this range, the movement of the water is softened somewhat but texture and shape is still evident. With these shutter speeds, the look of the water can change with just small changes in exposure length.
With these shutter speed ranges, a 6 stop ND filter is my go to choice and a tripod is necessary for keeping the camera stable.

1/4 second exposure capturing the movement and texture in the crashing waves
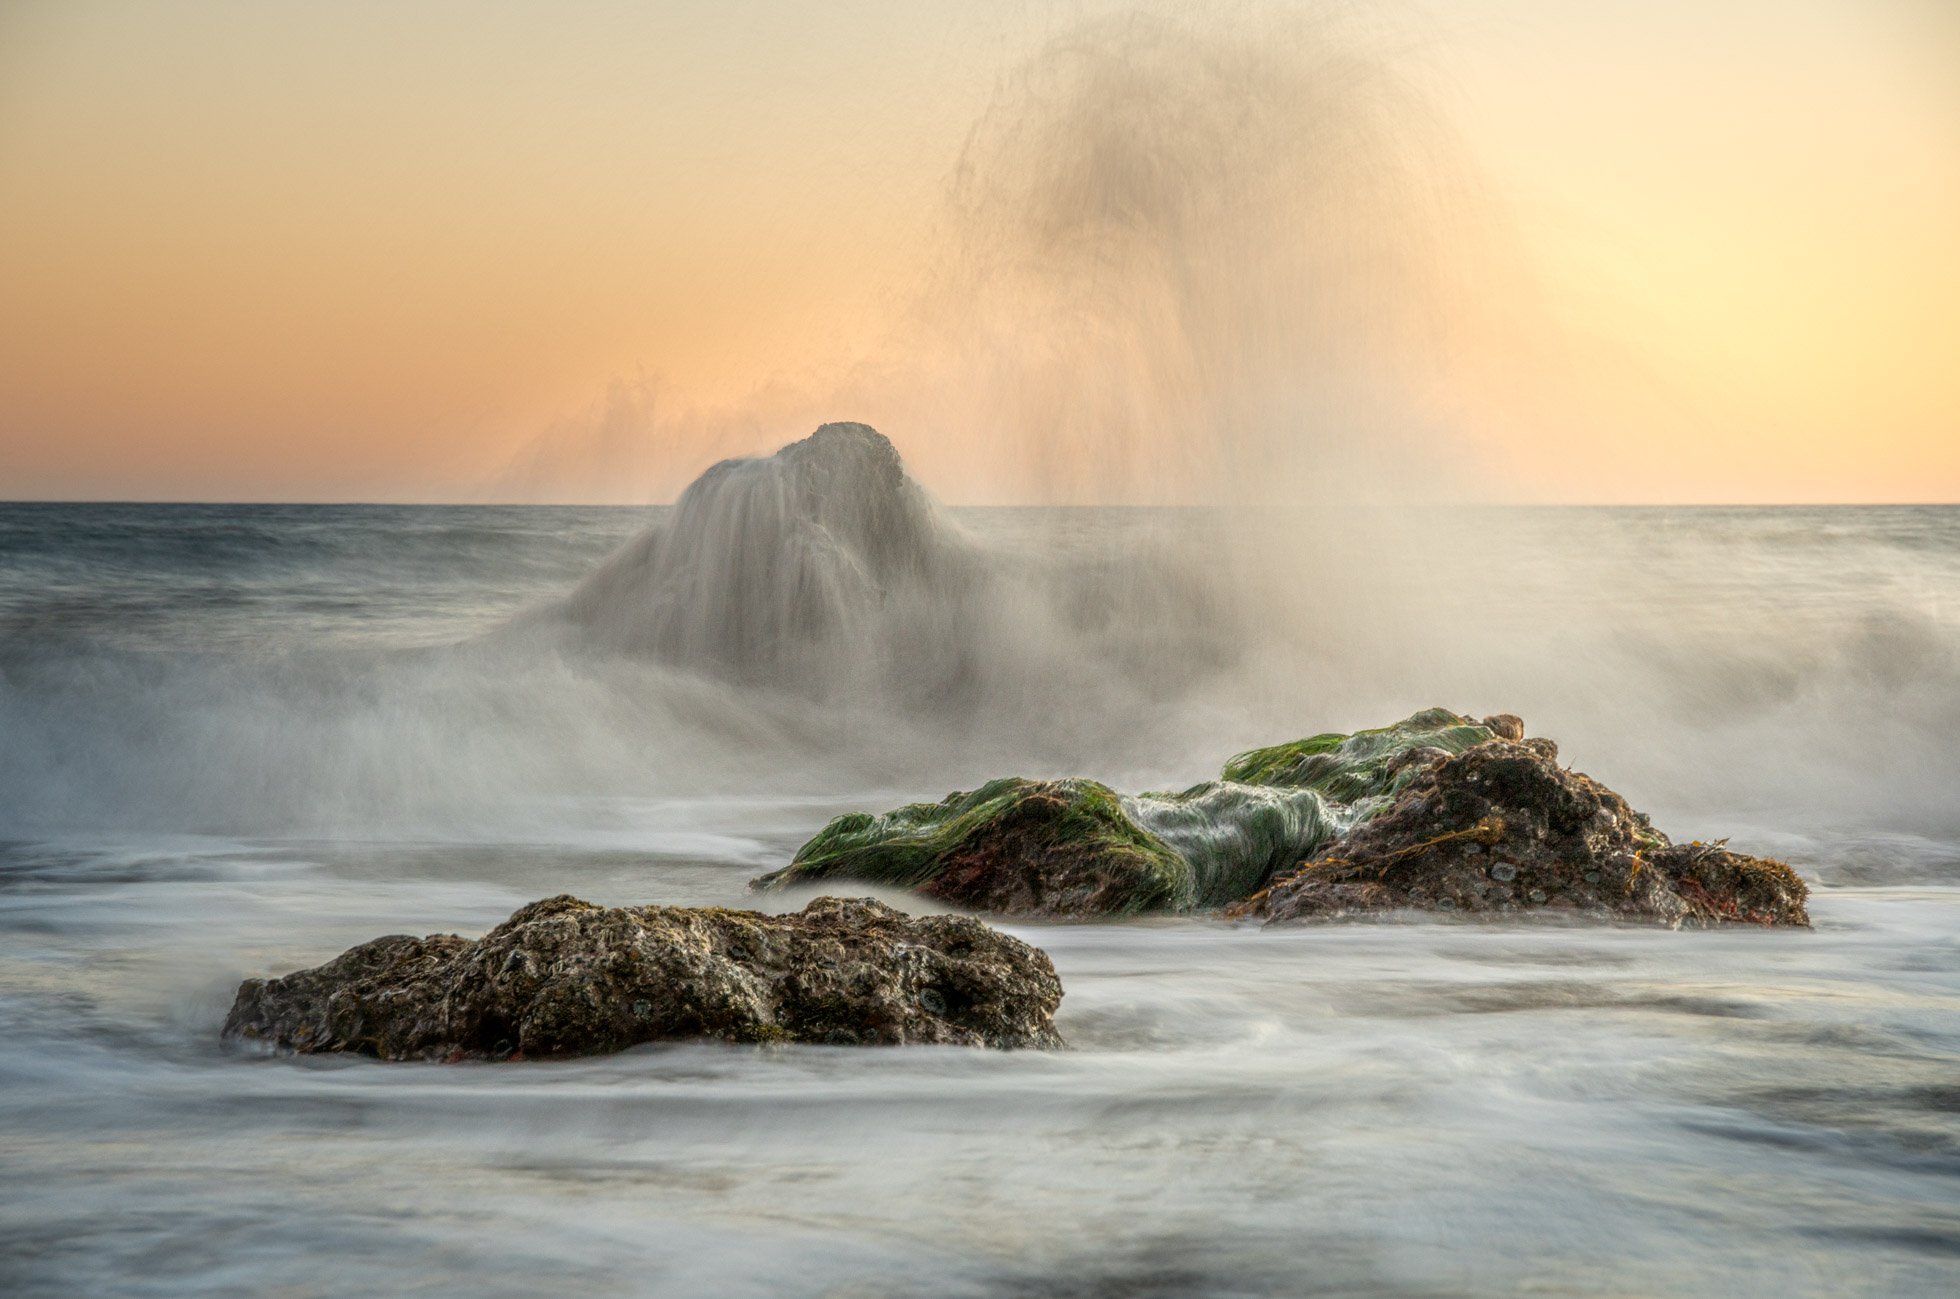
3) Much Longer Exposures - A third creative choice photographing the ocean is to use much longer exposures to smooth out the water completely and create a really soft and dreamy look. Here I am referring to shutter speeds generally of 10 seconds and longer. When we get even longer, with shutter speeds of 30 seconds and more for example, we also get the benefit of getting dreamy movement in the clouds too. When I photograph exposures from 10 to 30 seconds, a 10 stop filter is my go to ND filter. If working in bright daylight hours, more than 10 stops may need to be blocked to get 30 seconds or longer. In these situations, I will use a 15 stop filter or stack filters to extend the time. Be sure to make sure your tripod is stable for these longer exposures. If the water flows up over the legs, it can move just enough to blur the image.
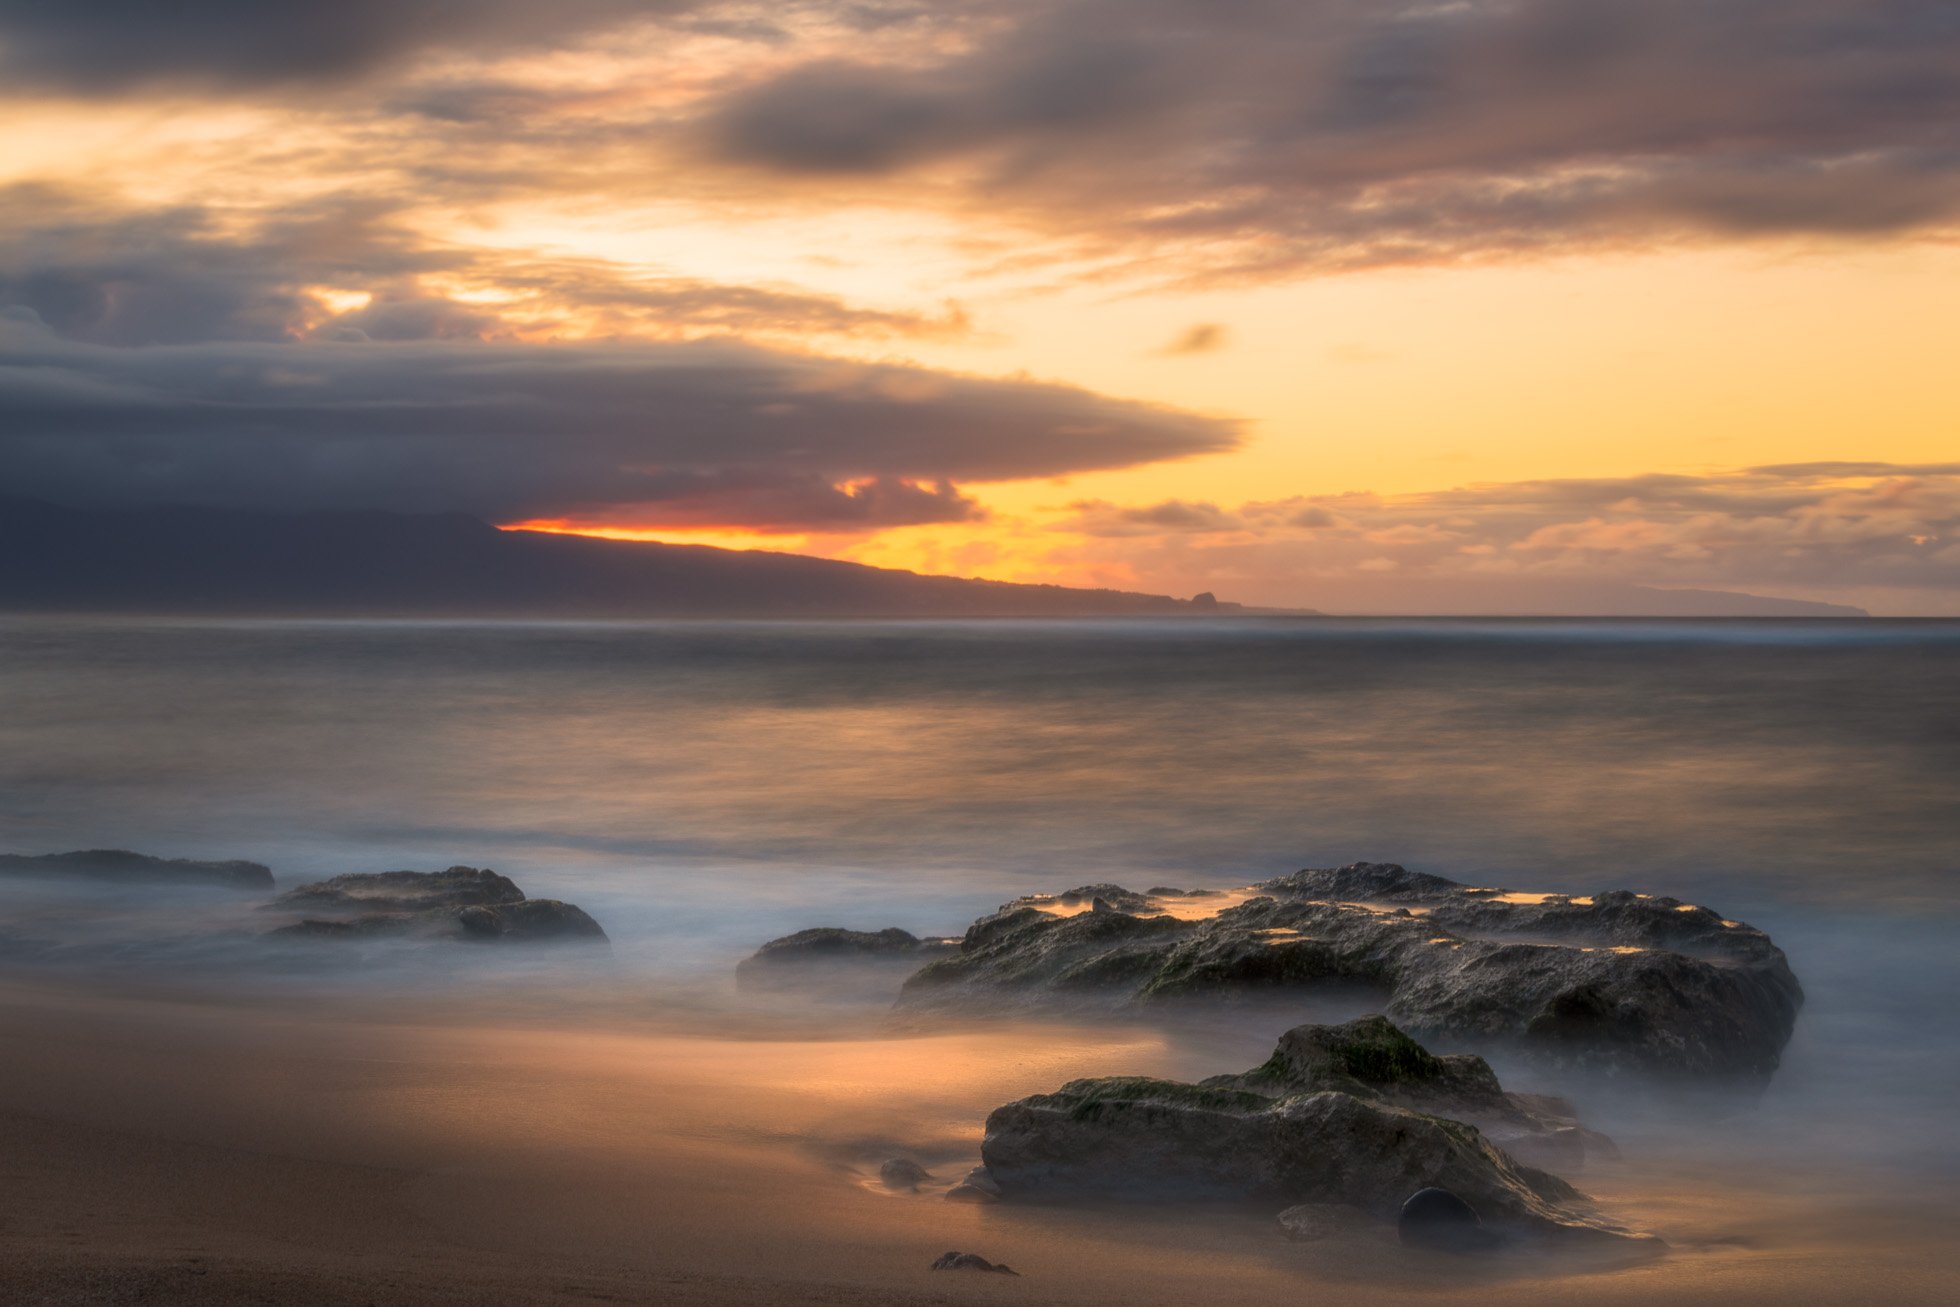
15 second exposure for a dreamy and soft feel in the water
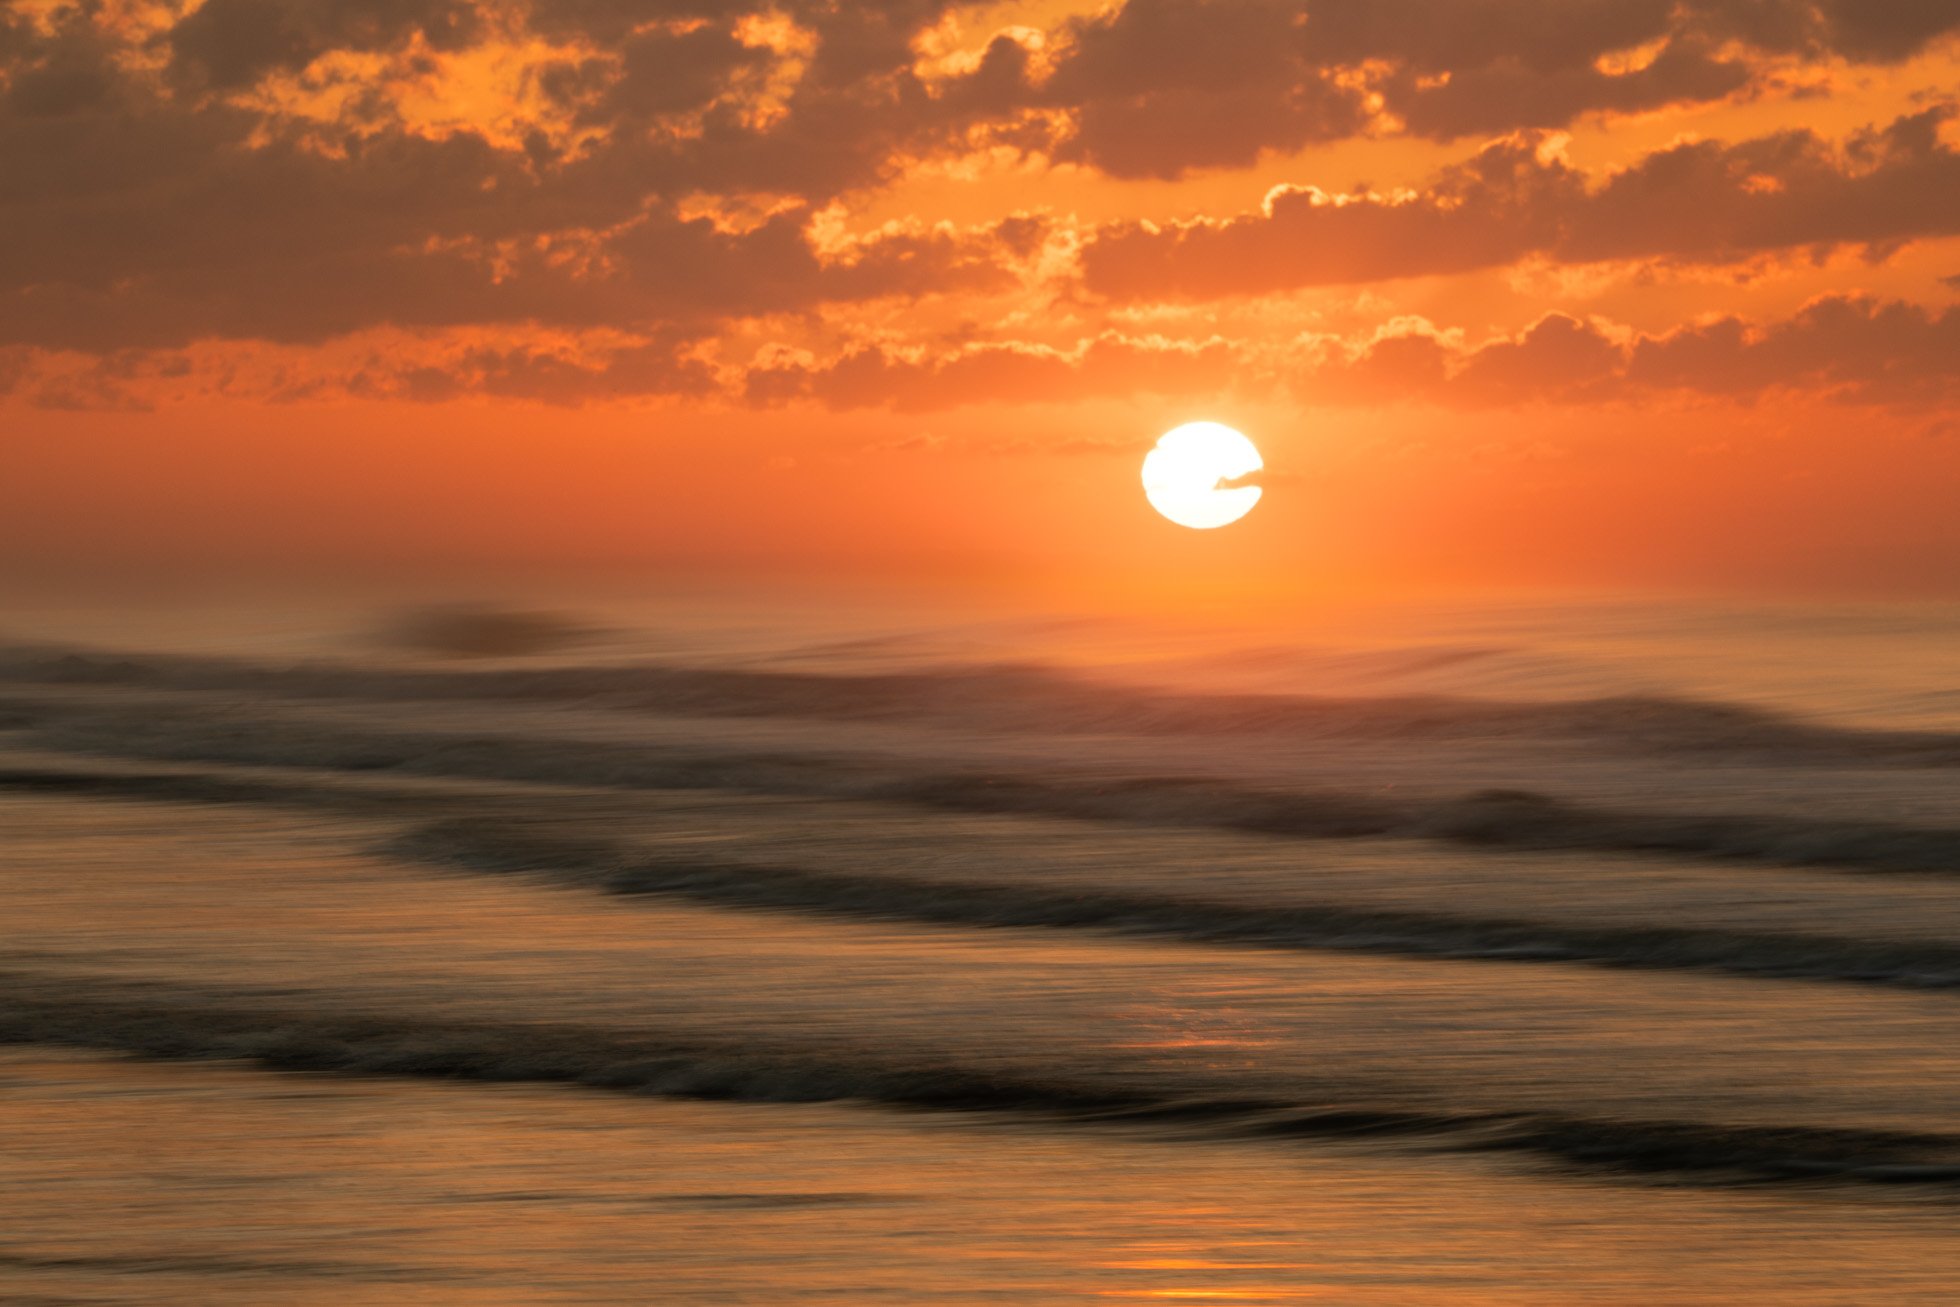
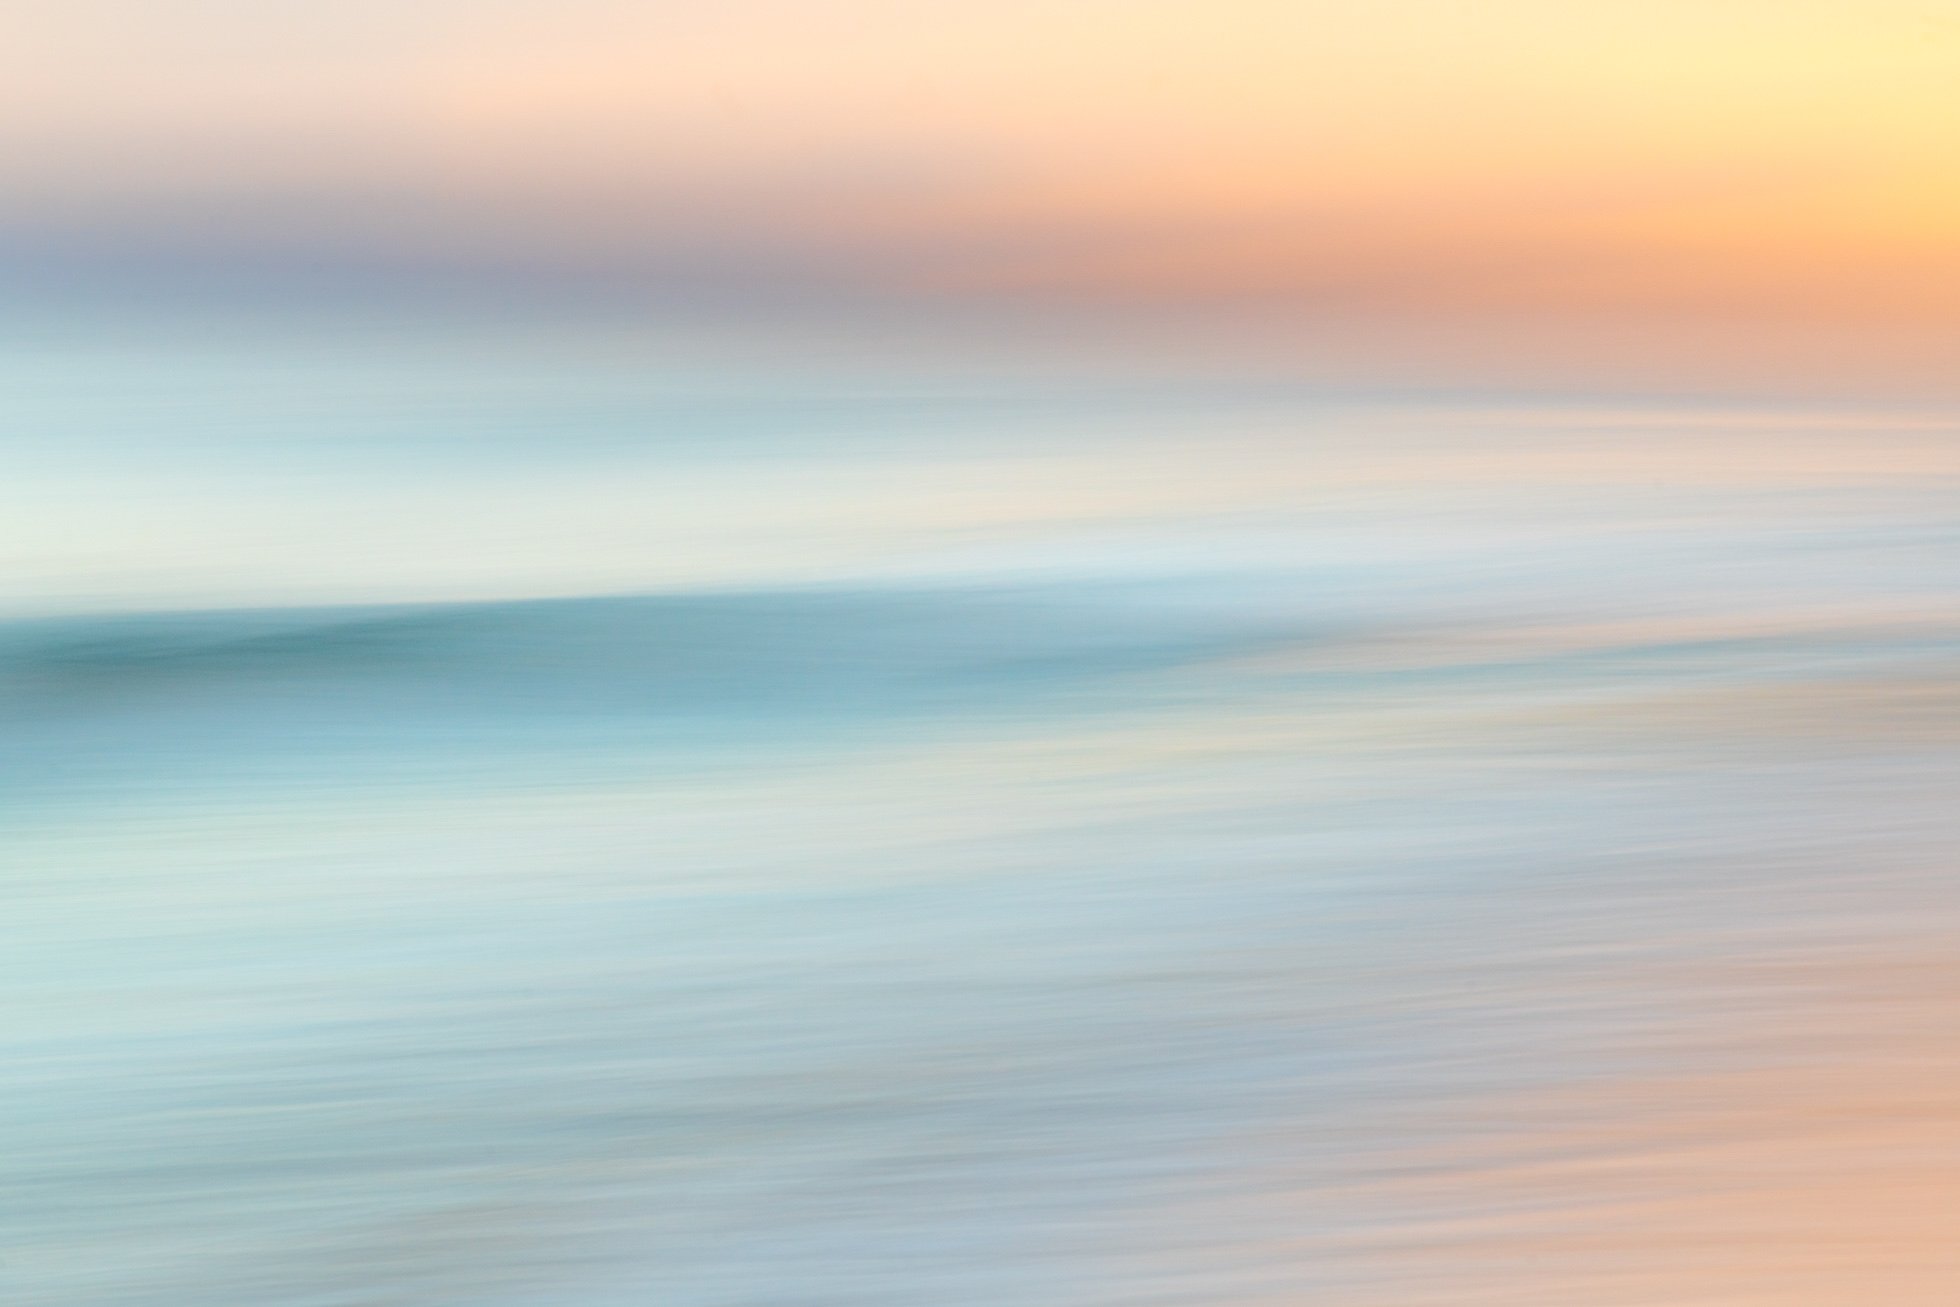
4) Intentional Camera Movement - the fourth way I love to shutter speed creatively is to combine a slower shutter speed with intentional camera movement. This movement creates an abstract and painterly feel to the ocean. My preferred shutter speed range for ICM is .5 seconds to 1 second because it allows me to control if I move fast or slow as well as how much I move the camera over this time period. I generally use a 6 stop ND filter to get my shutter speed in this range. If I am without a filter, it is possible to use intentional camera movement with somewhat faster shutter speeds with success and I don’t hesitate to do so. I simply prefer the .5s to 1 second range . Check out Seascape Panning for more information on using this technique.
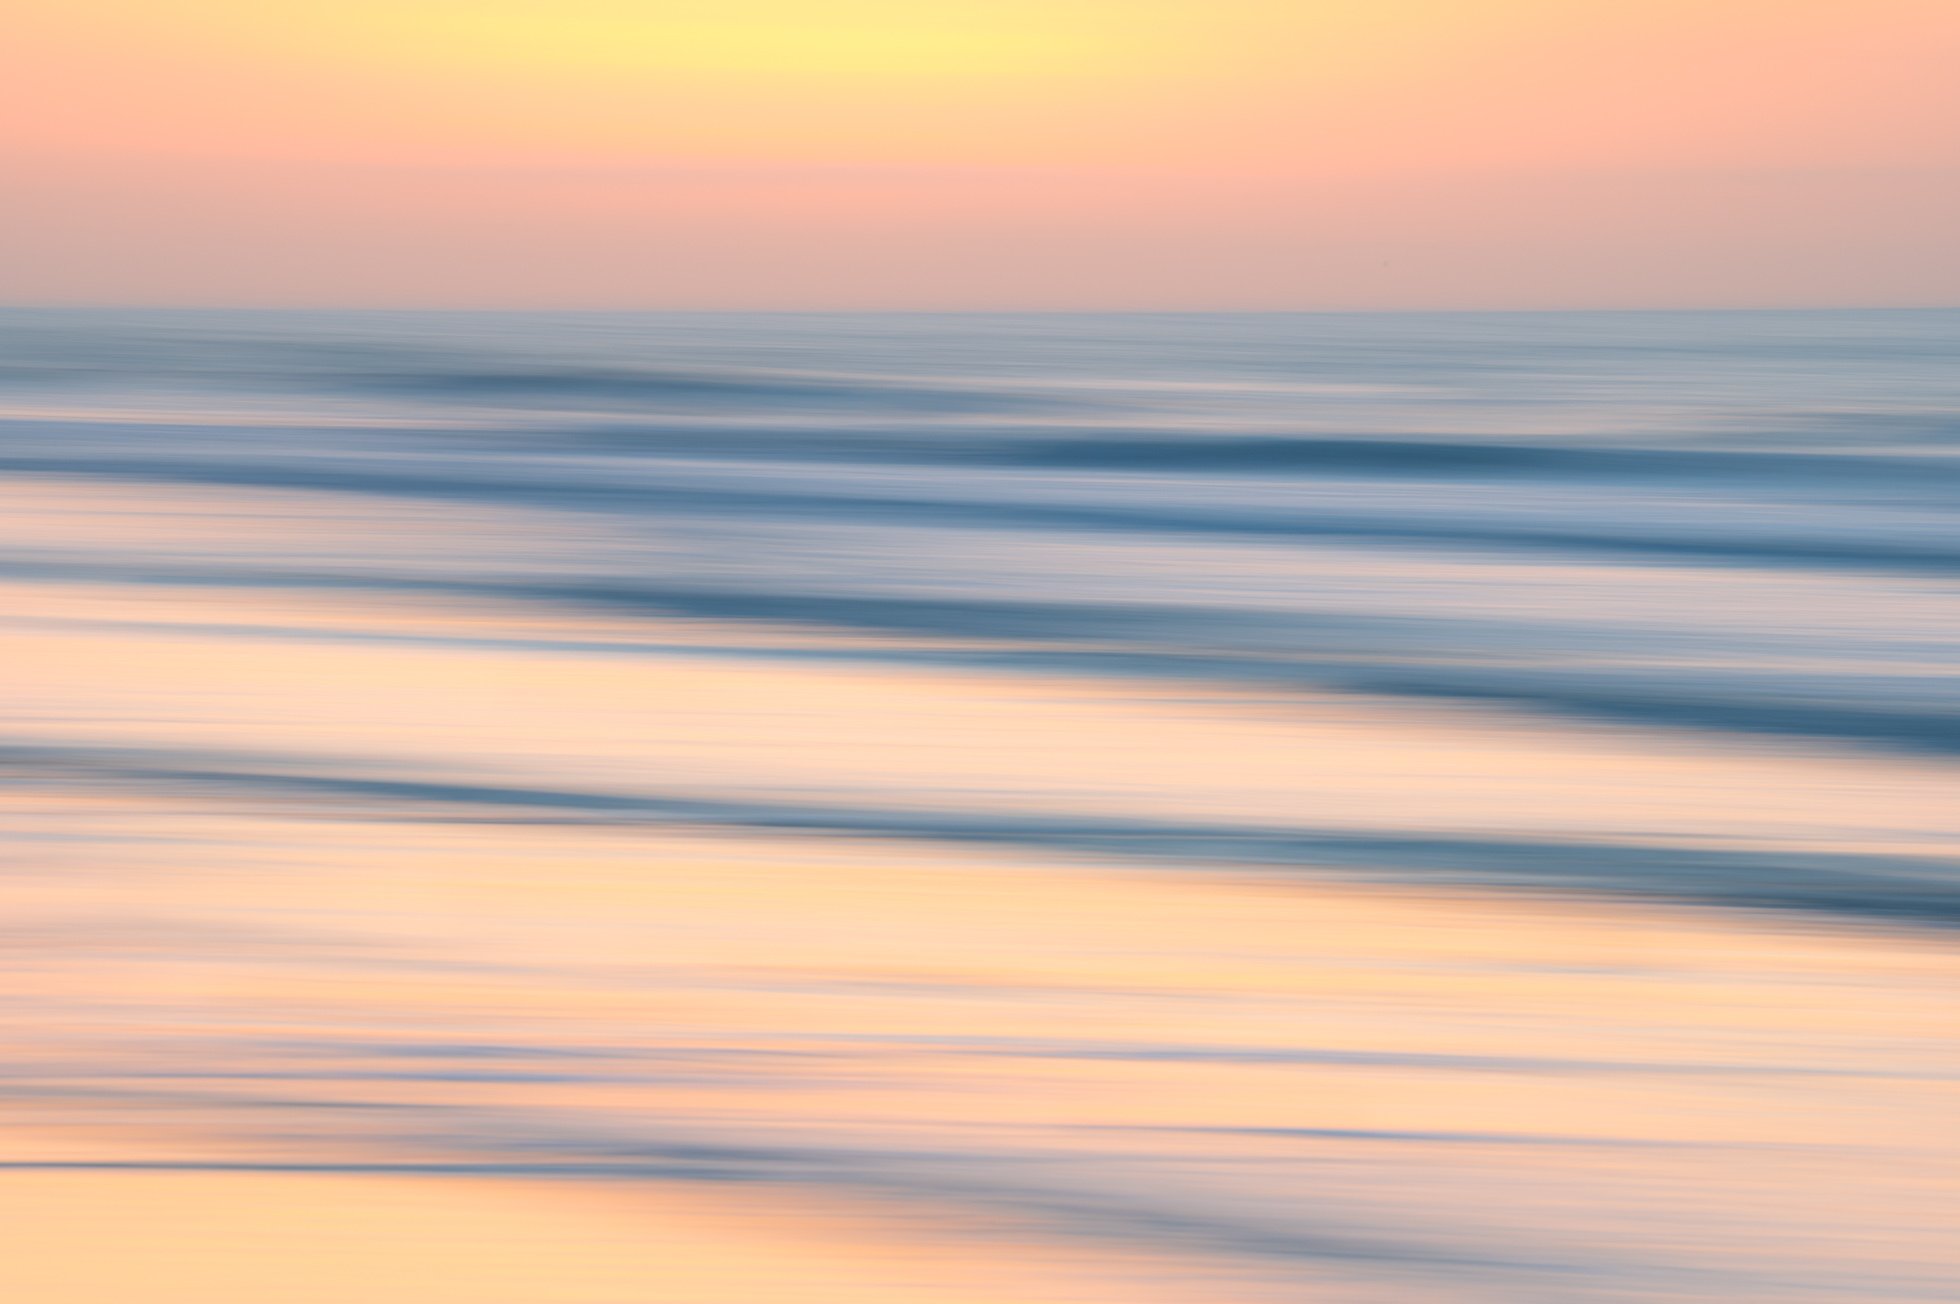
1/4 second of intentional camera movement with the Sigma 150-600mm Contemporary Lens at 220mm
Experimenting with all these different ways of photographing the water can keep me busy with the ocean for hours! Can’t wait to get back there again!
Kristen Ryan is an award winning and published landscape photographer and educator residing in the Midwest suburbs of Chicago. All images are available for purchase in the Fine Art Store or by request. Kristen leads ladies landscape photography retreats in the Tetons, Glacier NP, Hilton Head, Chicago, and the Canadian Rockies, offers private mentoring . New online educational materials are coming soon!
The Neutral Density Filter I use to photograph long exposures are from Breakthrough Photography.**
** affiliate link
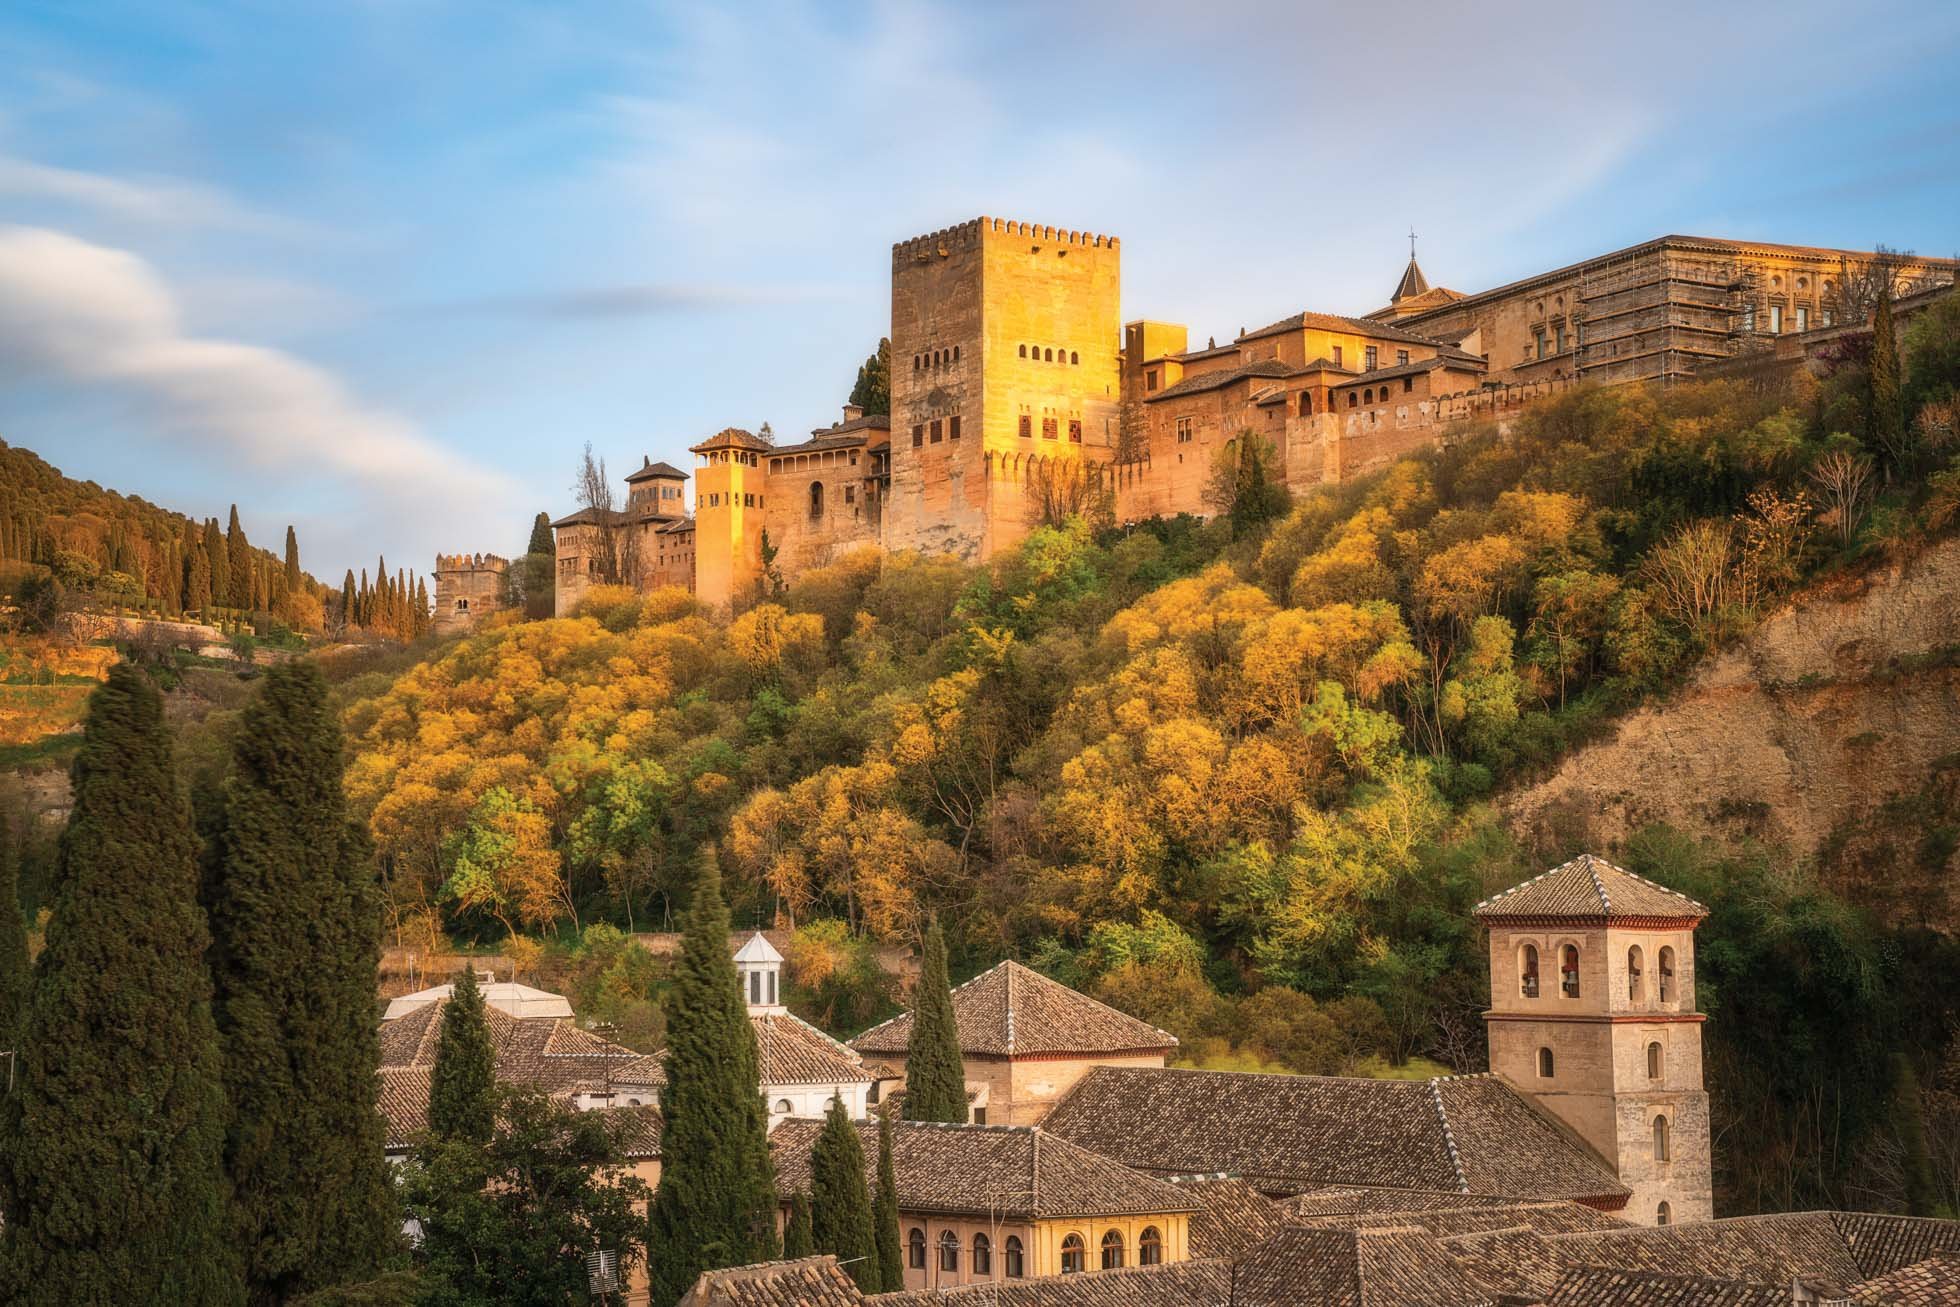
Wide Angle to Telephoto Case Study - Waimea Canyon
Recently I wrote an article for Click Magazine and Sigma about Why I love my Sigma 150-600mm Contemporary Lens for Landscape Photography. Shortly after writing this article, my family flew off to Kauai for spring break. When thinking of photographing the scenery of Kauai, I suspect a wide angle lens comes to mind for capturing the spectacular mountains and coasts of this garden island. And while a wider focal length was a great choice for many scenes, I frequently grabbed a longer focal length to tell the stories that caught my eye.
Carrying a range of focal lengths from 14mm to 600mm allowed me to photograph a variety of unique images that tell a more complete story of the beauty I saw than if I was limited to wider angle lenses.
Today I want to share a small collection of images from my last morning on the island. While my family slept in, I awoke at 4:30 a.m., grabbed my gear and necessary coffee and headed out on an hour and 20 minute drive from my hotel to the famed Kalalau Lookout, arriving shortly before sunrise. My first attempt visiting this view was met with rain and fog and I hoped the early morning would allow me to get a glimpse of the NaPali Coastline. We’ll save these images for another day.
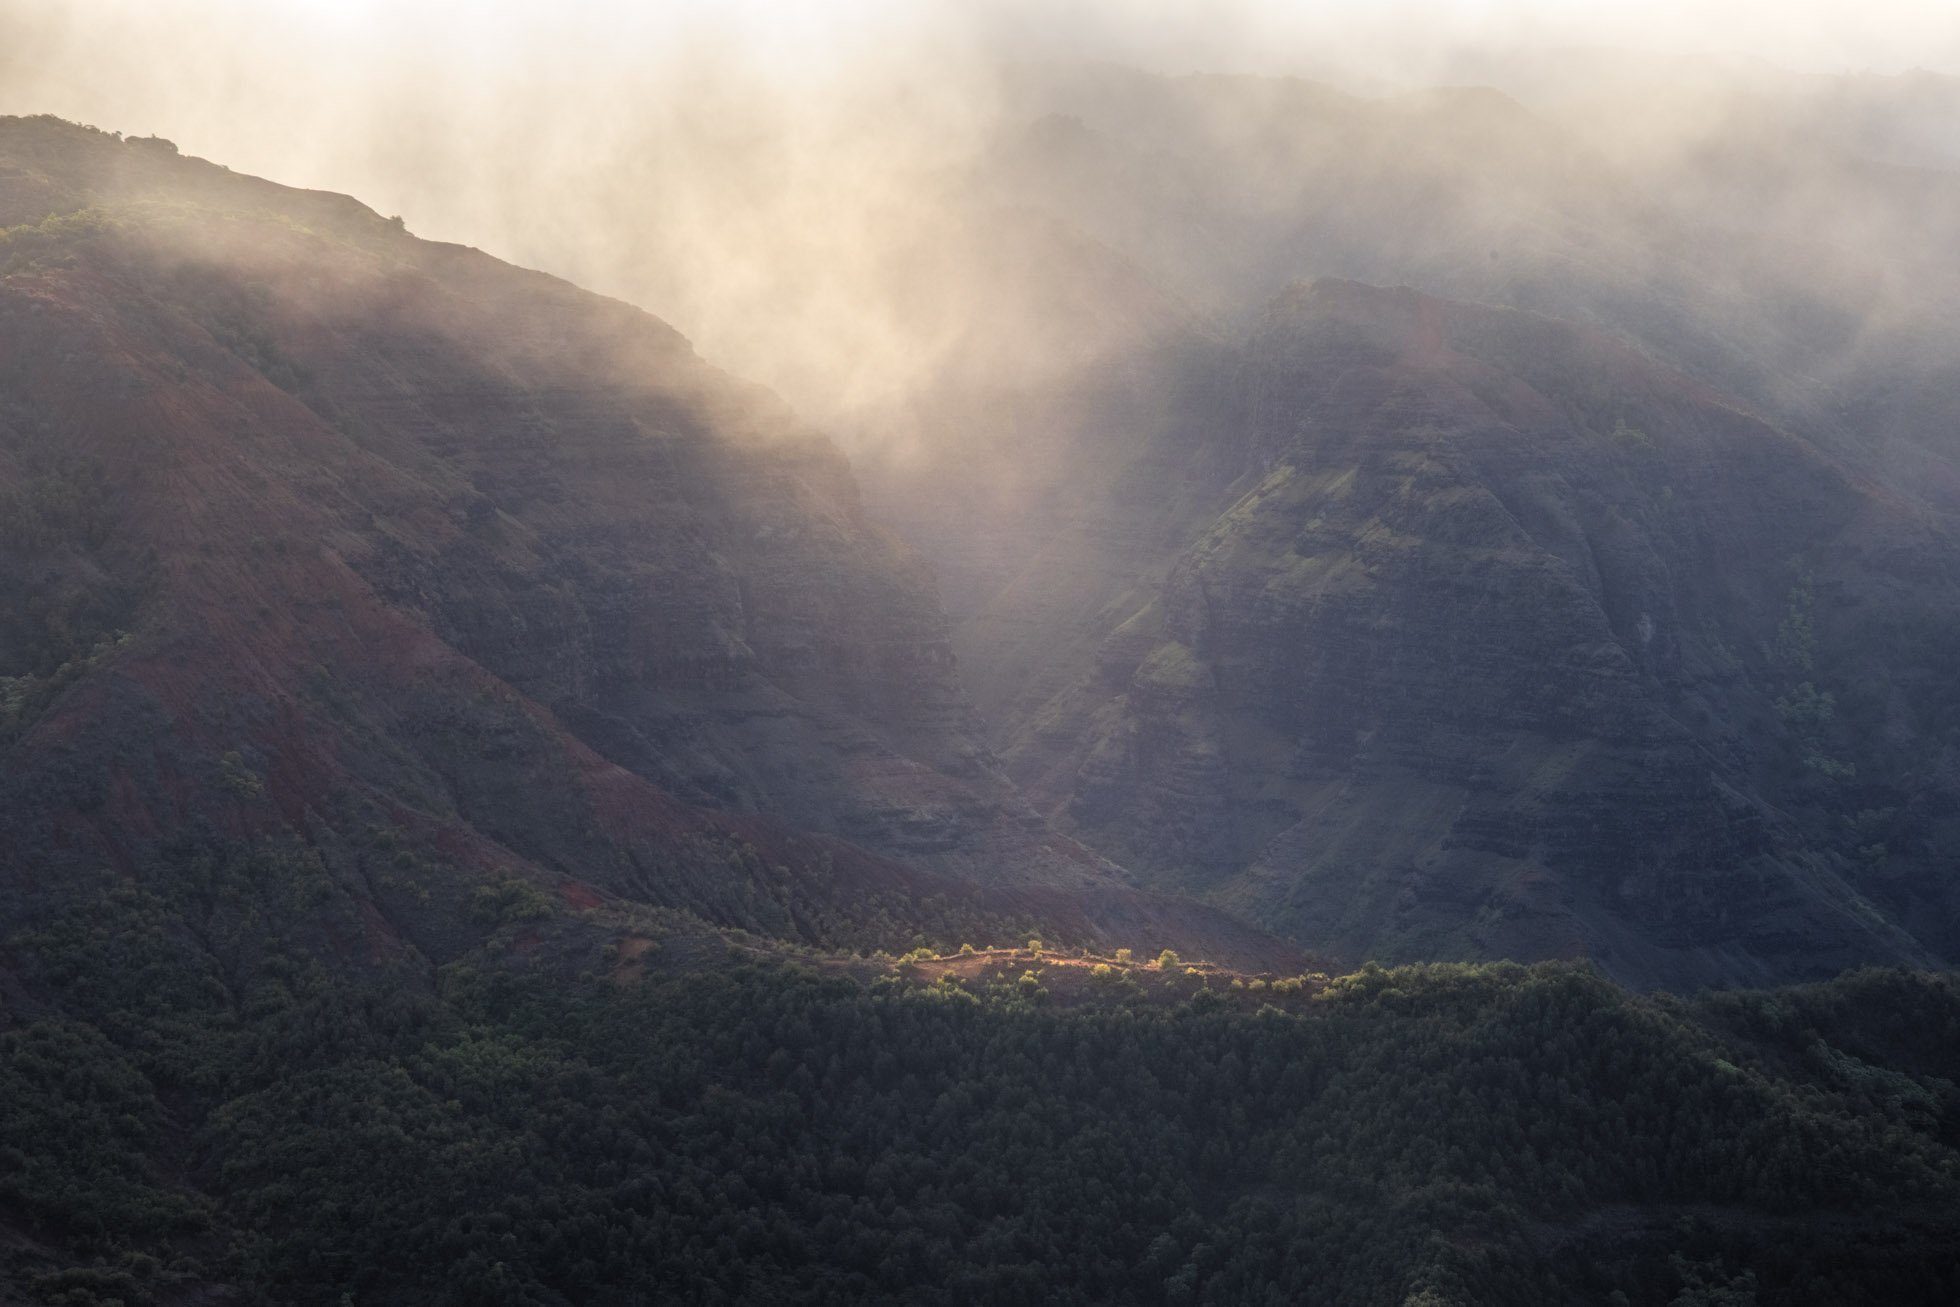
After experiencing the beauty of the Kalalau Lookout, I headed back down the road to Waimea Canyon where the clouds were minimal and the sun was already shining brightly. I pulled into the empty parking lot and walked out to the platform where I enjoyed the view by myself for awhile.
Looking out over the canyon, I was wowed by the vastness and the way the sun streamed into all the pockets, highlighted the many layers and led my eye to the river below. This was not my first time visiting Waimea but the beauty still amazed me!
I took a moment to grab my widest angle lens, the Sigma 14mm f/1.8 to photograph the vast and grand beauty of the canyon.

Grand view of Waimea Canyon with the Sigma 14mm f/1.8 lens
While I love the wide view the 14mm provided, with the many layers from foreground to sky, I could see so many smaller stories within the canyon. Additionally, with the sun as bright as it was, I did not want to include it in all of my images.
I grabbed my Sigma 24-105mm f/4 to get in a little closer. In this first one, shot at 82mm, I zoomed in on this area of the canyon where the light was streaming down and illuminating the ridge below.
And then I zoomed in more at 105mm to capture the way the light was streaming into the canyon below!

And then I moved on and grabbed the Sigma 150-600mm to get in a little closer and isolate some light and layers in the canyon.

310 mm to focus in on the layers of ridges from foreground to background

150mm focusing in on the light streaming into this pocket of the canyon

150mm giving a close up view of the river flowing through the canyon

440mm gets in close to the details of this ridge as the light hits the edges of the rock
Having a range of focal lengths in my bag with the Sigma 14mm, Sigma 24-105mm, and Sigma 150-600mm lenses allowed me to explore the canyon with my eyes and to isolate various peaks, ridges and light play that grabbed my attention. The longer focal lengths were the perfect tool to zoom in on the highlights, excluding other areas that might have distracted from the story I wanted to tell.
Next time you’re out, consider bringing a variety of lenses to photograph both the grand and intimate stories of the landscape!
Kristen Ryan is an award winning and published landscape photographer and educator residing in the Midwest suburbs of Chicago. All images are available for purchase in the Fine Art Store or by request. Kristen leads ladies landscape photography retreats in the Tetons, Glacier NP, Hilton Head, Chicago, and the Canadian Rockies, offers private mentoring . New online educational materials are coming soon!
Technical & Creative in Photography
It is pretty common to hear photographers chat about the technical vs creative aspects of photography. And sometimes you may hear someone say they are either a ‘technical photographer’ or more of a ‘creative photographer.’ Some say they are quite technical and don’t feel they are especially creative. Others feel they are creative but don’t concern themselves as much with the technical aspects.
I can understand where both sides are coming from and certainly can’t argue with anyone else’s personal approach. From my perspective, I see the technical and creative as forming a strong partnership in photography, as well as in many other arts or endeavors in life.
A little background…before I was a mom, (and a photographer) I was a freelance harpist. I spent several days a week performing for the afternoon tea at the Drake Hotel in Chicago and playing for weddings, cocktail hours and other events. It took a long time to develop my skills and a portfolio of music that allowed me to perform with confidence. I spent hours and hours on my technique and practicing each piece countless times before it was added to my repertoire.
When my twins were born 11 years ago and I had 4 kids age 5 and under, my time to play the harp at home and to gig outside the home became all but nonexistent. This was the point I finally took the step to start learning photography in a serious way.
Over the years, as photography took over my creative and professional life, I have played the harp on occasion but not regularly like I did when I was freelancing. At Christmas time this past year, I made time to sit down and play. In many ways, my fingers took to the strings like they always have but there are songs that I used to know well that are no longer ‘in my fingers’ at all. Other pieces I can play but not with the same expression and musicality that I once did.
So one night I lay in bed thinking about the parallels between playing the harp, or any other musical instrument, and photography and how the technical aspects are intertwined with the creative. The way that practice, understanding and mastery of technical skills creates a fluidity that makes way for creative expression.
I recall many hours practicing exercises on the harp simply to master finger positioning and agility. I learned music theory and counted out loud, with and without playing notes, and practiced individual lines and measures of pieces over and over again to the point my husband would request I play the full songs when he was around! These many hours of diligent practice and repetition are what allowed me to add expression into the songs that I learned. I could relax and feel the music as I played rather than focusing on the specific notes, rhythm and finger technique.
As an athlete, I see this in sports as well. Perhaps the parallel isn’t quite as obvious in sports as another artistic endeavor. But take basketball for example. One may watch basketball and simply see speed, strength, and technical skill of a player being able to nail that 3 point shot or gently put the ball up for a lay up after deftly moving past several defenders. But the ability to read the court takes creative strategy and quick thinking. The moves you see require repetitive practicing of ball handling skills to avoid looking at the ball, building up strength and agility in both the dominant and non-dominant hand, not to mention the soft touch on the lay up.
When it comes to photography, I also believe a solid mastery of the technicals opens us up to focus on our creative expression. If we are uncertain of what settings we should choose or where a button is on our camera menu, we can get bogged down in figuring this out while the light disappears in front of us. Sometimes a creative vision may not involve a lot of technical knowledge. But if the vision involves capturing the movement of water with a slow shutter speed and you have no idea how to use a neutral density filter, the process could be quite frustrating and unsuccessful. If you want details in the shadows of a high dynamic range scene but you fumble about trying to expose properly for both the shadows and highlights, you could find that the pieces just don’t come together when you get back to your computer.
Practicing and understanding the technical aspects may be more fun for some than others but I believe the time and effort rewards you with expanded creativity. If you are one who avoids the technicals, I would encourage you to reconsider putting the time in to learn them. When the technical becomes second nature, the mind is freed to focus on expression and vision. Being a ‘technical’ photographer does have to mean you aren’t also a ‘creative’ one. It just might open you up to increased creativity and flow.

Kristen Ryan is an award winning and published landscape photographer and educator residing in the Midwest suburbs of Chicago. All images are available for purchase in the Fine Art Store or by request. Kristen leads ladies landscape photography retreats in the Tetons, Glacier NP, Hilton Head, Chicago, and the Canadian Rockies, offers private mentoring . New online educational materials are coming soon!
4 Tasks to Prepare Camera Gear for a Photography Trip
Are you getting ready for a photography trip coming up soon? I’m just getting started with my 2022 travels and thought I would share the 4 things I do to prepare my gear before I travel so I’m prepared when I get out in the field.
1) There is one thing that I do before almost every trip I take and I cannot recommend it highly enough. I clean my camera sensor. If you have gone on a trip and come home to upload your images only to find that you have tons of little sensor dust spots, then you know how truly annoying it can be. It is a tedious and thankless job to have to clone out all those spots.
I know that cleaning my sensor a week or two before a trip is one small thing I can do to start out with my gear in the best shape. And clean gear is one factor that plays a part in creating high quality images.
If you have a camera store near you, you should be able to get your sensor cleaned there. (Note: Take it in with a fully charged battery!) You can also get sensor cleaning kits that allow you to clean your sensor yourself. There are a lot of tutorials out there to show you how to do this for your specific camera.
In addition to cleaning my sensor, as I get ready to travel, there are a few more things I do as I get ready to travel or prepare for a day of shooting.
2) As I gather and organize my lenses and filters to pack in my bag, I spend a little time cleaning them and checking them for smudges and spots. Just like camera sensor spots, dirty filters and lenses can also ruin image quality.
3) I charge up my batteries and make sure I start with a full battery in my main camera, my back up camera and an extra one for each. Then I put my charger right into my bag or suitcase so I don’t forget it!
4) Since I want to start out with an empty memory card with lots of space for my new images, I check to be sure all the images are uploaded and backed up in two places. Then I format my card so it’s ready for more exploring! While it is my typical workflow to upload and back up upon return from a shoot, it’s always a good idea to double check before formatting a card.
These steps set me up for success with clean gear ready to start off my next photography outing in the best possible way. I hope they serve as a helpful reminder to you for your next trip!

Kristen Ryan is an award winning and published landscape photographer and educator residing in the Midwest suburbs of Chicago. All images are available for purchase in the Fine Art Store or by request. Kristen leads ladies landscape photography retreats in the Tetons, Glacier NP, Hilton Head, Chicago, and the Canadian Rockies, offers private mentoring . New online educational materials are coming soon!
4 Tips for Processing Black and White Landscapes
Post processing is an important part of creating compelling black and white landscape photography. Starting with a RAW image that has a wide range of tones and varied textures will give an image a good start but the editing process will bring polish to the image. Creating a black and white image is more than simply hitting a button in Lightroom to remove the color. There are several steps I take to ensure my black and white landscapes have a nice distinction between tones across the histogram.
1) To start, I ensure the image has a white and black point, stretching the tones to the edges of the histogram. The ensures a full range of luminosity values through the image. The one situation where I don’t do this is when I’m going for a lower contrast black and white.
2) The HSL panel in Lightroom or ACR is extremely helpful for working with individuals colors in the image to increase micro contrast in sections of the landscape. For example, darkening the blue channel will darken the tones in a blue sky. Raising the luminosity of yellow and orange will lighten up grasses or flowers of a foreground.
3) Dodging and burning is one of the most important tools in black and white photography. Gently brightening light midtones and burning slightly darker ones will create distinction in those shades of gray between black and white.This technique will enhance the light and shadow play in your images as well as bring out the details in nature’s textures. Dodging and burning can be done in any editing program you use.
Lightroom’s new masking options now offer additional power for selectively dodging and burning specific tones within an image. The Color Range and Luminance Range masks allow you create a panel of adjustments to specific tonal pixels within your image.
In Photoshop, I love to use Tony Kuyper’s Luminosity Mask actions to isolate particular tones and luminosity values for dodging and burning. These masks offer so many options to control which luminosity values you are adjusting.
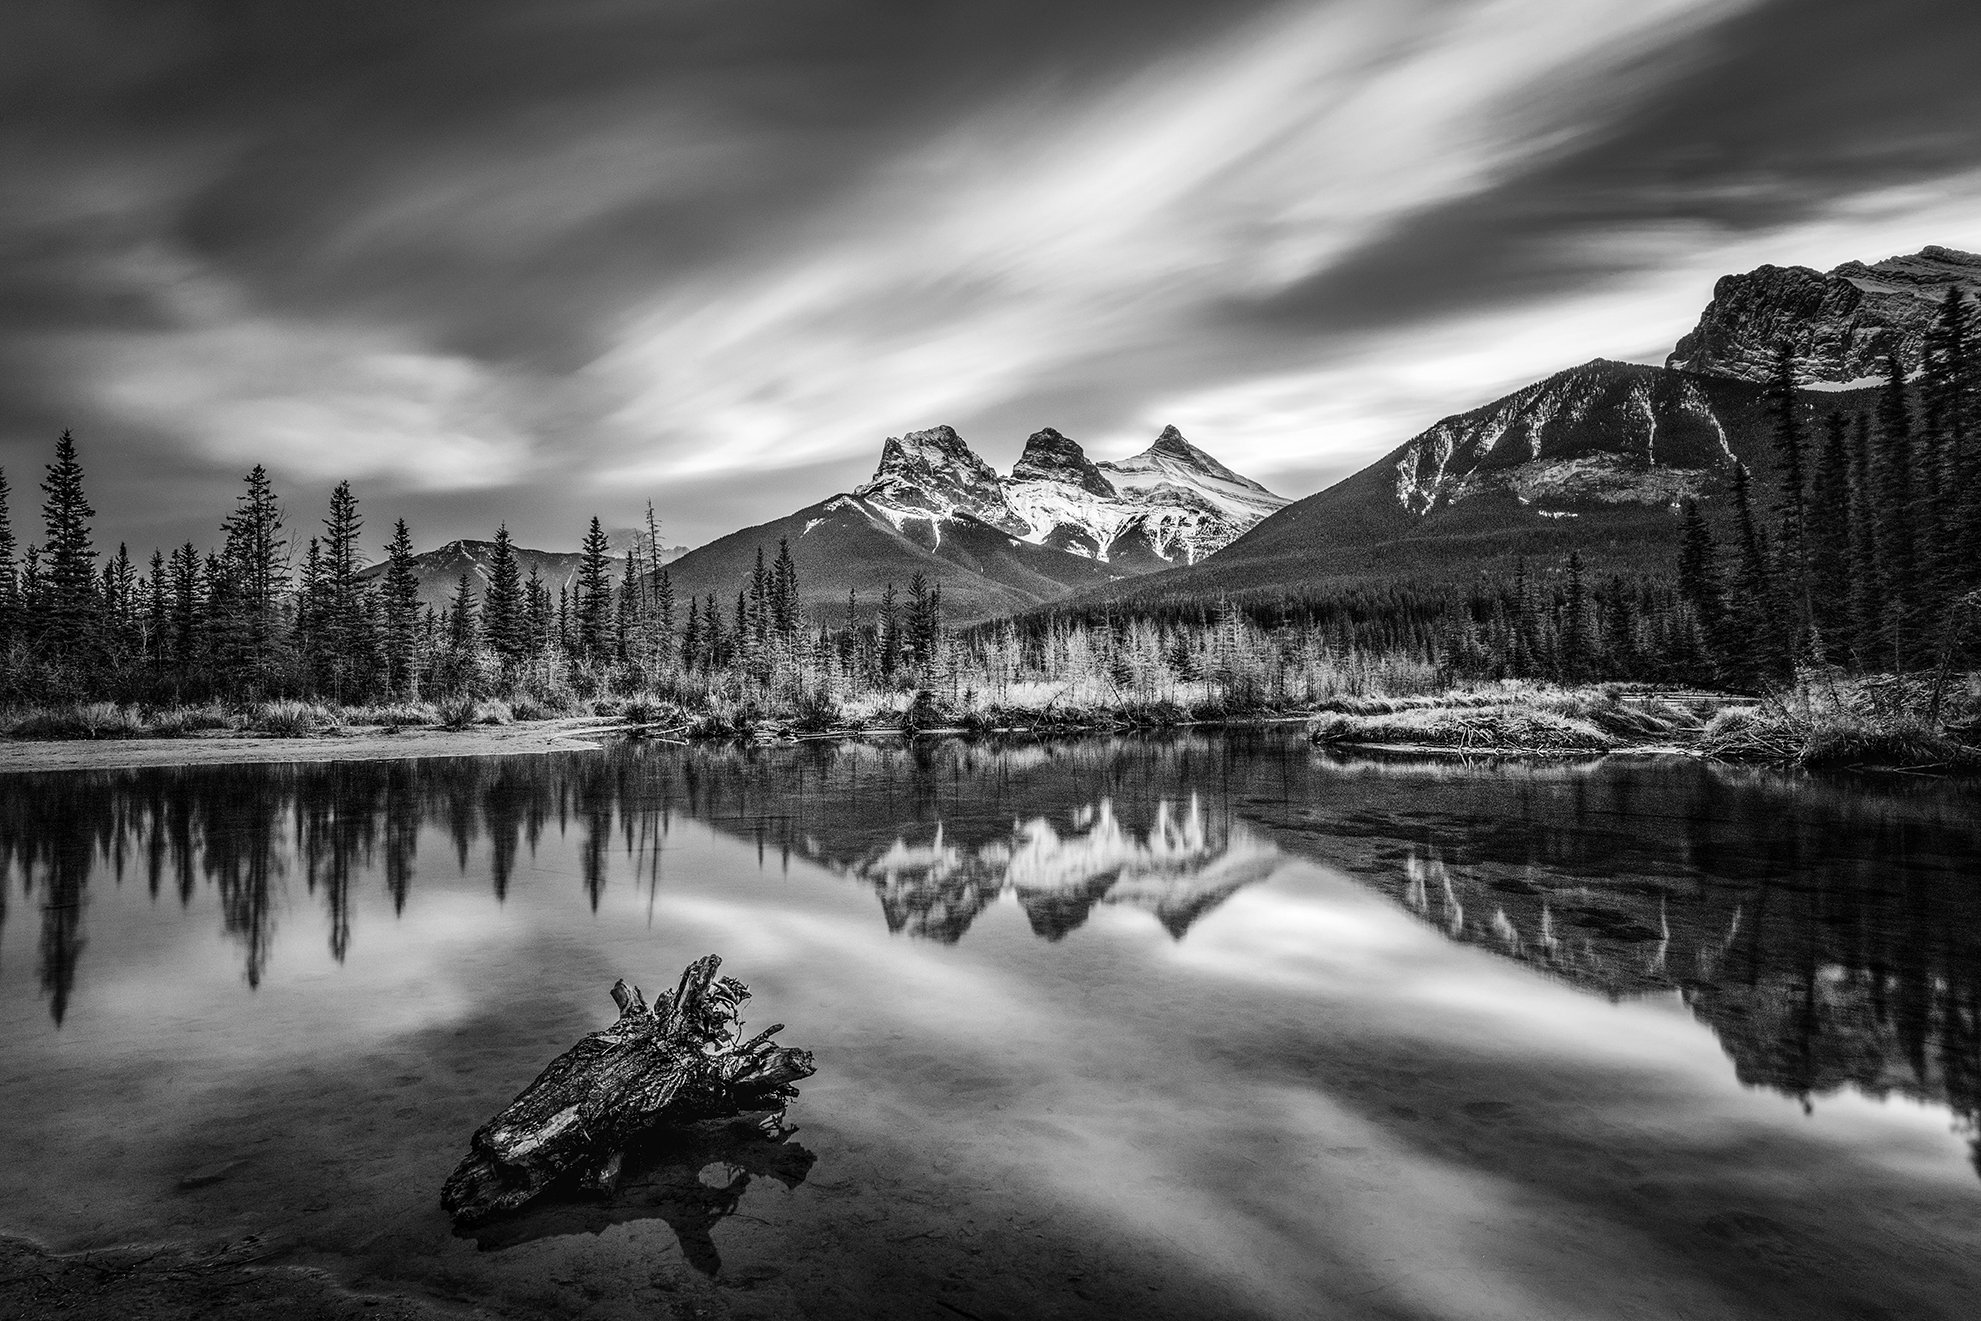
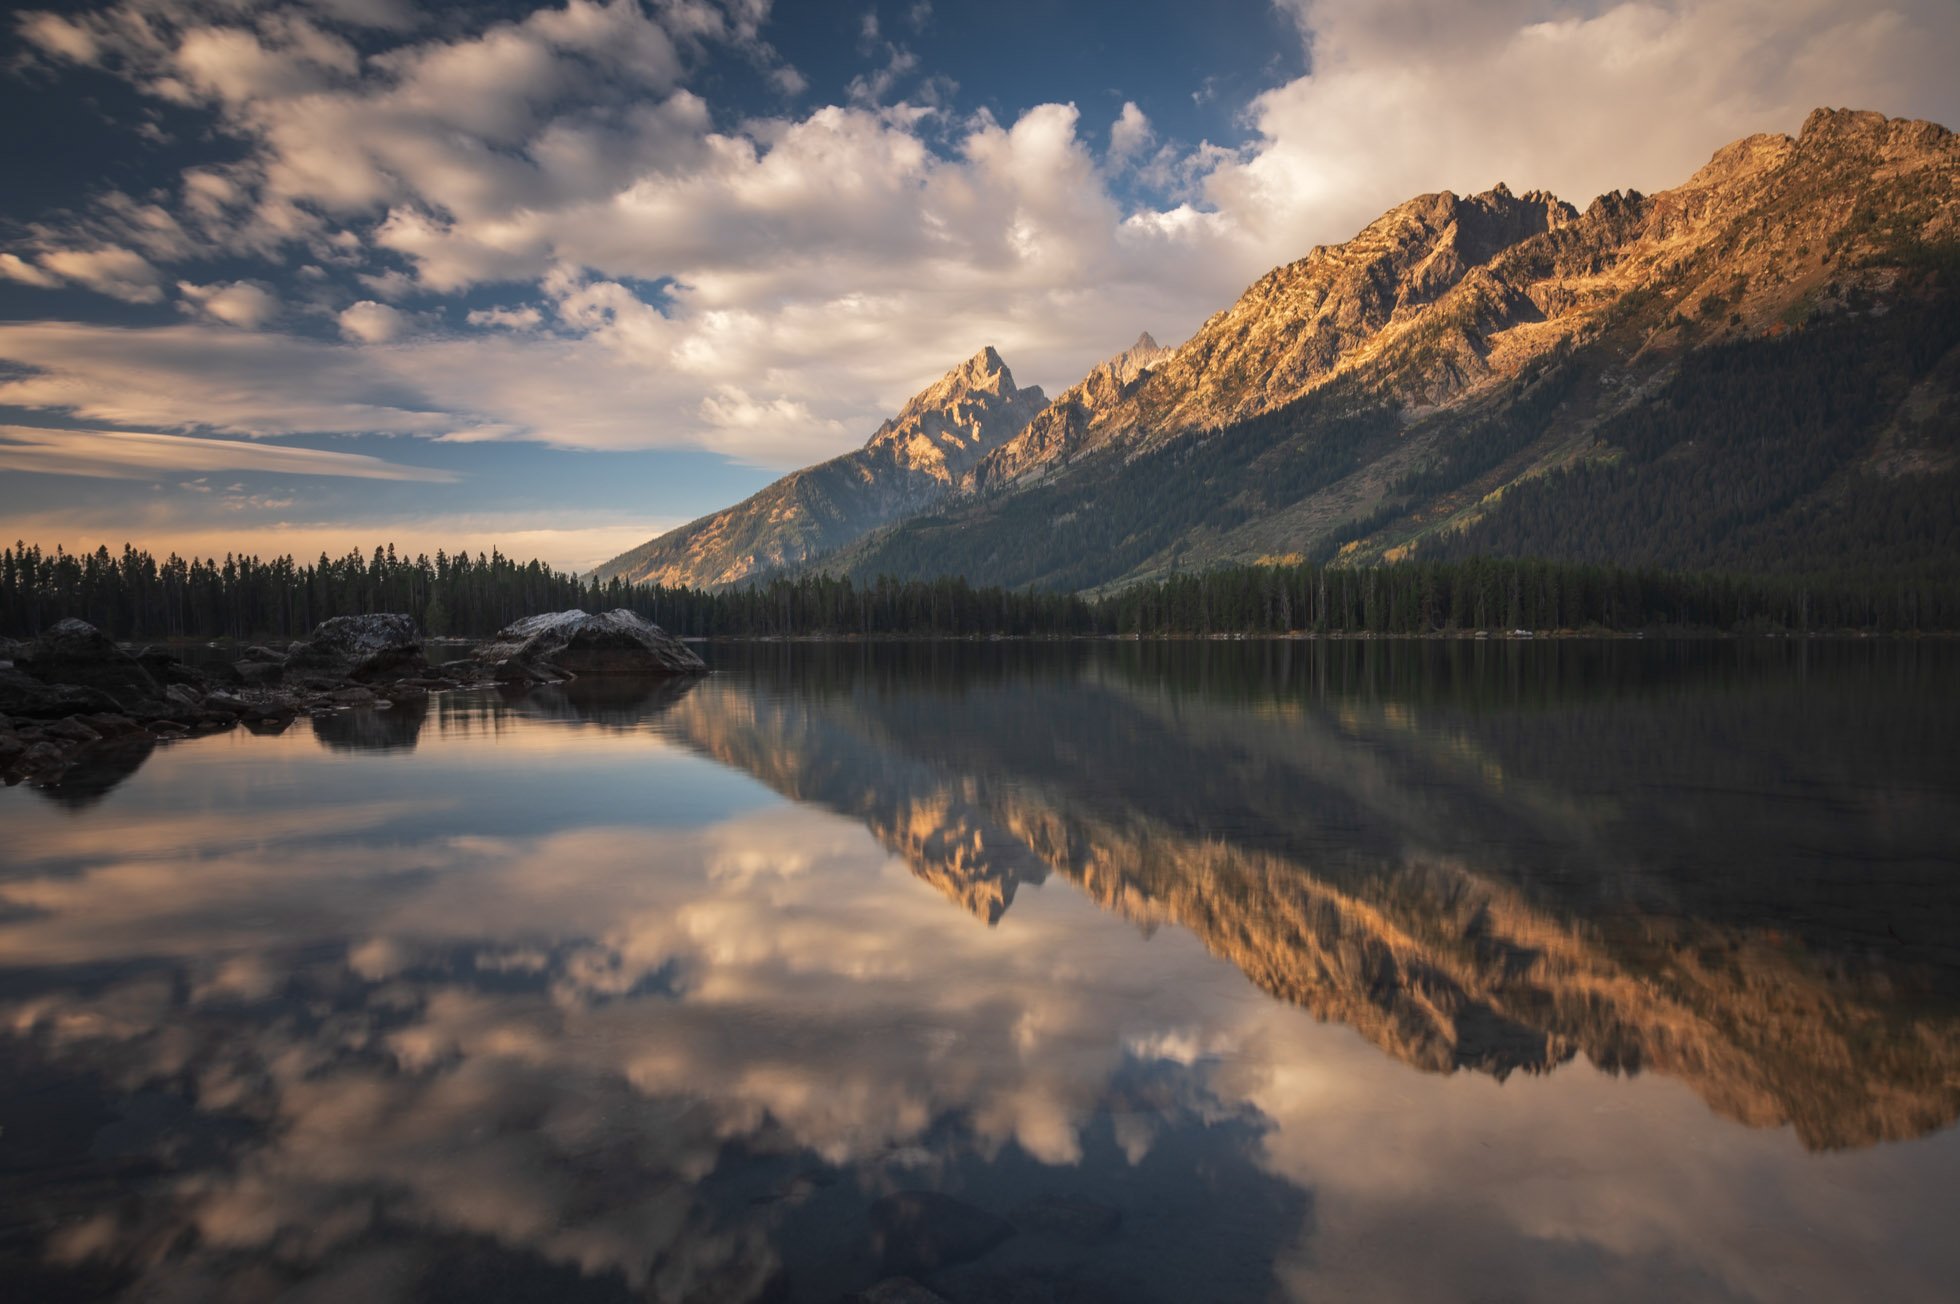
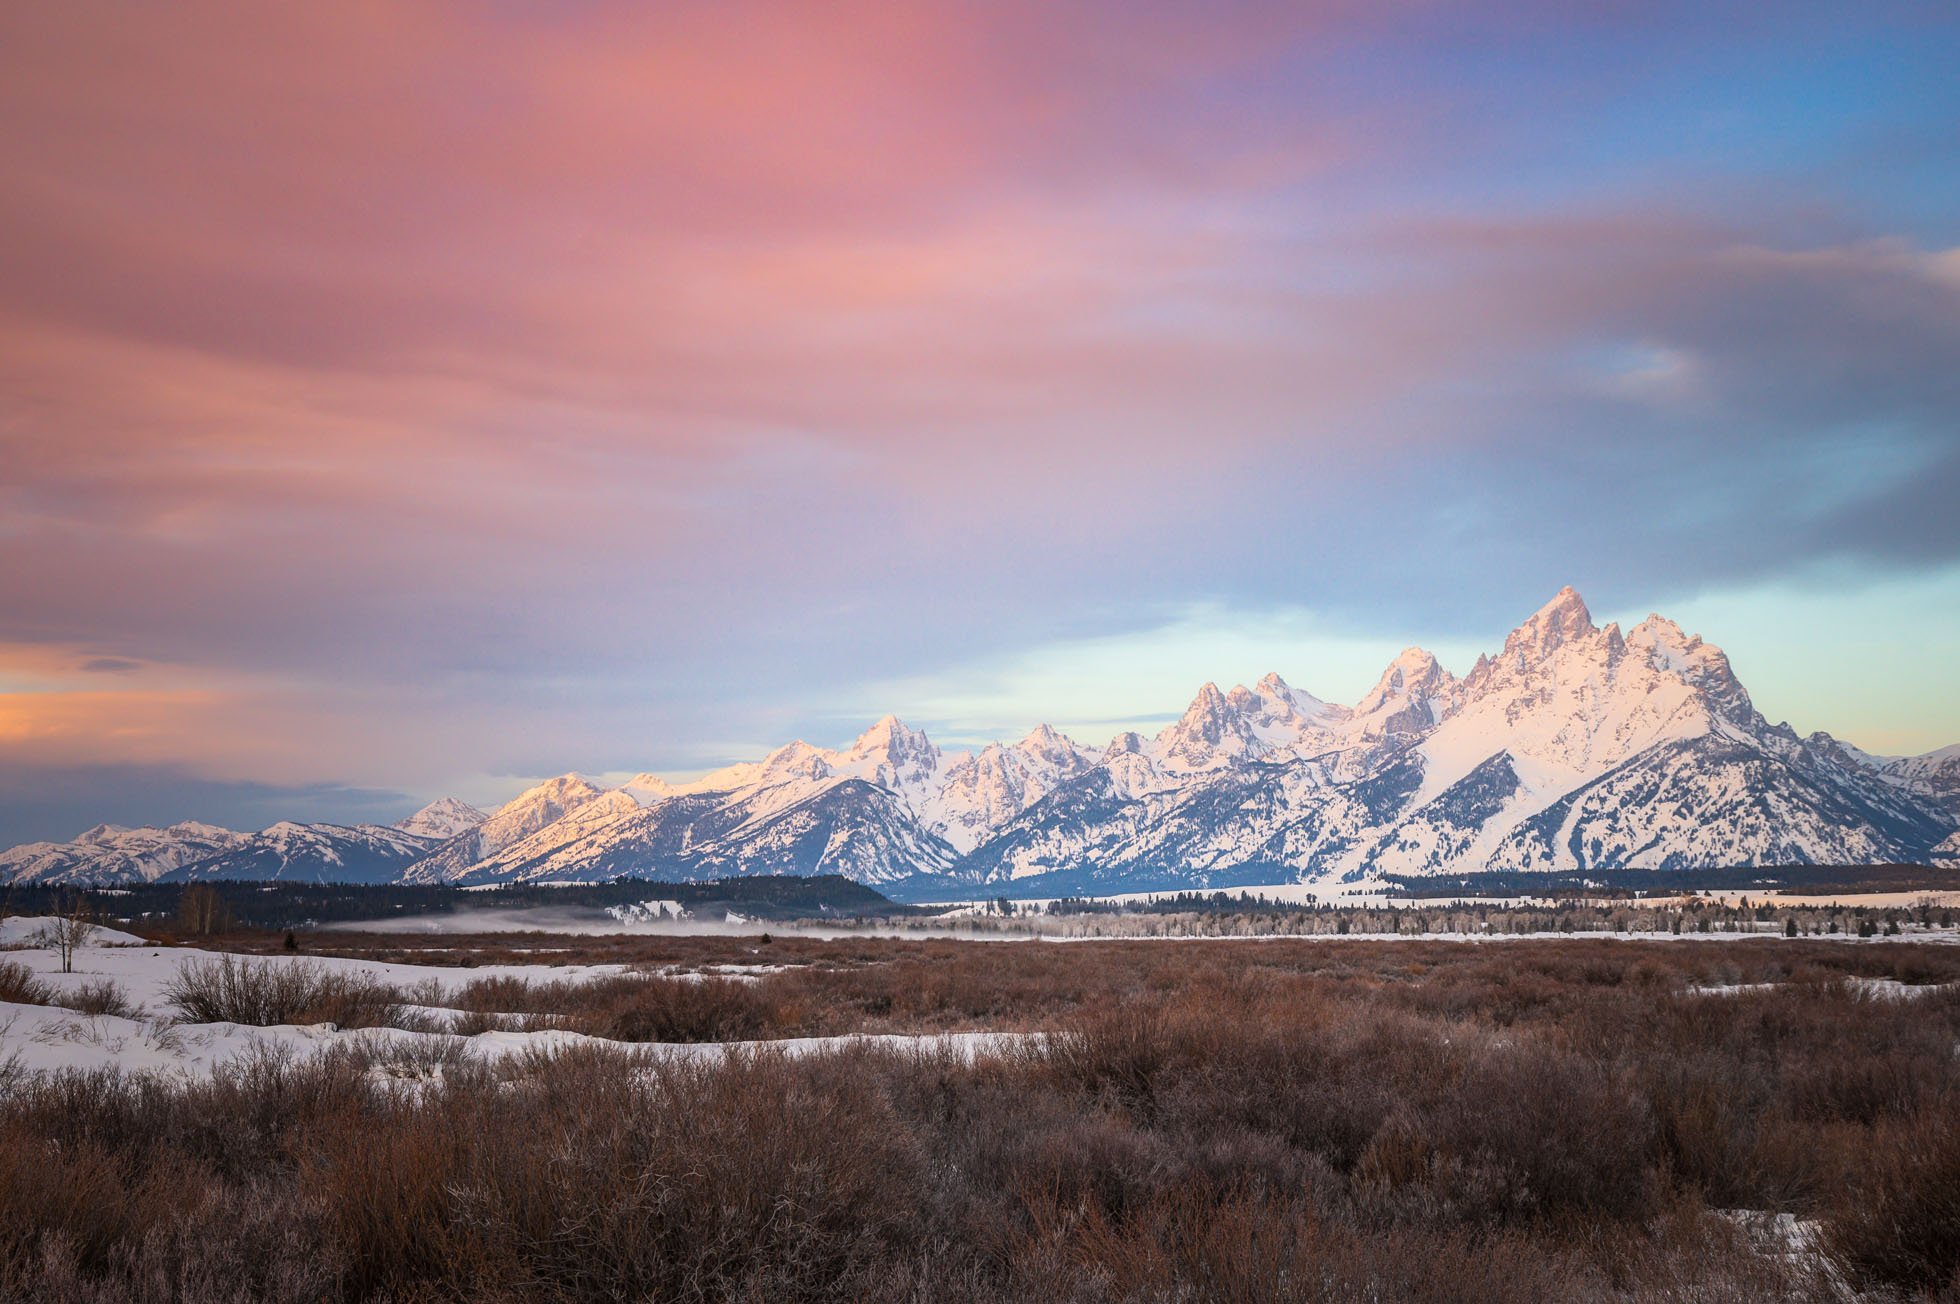
Keep in mind that strong black and white images don’t have histograms that all look the same. In some cases, tones are spread pretty evenly across the histogram like in the below image.

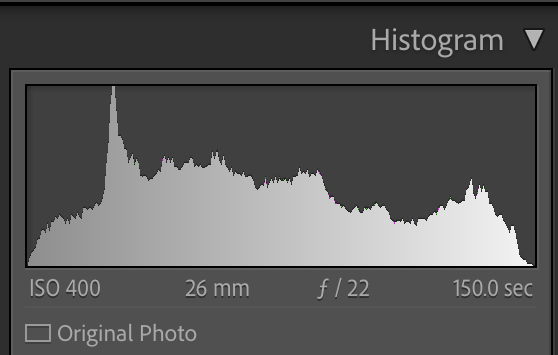
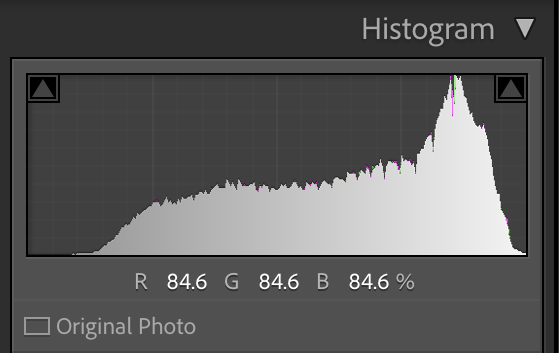
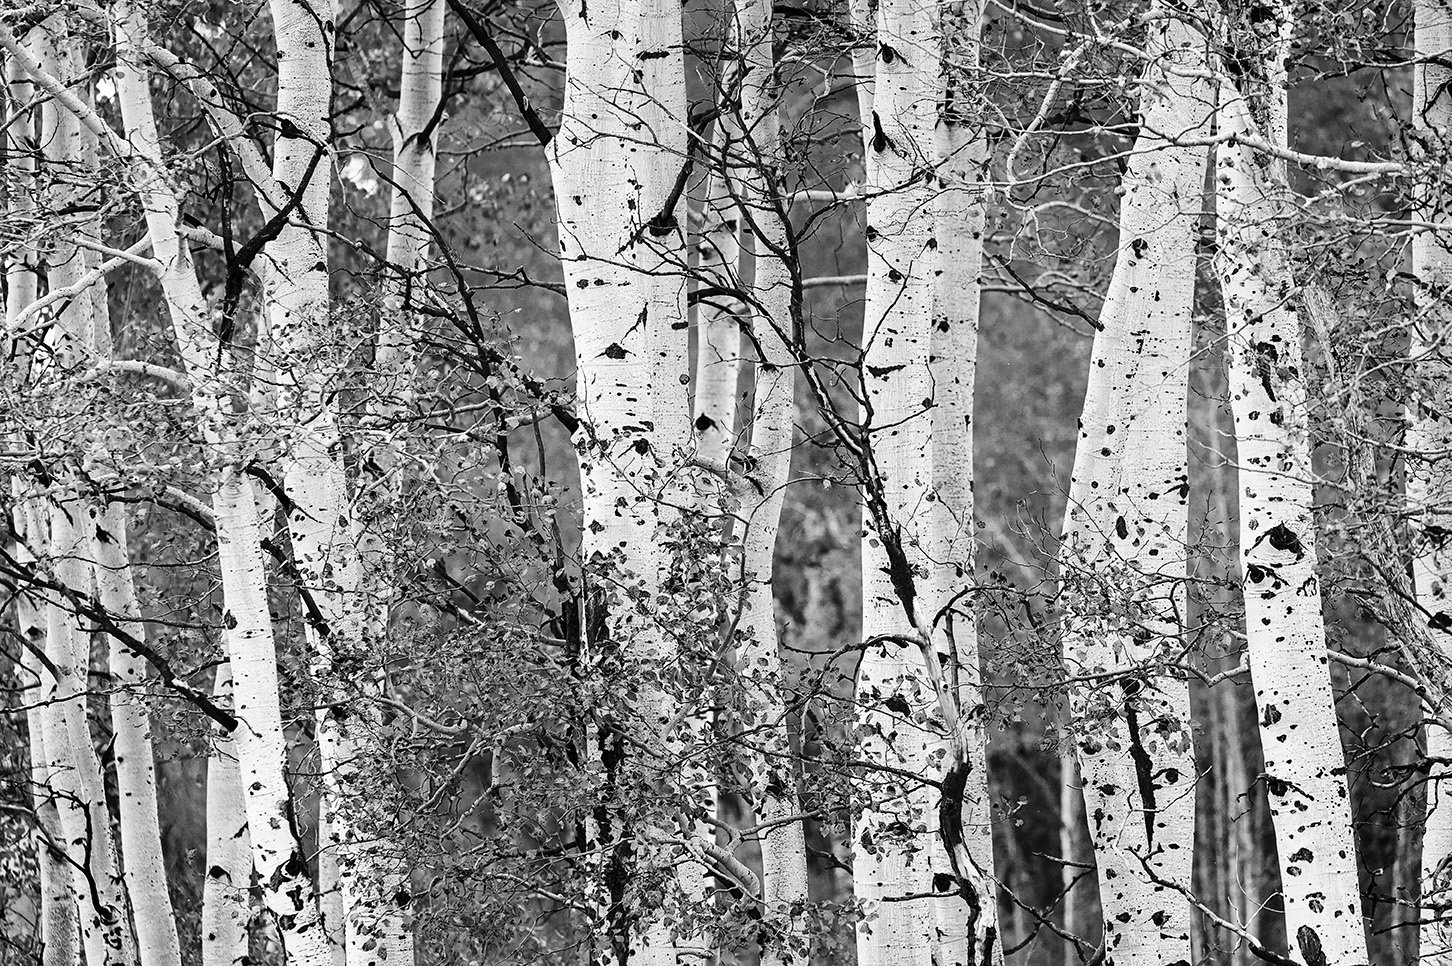
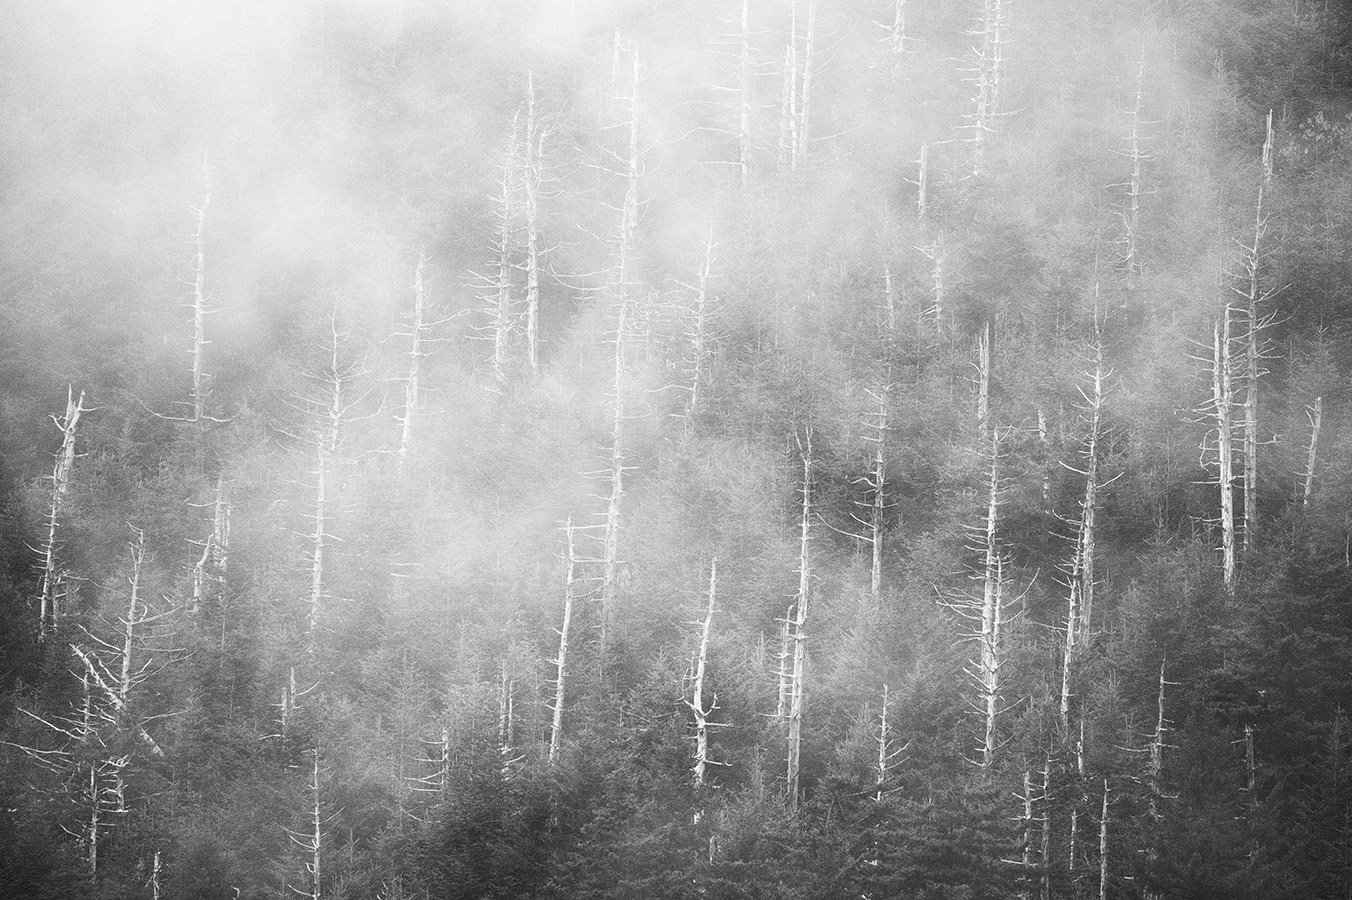
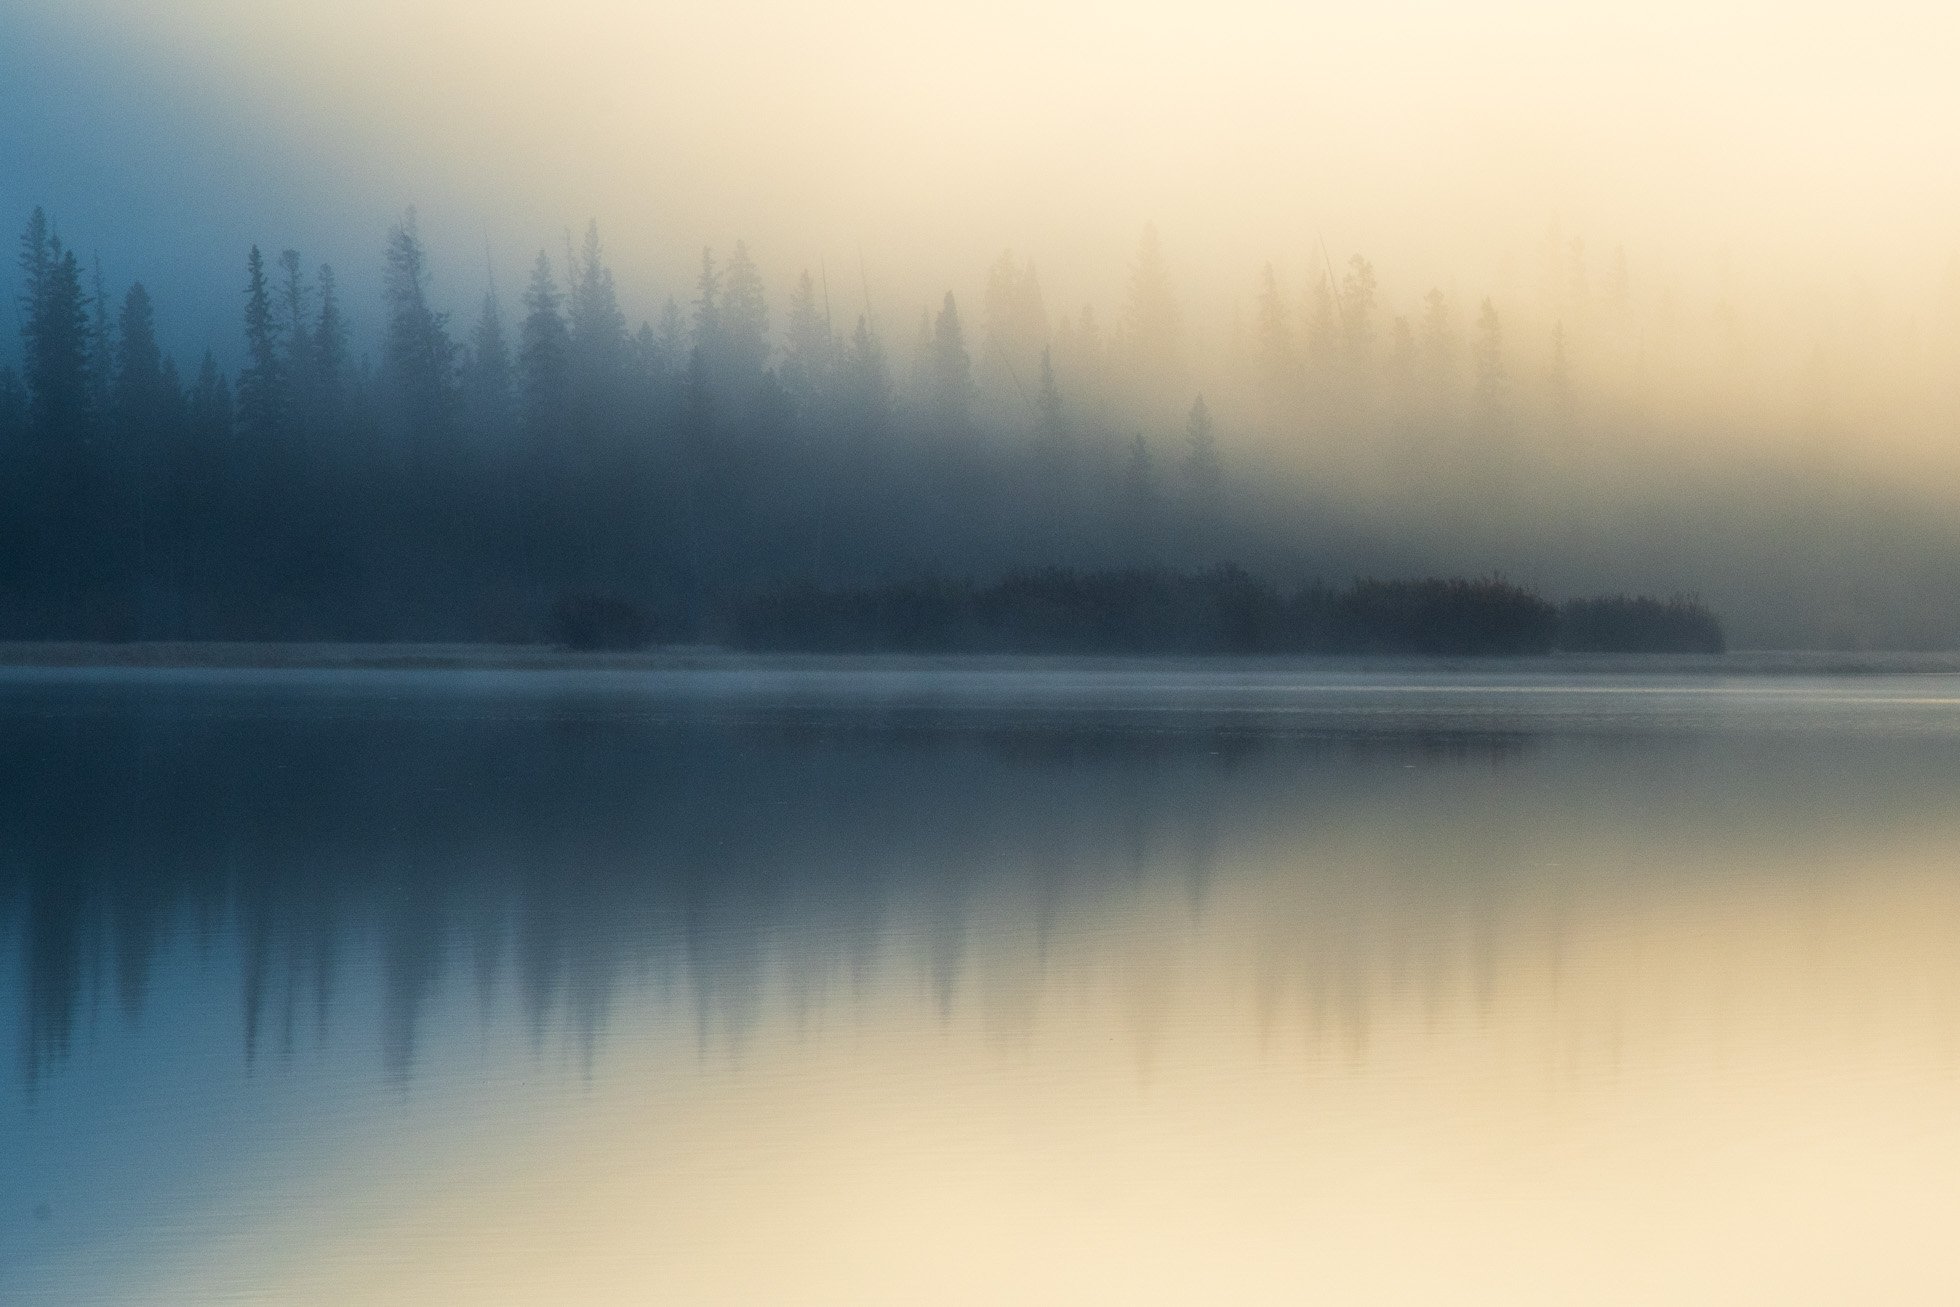
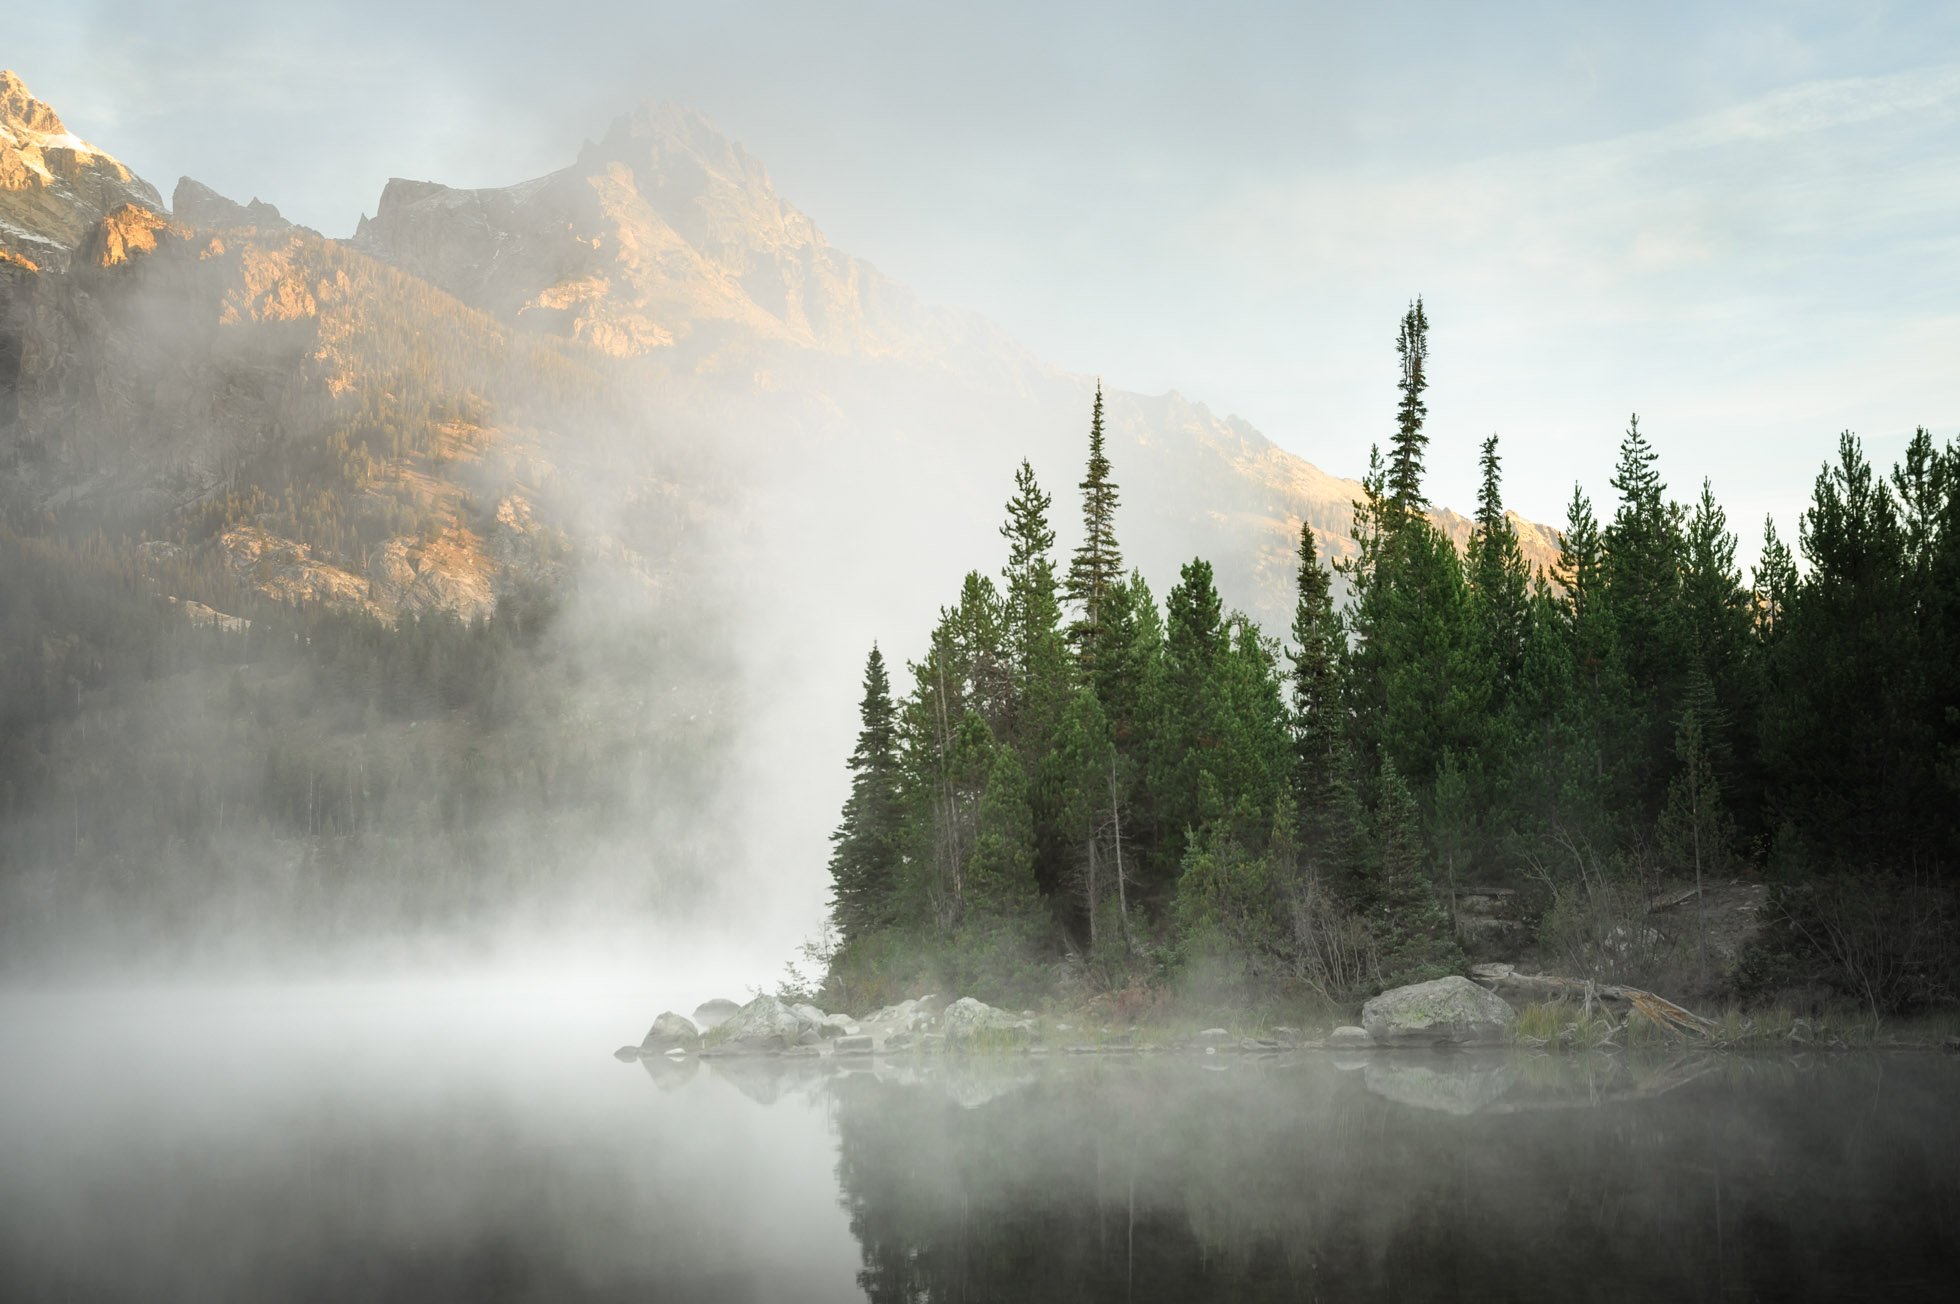
In some black and whites, there are more light tones where the histogram will lean towards the right like in this image with lots of fog amongst the trees.

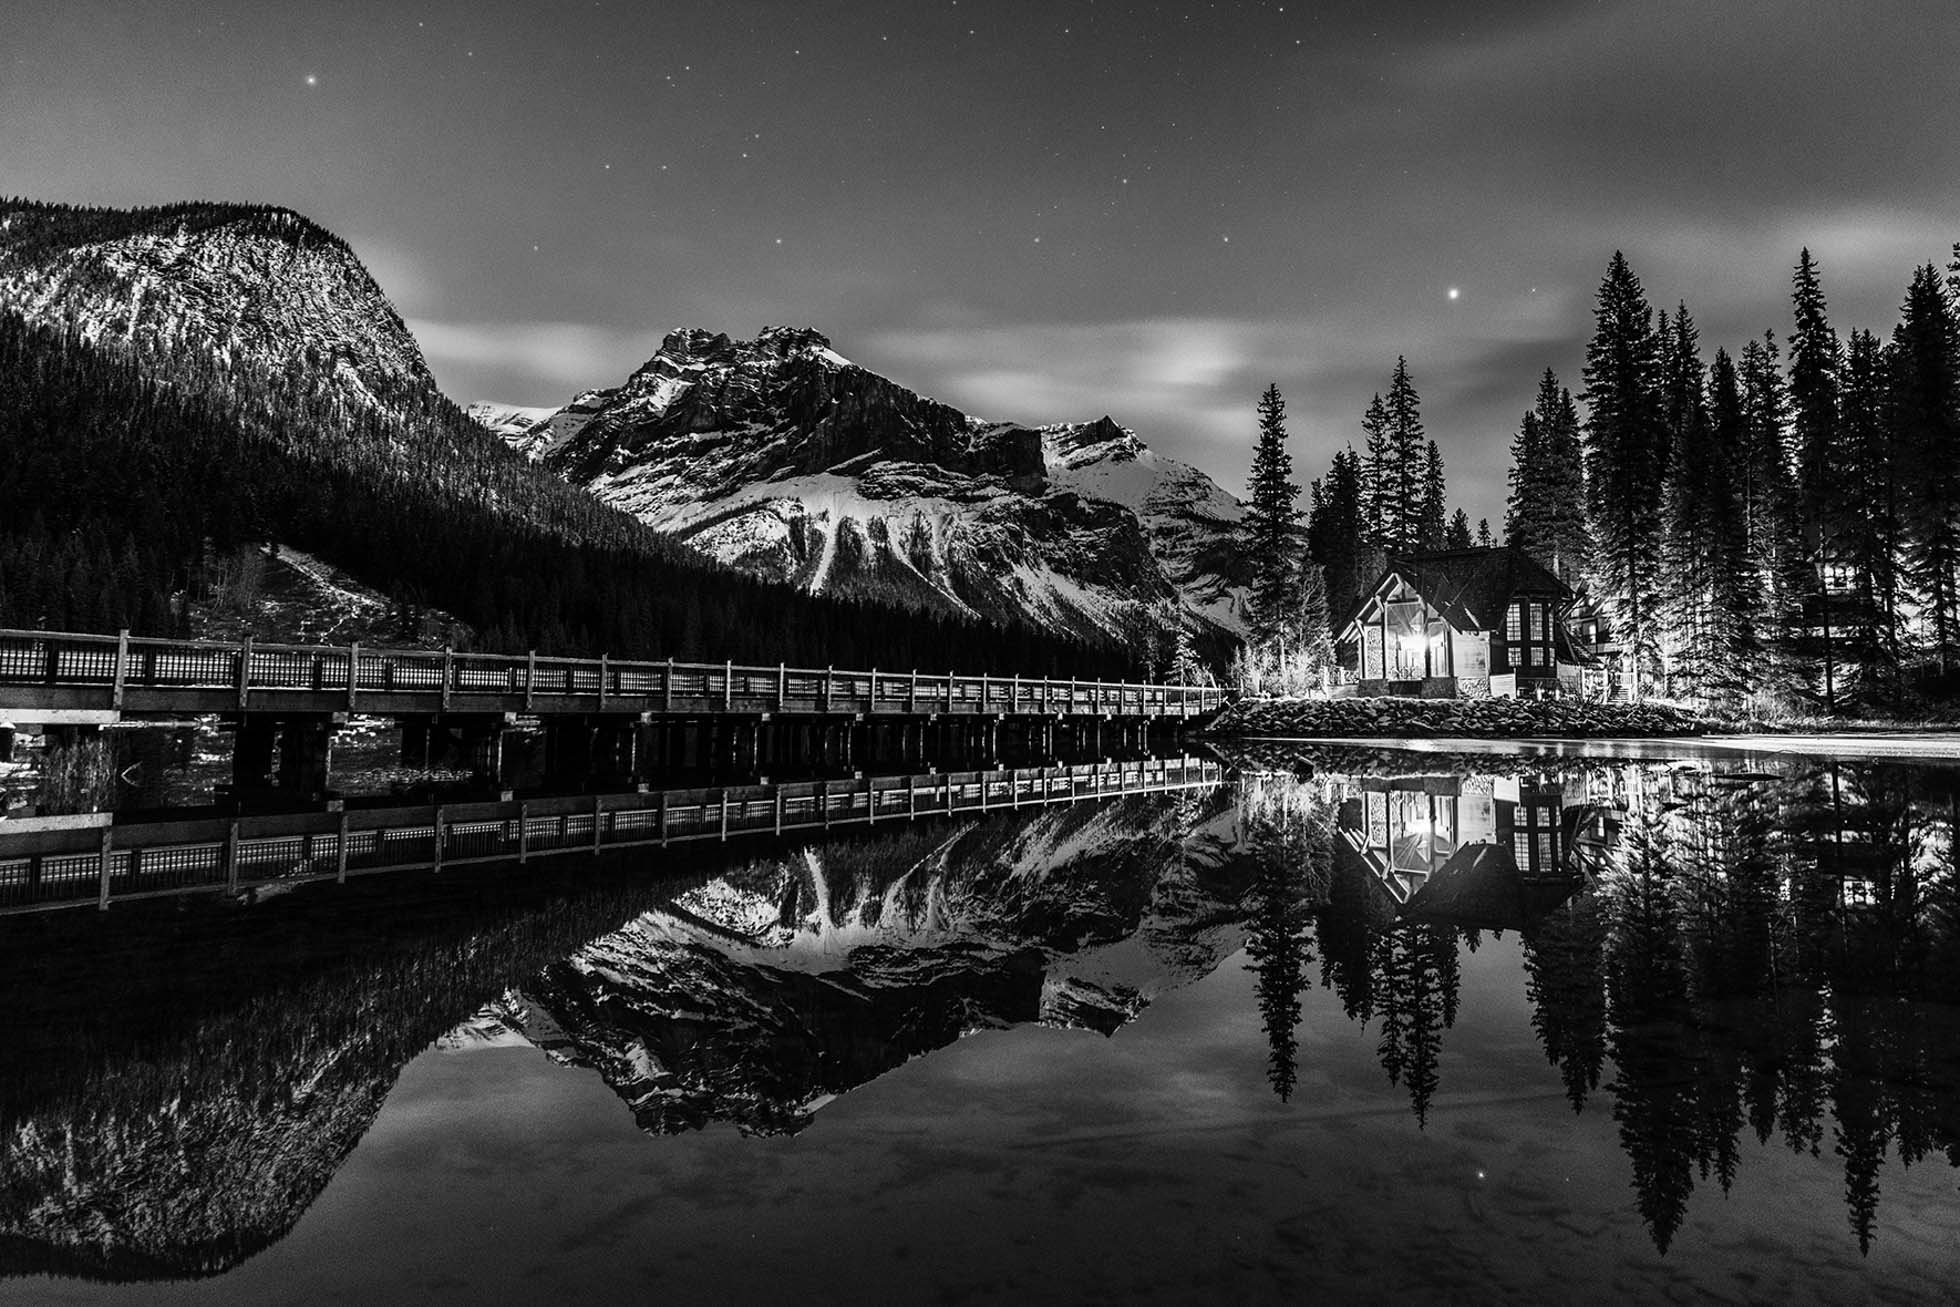
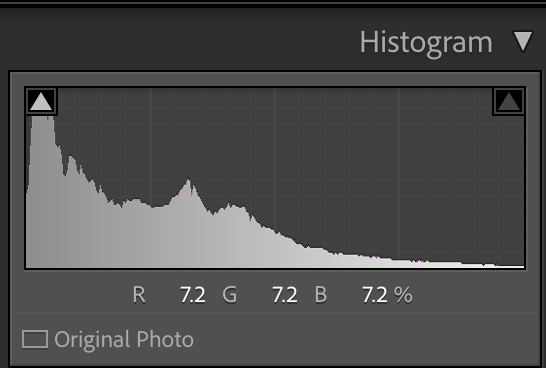
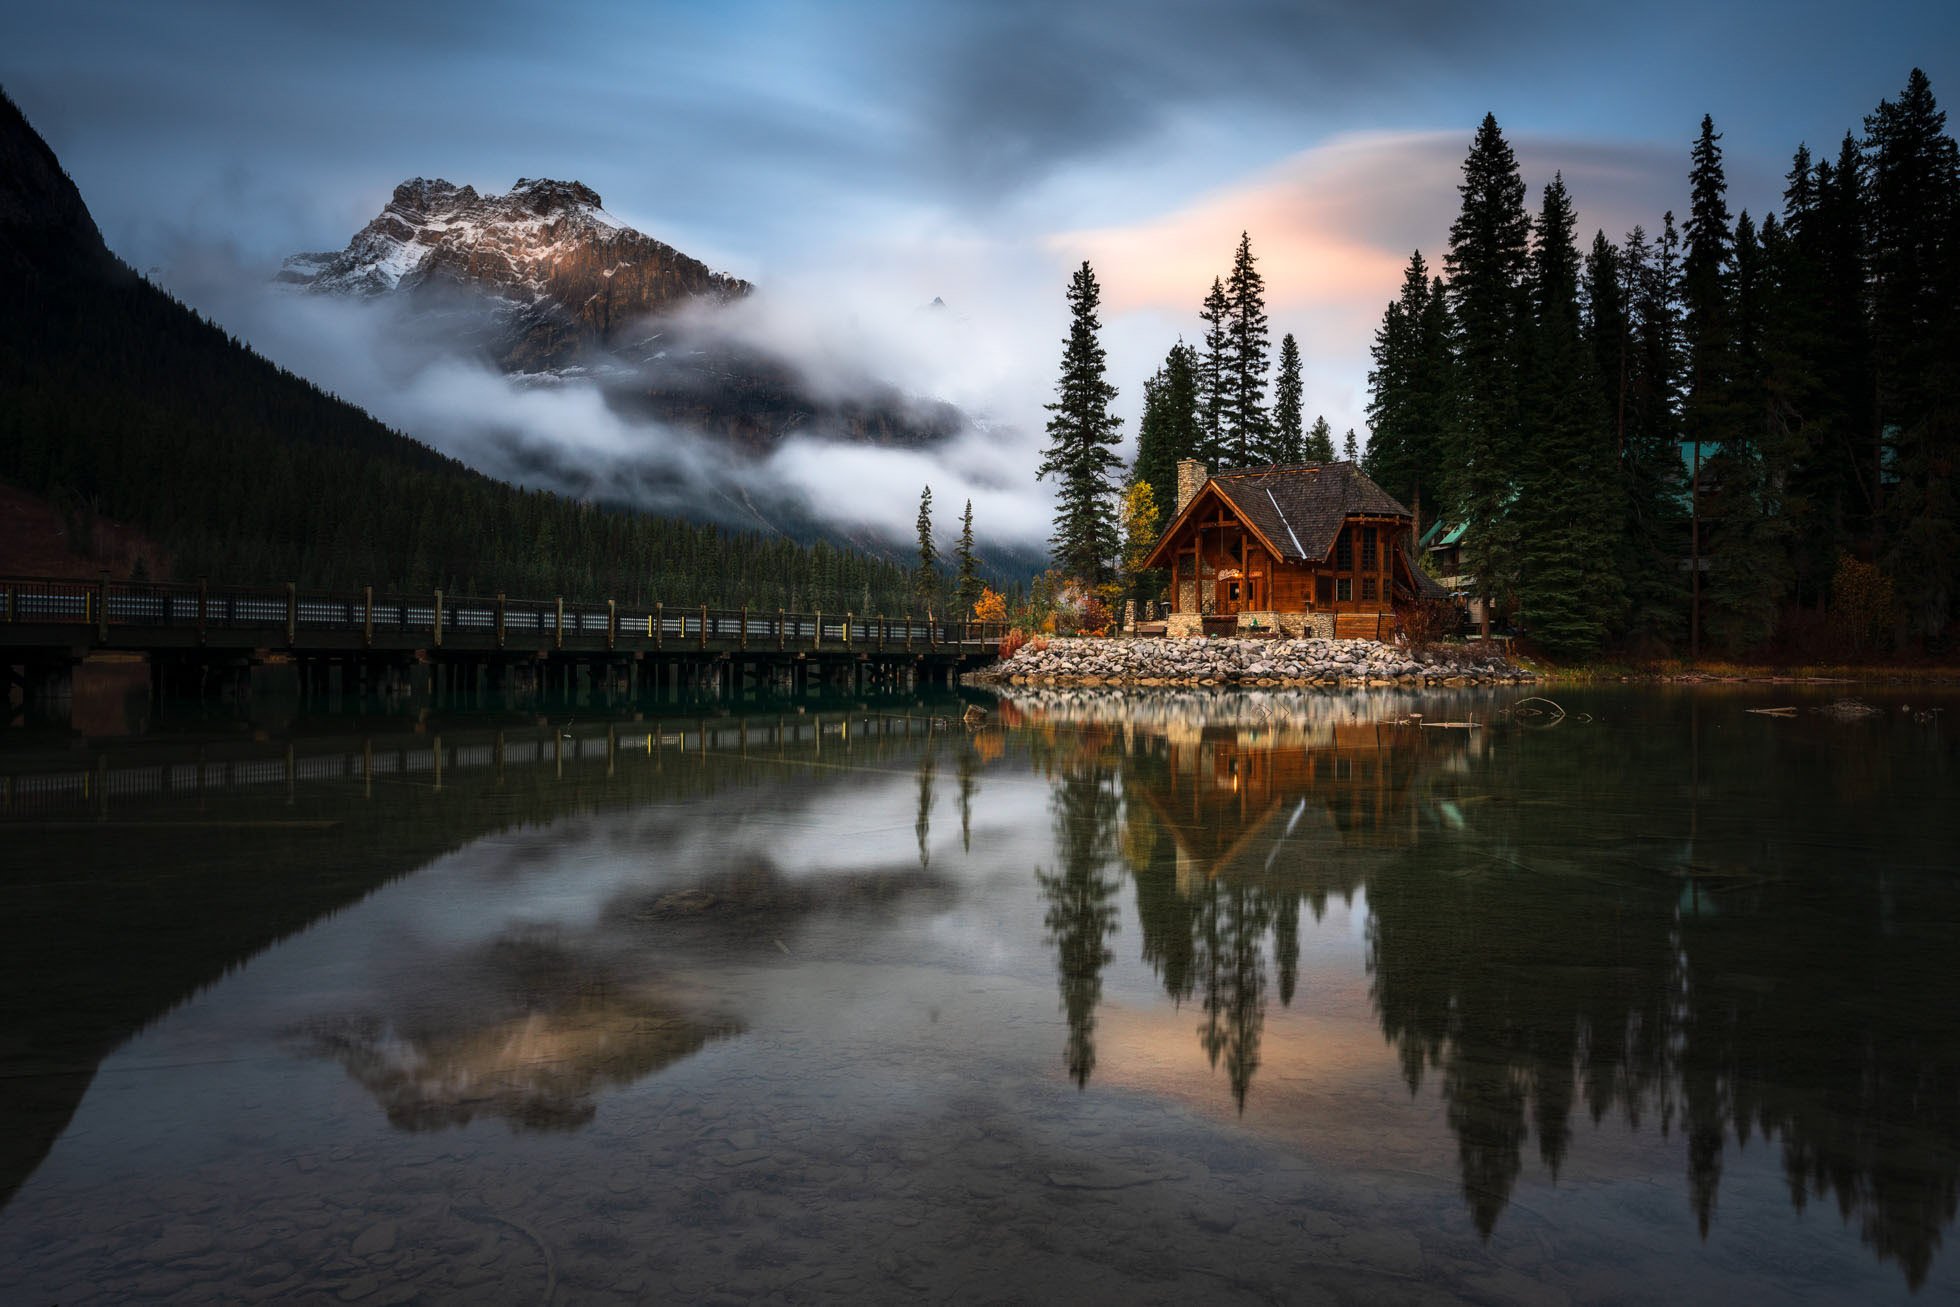
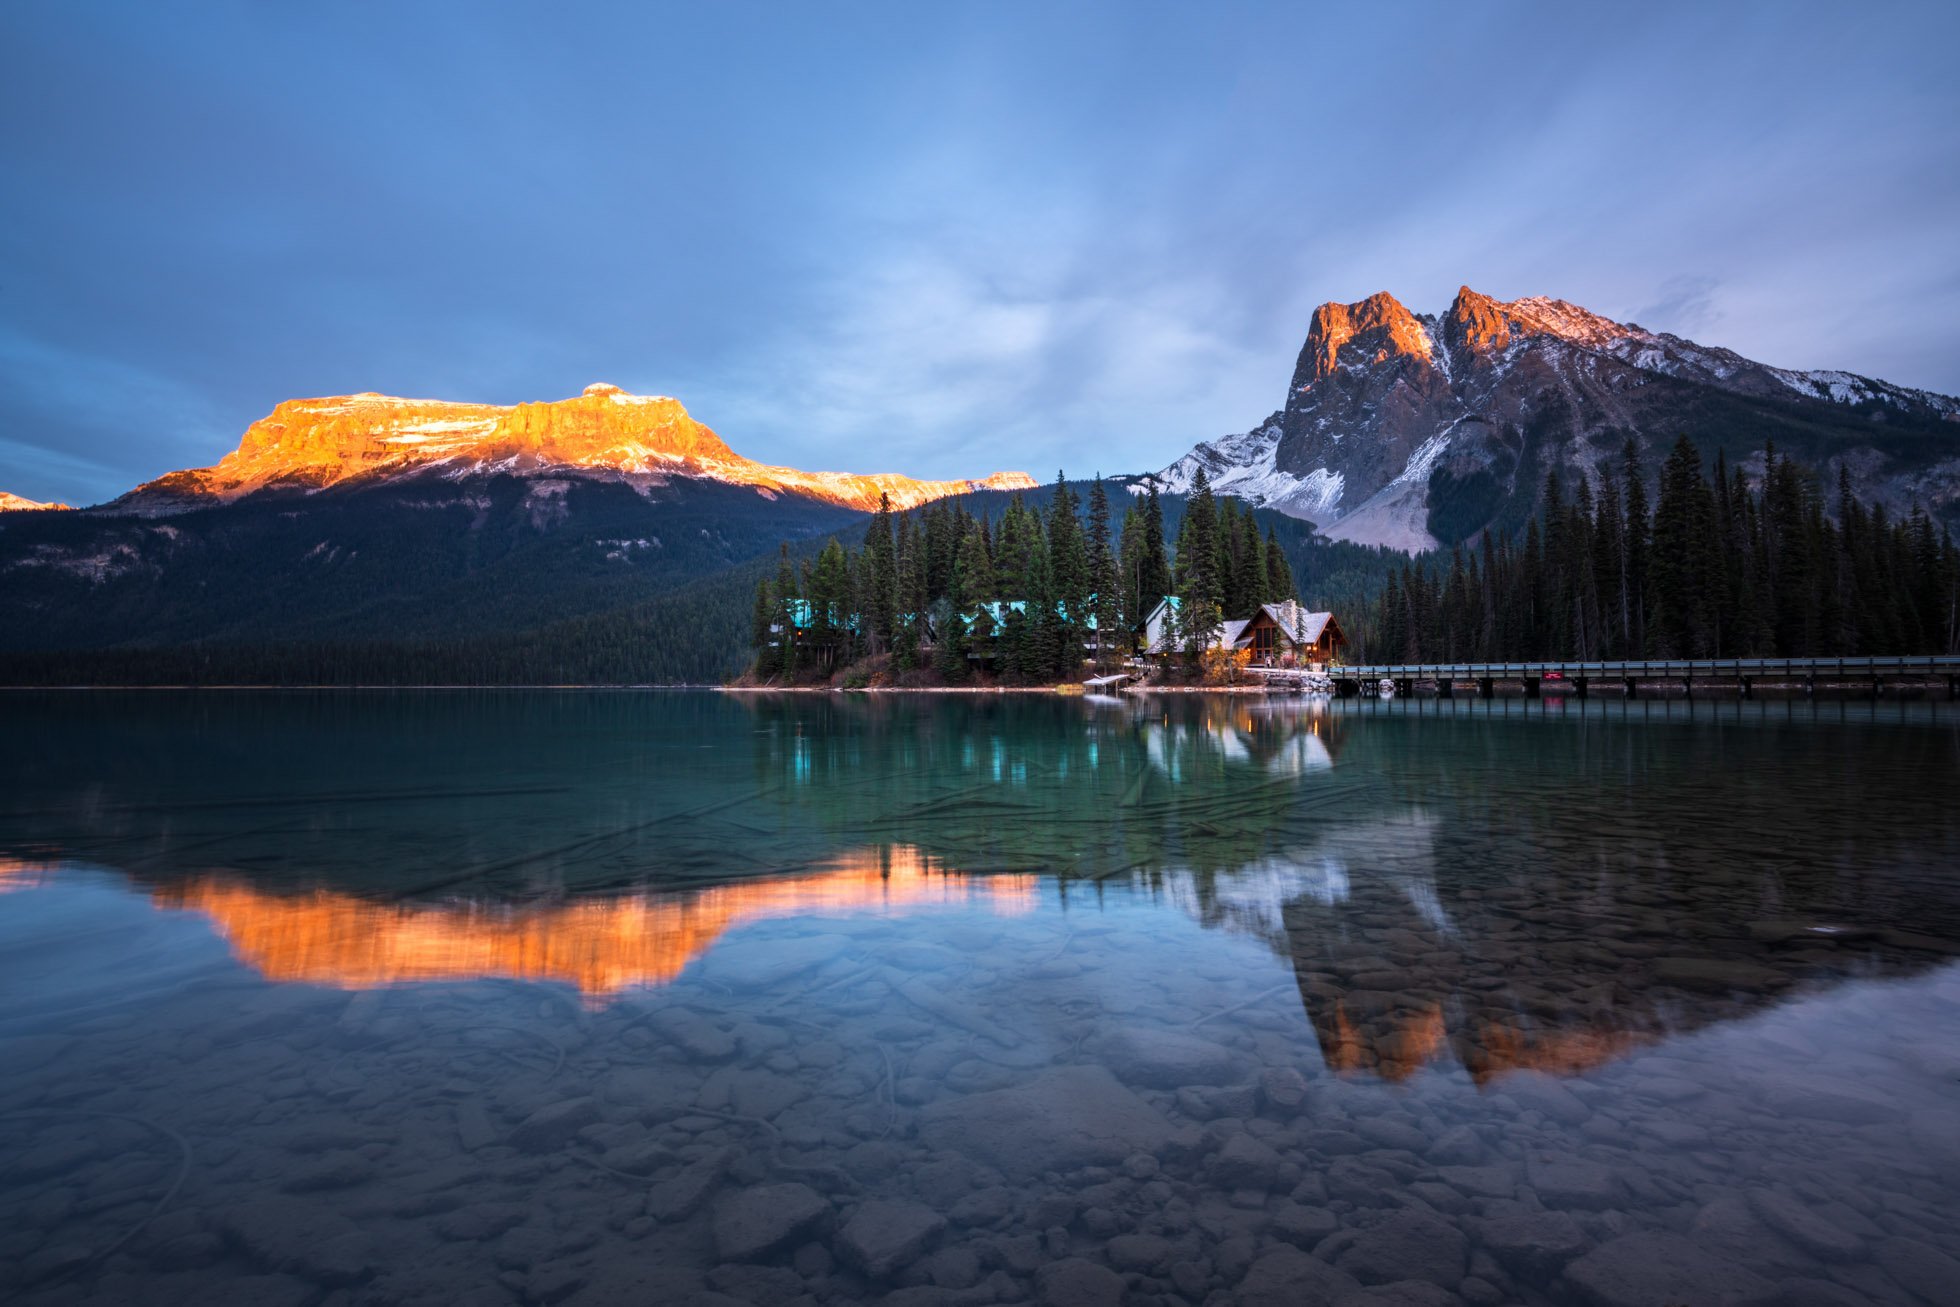
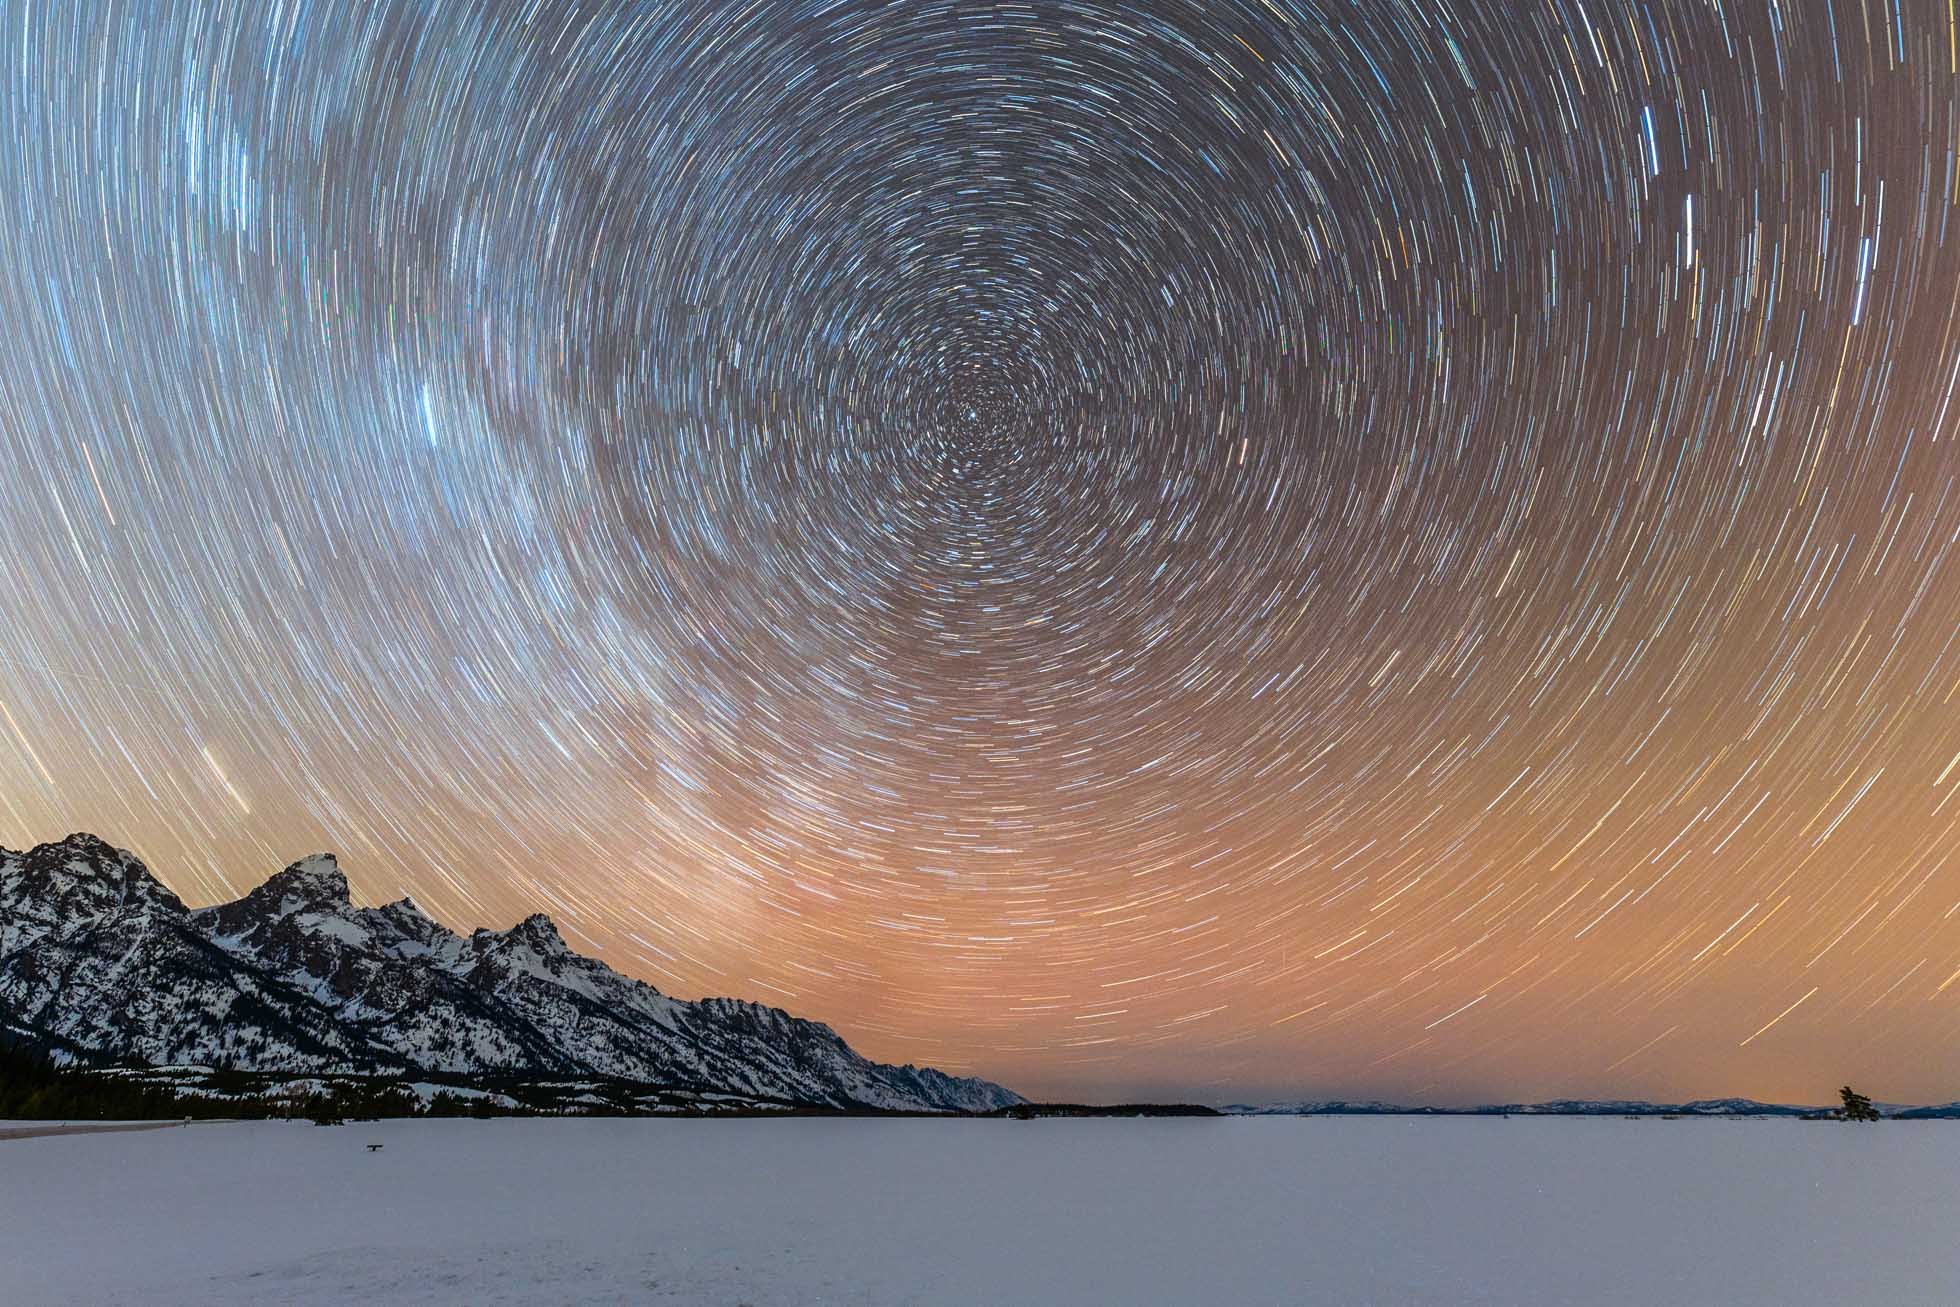
And in others, the tones will be heavy toward the left side of the histogram with lots of dark tones such as in this night time image of Emerald Lake. The histogram has a full range of tones from left to right, with the lights being the bright white tones, but the predominantly dark scene is represented by the histogram showing heavily on the left.
4) My last and most important tip is to EXPERIMENT! Practice with lots of images and try various techniques. Try different things with the same image. Ask for feedback from friends you trust. And don’t be afraid to push your adjustments a little further in black and white than color and get creative!
Post processing is a personal and subjective process. There are many tools in the various software programs. The techniques I share are ones that work for me, but you may have others that work best for you. That said, I always like to try new things and learn from others, so perhaps my steps will add something new to your workflow!
Kristen Ryan is an award winning and published landscape photographer and educator residing in the Midwest suburbs of Chicago. All images are available for purchase in the Fine Art Store or by request. Kristen leads ladies landscape photography retreats in the Tetons, Glacier NP, Hilton Head, Chicago, and the Canadian Rockies, offers private mentoring . New online educational materials are coming soon!
4 Tips for Creating Compelling Black and White Landscape Imagery
Color is everywhere around us! Nature’s color wows us with its vivid sunrises and sunsets, deep blue skies, forests of green, and rainbows of flowers. Landscape photographers seek golden hour light and the vibrant burn of the red setting sun for good reason. Our eyes are drawn to intense and contrasting colors. It can be hard to understand why one would want to strip that color out of a landscape photograph.
While color is a compelling element in many images, color can also draw the eye so strongly that other aspects of a photo are minimized or even lost to a viewer. Elements such as light, texture, pattern and shape take center stage when color no longer competes for attention. A black and white landscape will tell a different story than the very same image in color. There is a classic and timeless quality to black and white images as they draw focus to the mix of light and shadow, contrast and texture in a scene.
1) Learning to see in Black & White To create compelling black and white landscape images, we must find scenes with compositional elements and light that tell a strong story without the use of color. When color is no longer a focal point or supporting element, we are forced to find the other components of a scene that make it interesting.
When we previsualize in black and white we have to learn to see tonality in terms of shades of gray. Black and white is not only black and white but all the values of gray between true black and true white. A wide range of tones throughout the histogram will create the strongest images. This means having tones that are bright white, various shades of gray, and black. When an image has too many of the same tones, the image will lack depth and distinction because everything blends together.
Learning to understand and see how the colors and areas of a landscape will translate into shades of gray comes from practice and experience. For example, deep blues and forest green colors will translate to darker gray or near black while yellow and light greens will be lighter shades of gray. These tonalities will also be influenced by the exposure you choose at capture and how you adjust them in post processing.

2 ) LOOK FOR THE LIGHT:
Compelling black and white landscape imagery can be created in varying lighting situations. Dramatic light and scenes with a high dynamic range including bright highlights and dark shadows will naturally introduce strong contrast. I love to look for scenes where there are pockets of light across the landscape. Choosing black and white in a scene like this creates a story all about the dance of light and shadow.
Harsh daytime light is often considered unfavorable for color landscape photography but this kind of light can work well in black and white imagery. Bright sunlight is extremely effective in bringing out the detail of various textures by emphasizing the various tones across a surface. Deep blue skies turn dark in a black and white conversion and highlight lighter toned subjects. Stormy skies are a great opportunity for grand black and white landscapes as they create a dramatic and foreboding mood.

3) Find the Contrast:
Contrast is important in black and white landscapes both for tonal range and visual balance. The main subject must stand out amongst its surroundings. A dark subject needs to be set against a lighter background or a light subject against a darker background to be successful. For example, a bright waterfall flowing over dark rocks, or dark trees amidst light misty clouds. Through the frame, also look for areas of micro-contrast where light and dark tones contrast to highlight textures and patterns, such as in layers of rocks or in the movement of waves. The mix of tonality works to bring attention to these textures and shapes and creates depth.
With the way that black and white imagery emphasizes texture and form so beautifully, one way to elevate and balance the visual interest in an image is to use the contrast between various textures of the landscape. Using post processing tools to enhance these contrasting details will elevate an image from average to outstanding.
Contrast areas of detailed and rough textures with soft and smooth creates layers and depth. For example, consider an image with several layers including rocks in the foreground of smooth water, jagged mountains, and then soft wispy clouds in the sky. Using neutral density filters and slow shutter speeds is a great technique to use for creating the softness in the water or sky.

4) Emphasize Lines, Texture, and Patterns
Black and white landscape and nature photographs are a great way to emphasize lines, textures and patterns in a scene. The stripping of light brings out the beauty of these elements. Look for repetitive lines or shapes naturally occurring in the landscape. Notice how the light can bring out micro contrast in textures such as rock, sand and trees. And as mentioned above, look for those texture contrasts between smooth and rough as this creates visual interest and depth.
Next time you’re out photographing, give a little thought to black and white! I hope these tips help you out!
Kristen Ryan is an award winning and published landscape photographer and educator residing in the Midwest suburbs of Chicago. All images are available for purchase in the Fine Art Store or by request. Kristen leads ladies landscape photography retreats in the Tetons, Glacier NP, Hilton Head, Chicago, and the Canadian Rockies, offers private mentoring . New online educational materials are coming soon!
Make Your Tripod Work For You
As landscape photographers, our closets and bags are filled with gear and gadgets to help us photograph the beauty of the world around us. Among these, a tripod is one of the most useful tools we use, but one of the most cumbersome as well. We often have a love/hate relationship with our tripod. It adds weight to carry and can be annoying to set up, adjust, and pack back up! But it helps us to stabilize the camera and create sharper images especially when we are photographing with slow shutter speeds or shooting focus stacked or bracketed exposures.
In many cases, the tripod is crucial for the success of creating our visions. But it can also get in our way and hold us back in some ways if we don’t use it right. And I don’t mean whether we tighten the legs properly or adjust the ballhead right.
When we walk up to a location, it can be really easy to take out the tripod and set it up at the first thing we see. Then proceed to put the camera on the tripod and get stuck right there in that spot, at that height, and then forget to move around and change our perspective. Because it can be cumbersome at times to adjust the tripod, sometimes we get stuck in that one position we set it up in the first place. No doubt when I started out in landscape photography, I made this mistake, only to kick myself later as I reviewed my images.
As I learned to explore my locations more thoroughly before setting down my tripod, I have also learned to make my tripod work FOR me rather than against me. Using all my senses and my camera (handheld), I look around and find the perspective, height and composition that satisfies my vision. Then if my vision requires the use of the tripod, I set it up to put my camera in the position that I found through my exploration.
Additionally, after exploring a particular area or composition for a bit, make sure to pick up your tripod and go explore other compositions, once again using your tripod as a tool to photograph what calls to you.
So next time you head out, don’t work in the constraints of the tripod, make sure your tripod is one of the tools helping you photograph the composition that speaks to you! While you’re at it, there are MANY tripods out there - if the one you use makes you want to throw it in a lake, find a camera store and play with some until you find one that you’ll be happy to take along on your next hike or photo outing!

Kristen Ryan is an award winning and published landscape photographer and educator residing in the Midwest suburbs of Chicago. All images are available for purchase in the Fine Art Store or by request. Kristen leads ladies landscape photography retreats in the Tetons, Glacier NP, Hilton Head, Chicago, and the Canadian Rockies, offers private mentoring . New online educational materials are coming soon!
2022 Word of the Year
Do you choose a word of the year? A word that guides you in your photography and/or life in general? I know many photographers who do this. This is something new for me just in the last couple of years.
I have chosen words that I felt applied to the way I wanted to approach both my photography and my life. In 2020, I chose the word “Internal” as my year started off with some challenges where I had to rely on my internal instincts even when they led me to some tough and uncomfortable decisions. 2020 proved to (obviously) be a challenging year and my word continued to guide me through making business decisions in the face of a pandemic as well as looking inwards with my own work.
Following the crazy of 2020, in 2021 I decided on the word ‘present’ as my word for the year. I chose this as my word because I wanted to spend the year embracing each day fully, being fully PRESENT in the moment, whether I was out exploring and photographing or spending time with my kids.
This year, I have chosen the word MINDFUL. More than ever, I feel like it is so important for me to make mindful choices in how I spend my time and where I put my energy. Just like last year, I want to be fully present in the moments I am in nature and home with my family. Quality over quantity when it comes to my imagery, photographing what makes me happy. And as I move forward with the business and education side of my photography, being mindful of choosing the projects and opportunities that bring me the most joy feels critical, especially with my kids’ childhood seeming like it is flashing before my eyes. Sometimes life can feel so busy and chaotic that my mind is distracted away from being fully present. Being mindful of choosing the right projects and not overcommitting myself feels critical to happiness at home and fostering full enjoyment of photography and the people I get to connect with through this art.
Being out in nature, photography is always a mindful activity for me, bringing me fully into the present moment. The longer I engage in this art, the more mindful and thoughtful it becomes as I slow down and let nature speak to me. I look forward to embracing this practice and approach in the coming year.
If you have chosen a word of the year, what is it and why did you choose it? I’d love to hear about it!
Kristen Ryan is an award winning and published landscape photographer and educator residing in the Midwest suburbs of Chicago. All images are available for purchase in the Fine Art Store or by request. Kristen leads ladies landscape photography retreats in the Tetons, Glacier NP, Hilton Head, Chicago, and the Canadian Rockies, offers private mentoring . New online educational materials are coming soon!
3 Ways to Celebrate Your Work from 2021
It’s 2022 and a brand new year! As you set new goals and look forward to what will hopefully be a great year, it’s a great idea to look back on the past year and celebrate all your successes, growth and the beautiful memories you captured in your images.
There are three things I like to do toward the end of the year to reflect back on the moments and images that I have collected since the last New Year’s Day.
The first thing I like to do is scroll through my Lightroom catalog and look for any favorite images I haven’t edited yet and create a collection of them so that I can be sure to work through them early in the new year! There are always images I don’t get to right away or images that I may have overlooked during the first run through.
As I work on a seascape presentation coming up for me early this year, I went back to some images from earlier in 2021 and discovered a small collection of images I love that I had yet to edit.

The second thing I do is go through my edited images and choose my favorites. Then I make a collection and sometimes create a slideshow. Seeing them together usually adds to my sense of accomplishment and renews my gratitude for all the moments I was lucky enough to spend out in nature.
A collection of some of my favorite horizontal images from 2021!


Or instead, or maybe in addition to annual favorites, maybe gather a collection of images from a particular trip or project that you worked on. For example I could create a collection of my abstract images or backyard images, two of my projects from 2021.
Finally, I choose some of the year’s images to print. Whether I print some large to hang on the wall or smaller to put in a few frames, printing always gives me a newfound appreciation of my work. Seeing some of my images in print is a great way to wrap up the year and give me motivation for the year to come!

Probably my favorite image from 2021 that I’m printing large on metal!
Before you move onto setting goals for 2022, I hope you take the time to reflect on and celebrate all the amazing moments experienced and images captured in 2021!
Kristen Ryan is an award winning and published landscape photographer and educator residing in the Midwest suburbs of Chicago. All images are available for purchase in the Fine Art Store or by request. Kristen leads ladies landscape photography retreats in the Tetons, Glacier NP, Hilton Head, Chicago, and the Canadian Rockies, offers private mentoring . New online educational materials are coming soon!
6 Quick Tips for Photographing in the Falling Snow
Have you had your first snowfall yet this year? It seems the snowy weather is late for most areas this year. It is unseasonably warm here in Chicago right now, but after this warm snap, it looks like winter temps are on their way, and I can’t help wishing for snow and a white Christmas. There is something so magical about the first snowfall.
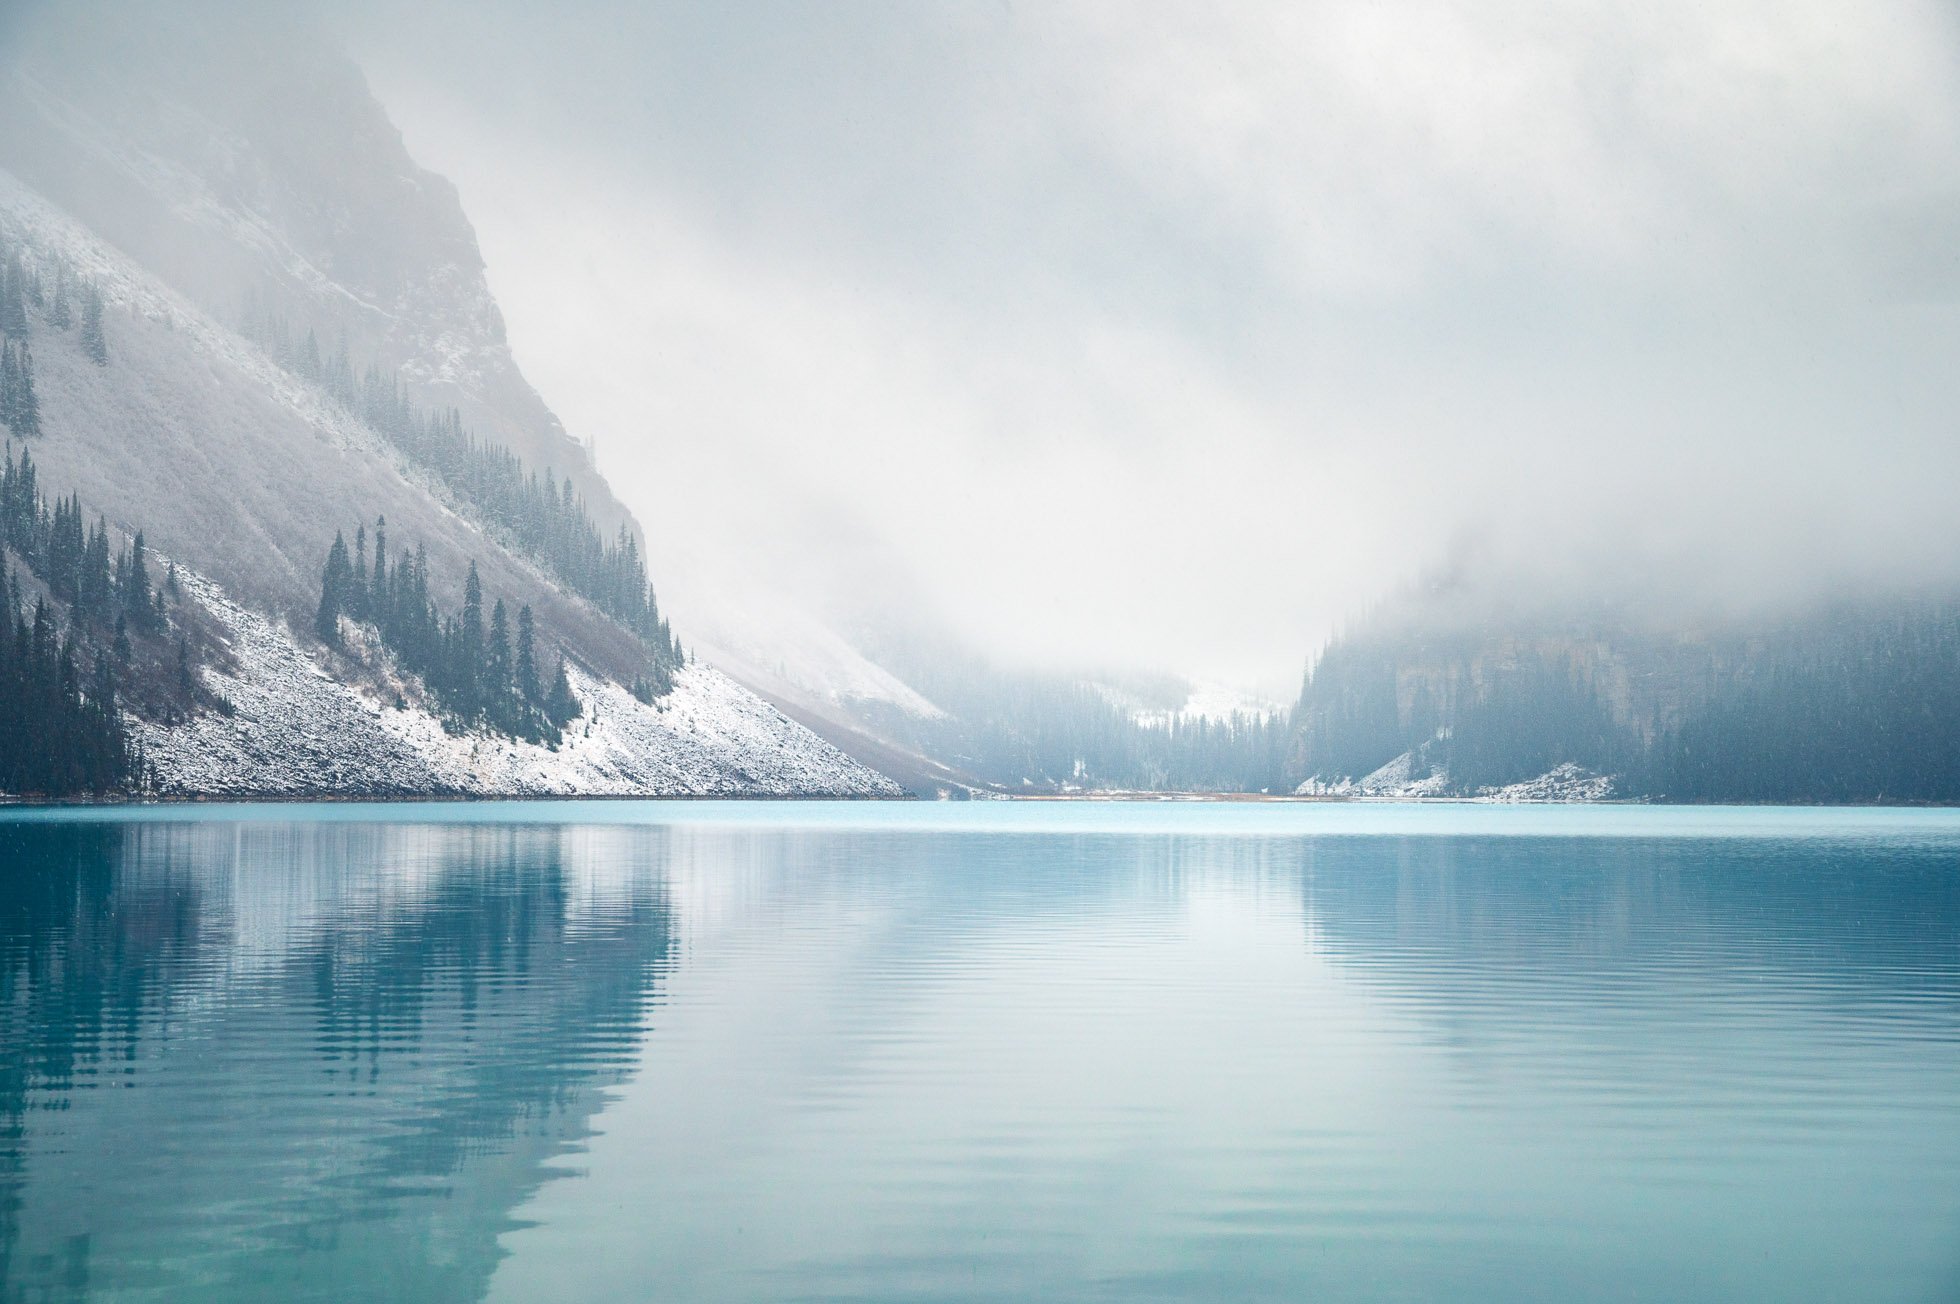
While Chicago is still awaiting the snow, I was lucky enough to experience a beautiful snowfall at Lake Louise this past October. In fact, I chose that location for the group that morning specifically because there was a strong chance of snow and there are few things more magical than freshly falling snow in the mountains.
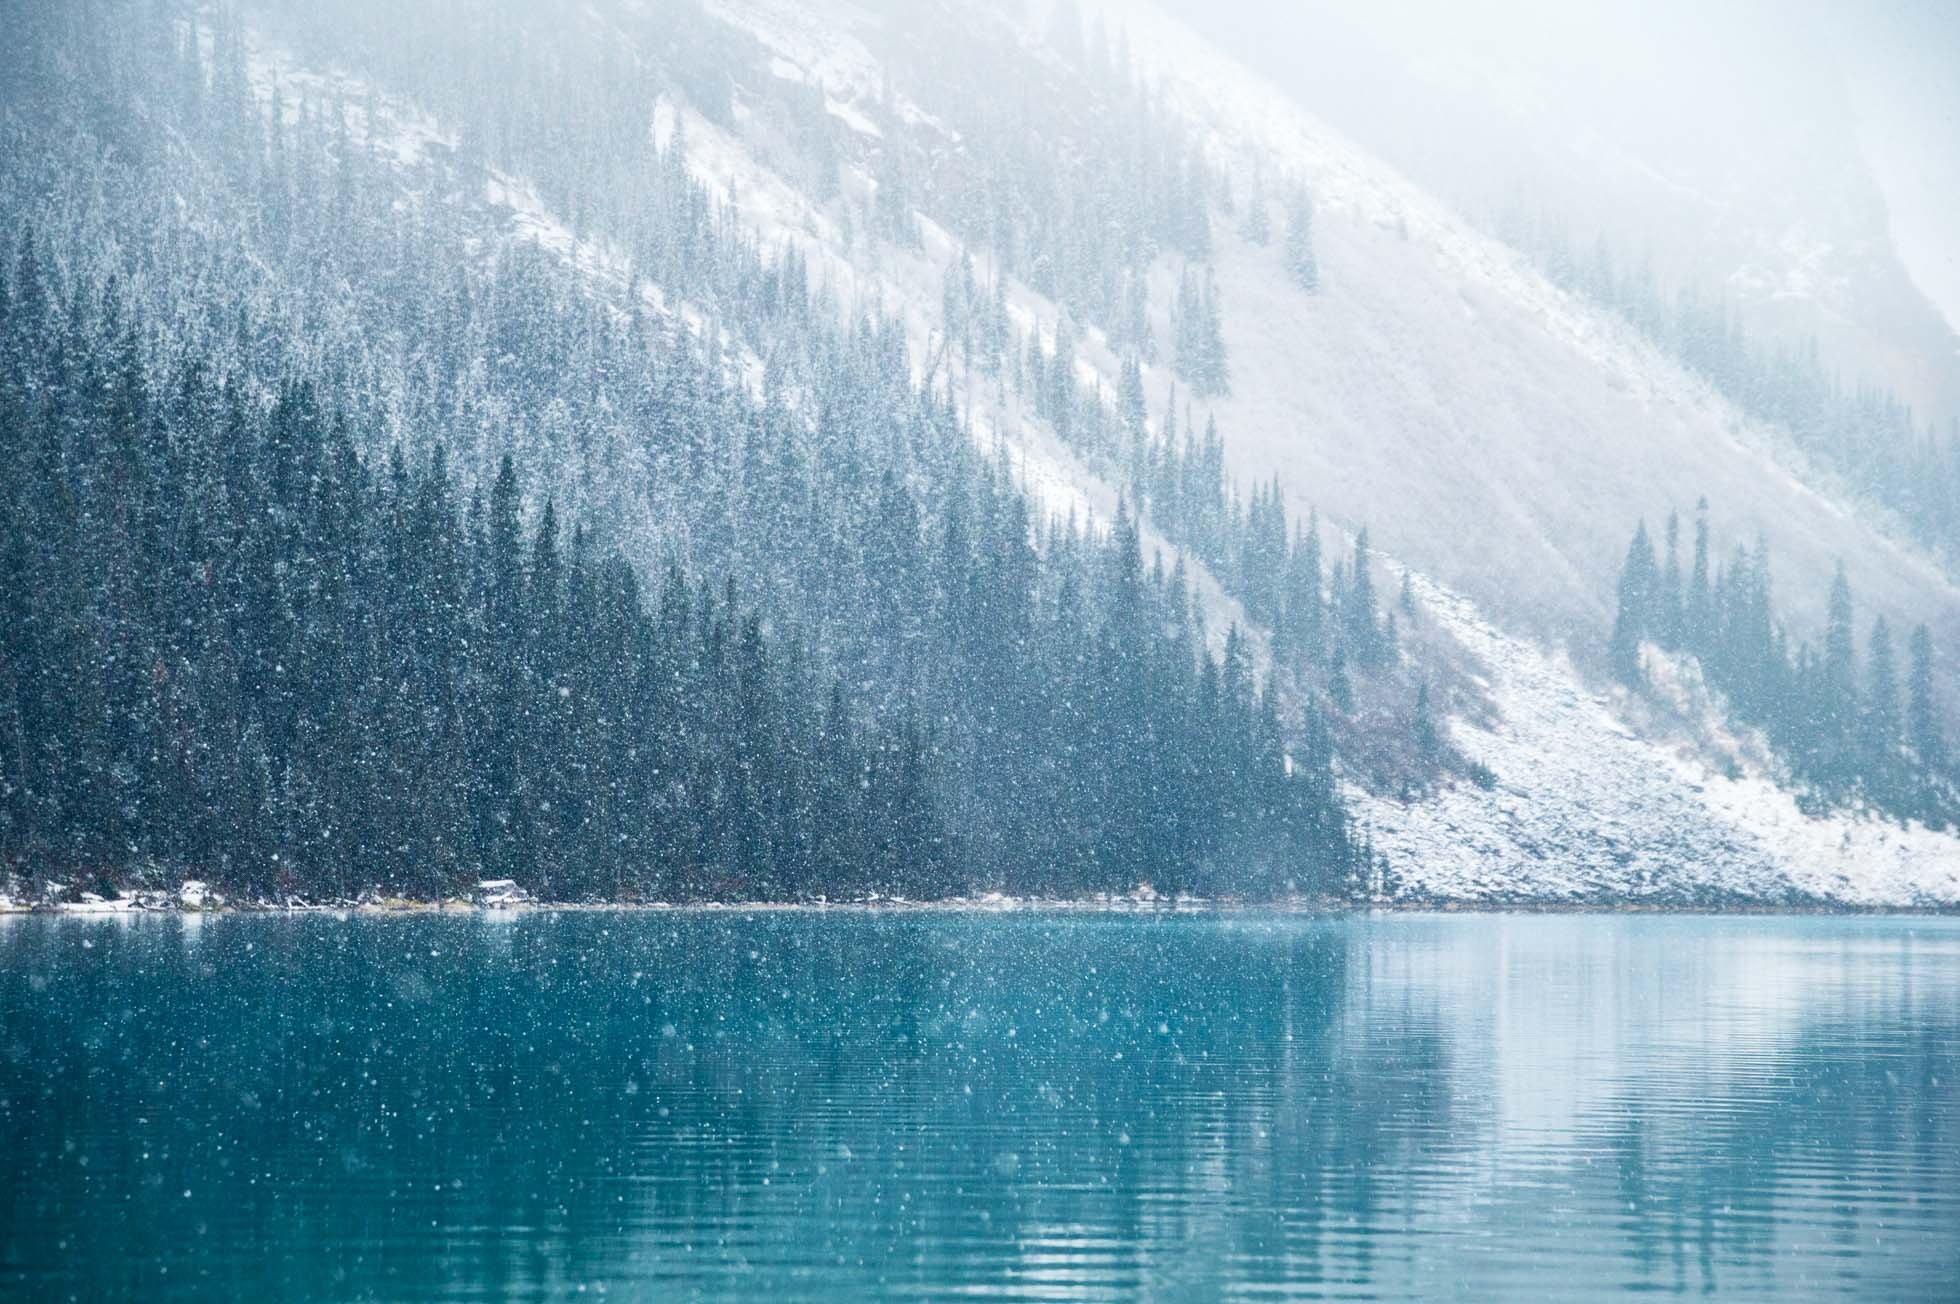
Lake Louise captured with the Sigma 24-105mm at 105mm
Shutter speed 1/160 to capture the falling snowflakes
There are a few things to consider when photographing in falling snow, both technically and creatively, to come away with the magic of the snowfall!
1) Use a lens hood to help keep your lens free of falling snowflakes! As the snowflakes fall, they can land on your lens and melt, creating droplets that show up as spots in your images. Obviously this is not ideal. A lens hood can help to protect the front of your lens as you photograph.
2) Keep a microfiber cloth handy to dry your lens of the snowflakes that make their way onto your lens. Even with a lenshood, sometimes the direction of the falling snow and wind can still cause some flakes to land on your lens. Be sure to check your lens between exposures and use the cloth to clear it free of moisture.
3) Use a rain/snow cover over your camera to protect it from the moisture!
4) Avoid changing lenses as the snow falls to keep moisture out of the inside of your camera. If you have more than one camera body, put a wider angle lens on one camera and a telephoto lens on the second.
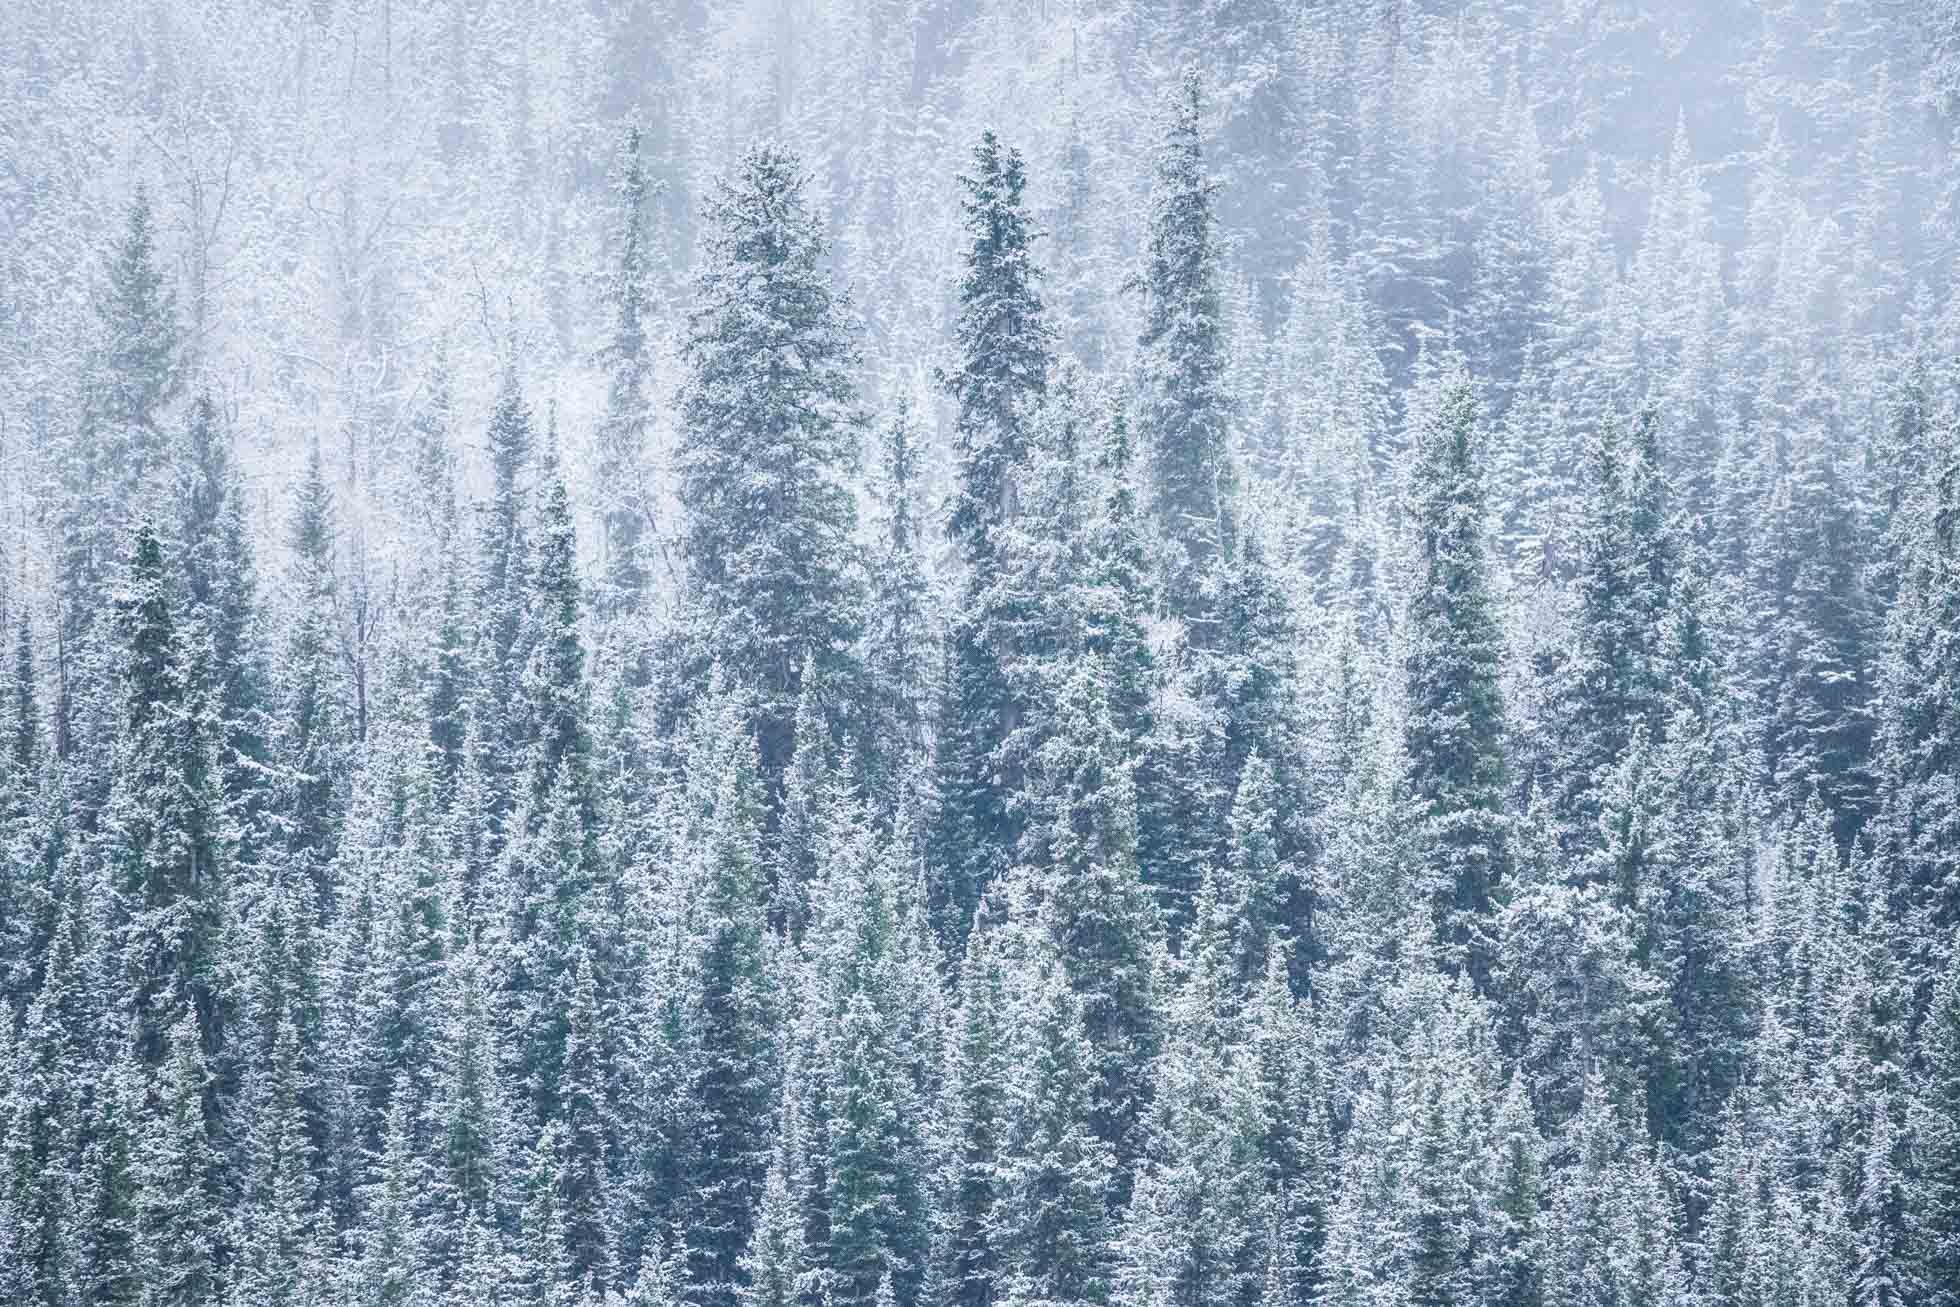
Snow in the trees captured with the Sigma 150-600mm Contemporary lens with a shutter speed of 1/800
5) Consider your shutter speed. Use a fast shutter speed to freeze the falling snow if you want to emphasize the snowflakes. A slower shutter speed will show the movement of the flakes with streaks that look more like falling rain.
6) Look for dark backgrounds to emphasize the snowflakes. The white snow will blend into the sky or other light area of the scene. Backgrounds like deep green trees or blue waters will allow the white snowflakes to stand out!

Snow falling on Lake Louise captured with the Sigma 24-105mm at 82mm . I shifted my perspective to the water and trees so that the snowflakes would show up against the darker backgrounds.
Hope you get out there to photograph when the snow arrives!
Kristen Ryan is an award winning and published landscape photographer and educator residing in the Midwest suburbs of Chicago. All images are available for purchase in the Fine Art Store or by request. Kristen leads ladies landscape photography retreats in the Tetons, Glacier NP, Hilton Head, Chicago, and the Canadian Rockies, offers private mentoring . New online educational materials are coming soon!
Embrace and Enjoy the Journey
This little blog space has been quiet for some time now. I’ve more or less been silent here for the last year. The silence, though, is not because I haven’t been up to anything or had any thoughts to share. It is probably more because my mind has been overrun by so many thoughts that it has often felt impossible to wade through them, decide what might be worth sharing, and do so in a thoughtful and clear manner. I’d head out on a walk with the dog or with my camera and find myself in a clear and reflective space and come back home to find my brain once again overwhelmed by the noise, both literal and figurative.
That said, through the noise and haze that has felt disruptive in my mind during these months (almost years now) of the pandemic, I have also found a clarity in my vision for my photography and in the direction I want my teaching to go.
The first year of the pandemic, giving me more time at home and slower days, made me reflective on my photography and took me back to the roots of where I began. I spent more time quietly observing my local environment and I am grateful to photography for opening my eyes to beauty I am certain I would not have noticed before immersing myself in this art.
On a visit to my dad down in Hilton Head, I noticed a poem framed on a table in their hallway, one I remember reading as a child. It applies to life, but it felt very applicable to photography as well.
The Station by Robert J. Hastings
Tucked away in our subconscious is an idyllic vision. We see ourselves on a long trip that spans the continent. We are traveling by train. Out the windows we drink in the passing scene of cars on nearby highways, of children waving at a crossing, of cattle grazing on a distant hillside, of smoke pouring from a power plant, of row upon row of corn and wheat, of flatlands and valleys, of mountains and rolling hillsides, of city skylines and village halls.
But uppermost in our minds is the final destination. On a certain day at a certain hour we will pull into the station. Bands will be playing and flags waving. Once we get there so many wonderful dreams will come true, and the pieces of our lives will fit together like a completed jigsaw puzzle. How restlessly we pace the aisles, damning the minutes for loitering — waiting, waiting, waiting for the station.
“When we reach the station, that will be it!” We cry.
“When I’m 18.”
“When I buy a new 450SL Mercedes-Benz!”
“When I put the last kid through college.”
“When I have paid off the mortgage!”
“When I get a promotion.”
“When I reach the age of retirement, I shall live happily ever after!”
Sooner or later we must realize there is no station, no one place to arrive at once and for all. The true joy of life is the trip. The station is only a dream. It constantly outdistances us.
“Relish the moment” is a good motto, especially when coupled with Psalm 118:24 “This is the day which the Lord hath made; we will rejoice and be glad in it.” It isn’t the burdens of today that drive men mad. It is the regrets over yesterday and the fear of tomorrow. Regret and fear are twin thieves who rob us of today.
So stop pacing the aisles and counting the miles. Instead, climb more mountains, eat more ice cream, go barefoot more often, swim more rivers, watch more sunsets, laugh more, cry less. Life must be lived as we go along. The station will come soon enough.”

It had been awhile since I had last read that poem, but it is such a good reminder to find joy in all the small things in our everyday. And reading it during the pandemic, when so many of our big moments were cancelled - graduations, weddings, travel, birthday celebrations - felt like serendipitous timing.
It occurred to me at the time and has stuck with me since, that this idea translates so well to landscape and nature photography as well. We can get caught up in what we want to learn, capture, accomplish, or to believe we need certain gear for our photography to improve. As landscape photographers we tend to share a wanderlust for travel to beautiful and awe inspiring places. We long for “epic” views and conditions that make our jaws drop to the floor. We have bucket lists of places we long to go, those lists lengthened as we scroll our instagram feeds. I have heard photographers walk away from a stunning view disappointed as they lament the lack of an ‘epic’ sunset even while I was awed by the beauty.
Now don’t get me wrong, I love to travel to jaw dropping places and watch Mother Nature knock me over me with her magic! Those moments when I am jumping up and down and audibly saying “wow” from one minute to the next are incredible. Some of my very favorite images have come from those moments. I would liken those moments in photography to being a “station” as Robert Hastings calls the milestones and big moments in life.
Not to discount those iconic views and epic skies, but there is beauty everywhere if our eyes are open to it. I won’t lie and say I don’t still want to explore all the places on my bucket list. I do! But spending more time at home in 2020 had me pausing to take in the simpler beauty of my local surroundings. Embracing those moments has taught me to see more creatively and increased my enjoyment of where I live. My eyes are opened up to new details of beauty all the time.

I pick up my camera to capture the things that move me, that make me pause, and that bring me joy. I often still find it easier to photograph when I travel because the busy-ness of day to day life at home can make it hard. But even if I don’t click the shutter, I see beautiful ‘frames’ of nature in my mind everyday, and I pause a few moments to enjoy them. And that’s a wonderful journey to be on.
Wherever you are in your photography, and wherever you live in this world, I hope you find joy in the beauty around you everyday, and find the time to capture some of it with your camera!
Kristen Ryan is an award winning and published landscape photographer and educator residing in the Midwest suburbs of Chicago. All images are available for purchase in the Fine Art Store or by request. Kristen leads ladies landscape photography retreats in the Tetons, Glacier NP, Hilton Head, Chicago, and the Canadian Rockies, offers private mentoring . New online educational materials are coming soon!
Chasing Magic Coffee Table Book
The last year has been a time when our world explorations were cancelled and ‘social distancing’ ruled our physical interactions and connections with others. Disappointing in so many ways, and yet sometimes great things come out of adversity.
It all began with an idea…
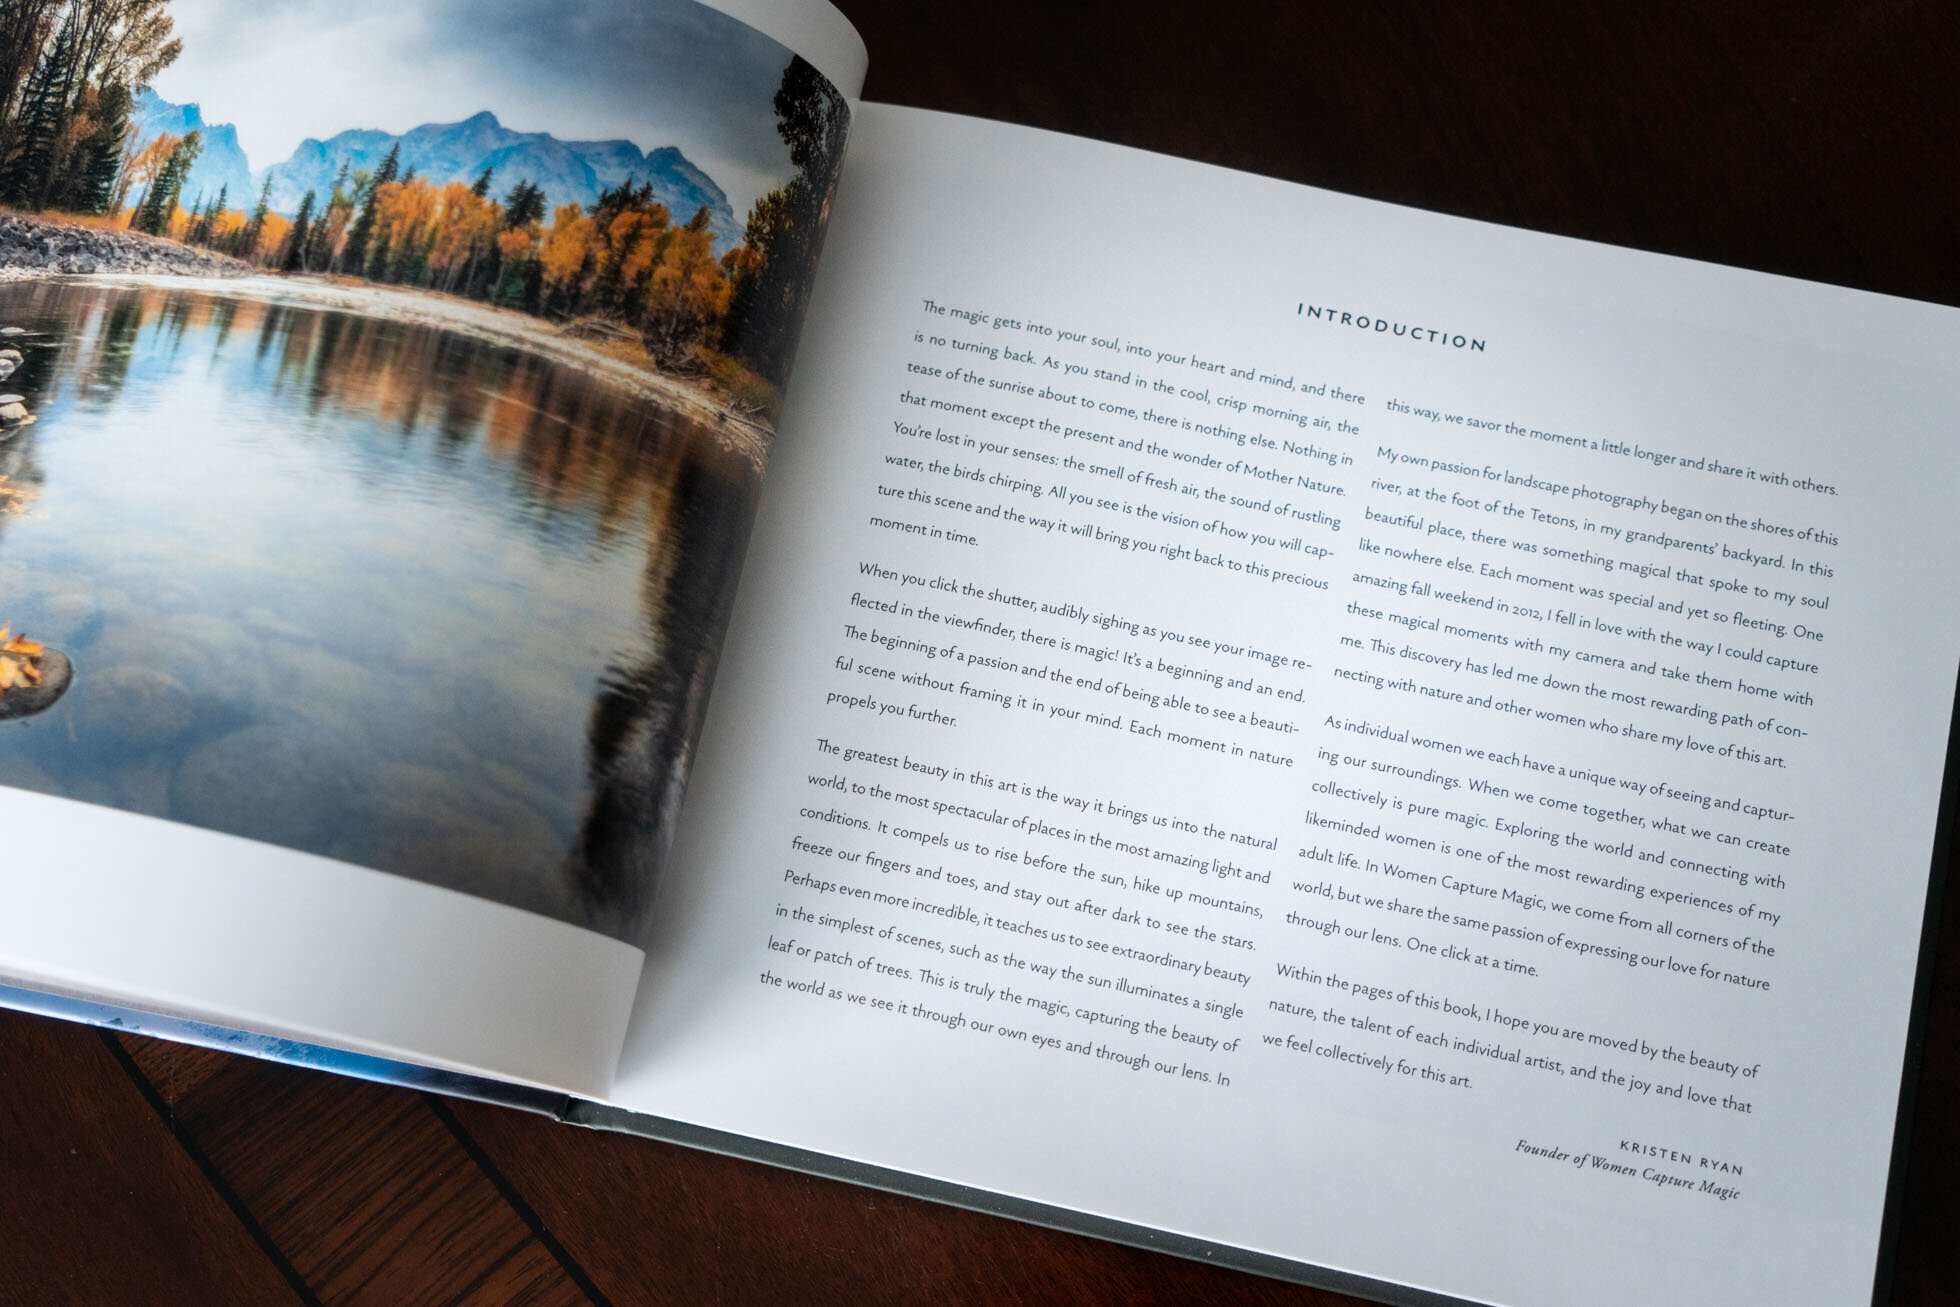
Two years ago, Amy Miller, a friend and alum of my workshop, The World Around You, came to me with an idea. She is not only a talented photographer but also a graphic designer with a growing interest in designing books. Amy was dreaming of a coffee table book that would celebrate the work of the female landscape and nature photographer. She envisioned us collaborating and launching the idea into our community of female nature photographers.
It felt like we must have been on the same wavelength because when she approached me, I had been lost in thought about ways to continue to nurture the photography and connection among the women in my community. I was looking for a way that we could celebrate each other’s art, share our knowledge and experiences, and foster connection. There is joy in the solo experience of photography but so much beauty in finding ways to collaborate and share with likeminded artists. Ideas of a collaborative website, blog, magazine, etc. were running through my head on a daily basis, but I hadn’t quite landed on anything yet.
Amy and I had a couple brainstorming sessions about the book and came up with some preliminary ideas and set the idea on the back burner to let our ideas ‘marinate’, if you will, and checked in with each other occasionally.
In the meantime, a friend introduced to me to a platform called ‘Mighty Networks’ and my vision of an online space for a female nature community was created in February 2020 with Women Capture Magic. The vision for this space was to be a place where female nature photographers could come together to share, learn, inspire and connect.
After the pandemic began in March 2020, the world felt heavy, exploration was no longer, and there was a yearning for social connection. Once again, Amy and I were on the same wavelength. Not even a week after I was thinking to myself that this would be a perfect time to launch the book project, I got a message from Amy saying we should revisit our brainstorming and move forward. This time, we finished our session with a very solid vision and we were on our way. The next step involved asking our talented friend, Megan Arndt, to join in the project. Megan was the perfect person to come into this idea in the formative stages, as we collectively narrowed and polished the vision for the themes of the book and how we wanted to approach collecting images, creating the book itself and eventually announcing it. It felt like the perfect time to bring together female artists from all over the world in a collaborative project that celebrates the way we see the world!
Women Capture Magic was the perfect place in which to launch the book. The community is filled with talented and inspiring female photographers who respectfully and kindly support and encourage one another. We could not have been more thrilled by the enthusiastic response from the community and blown away by the amazing images submitted for consideration.
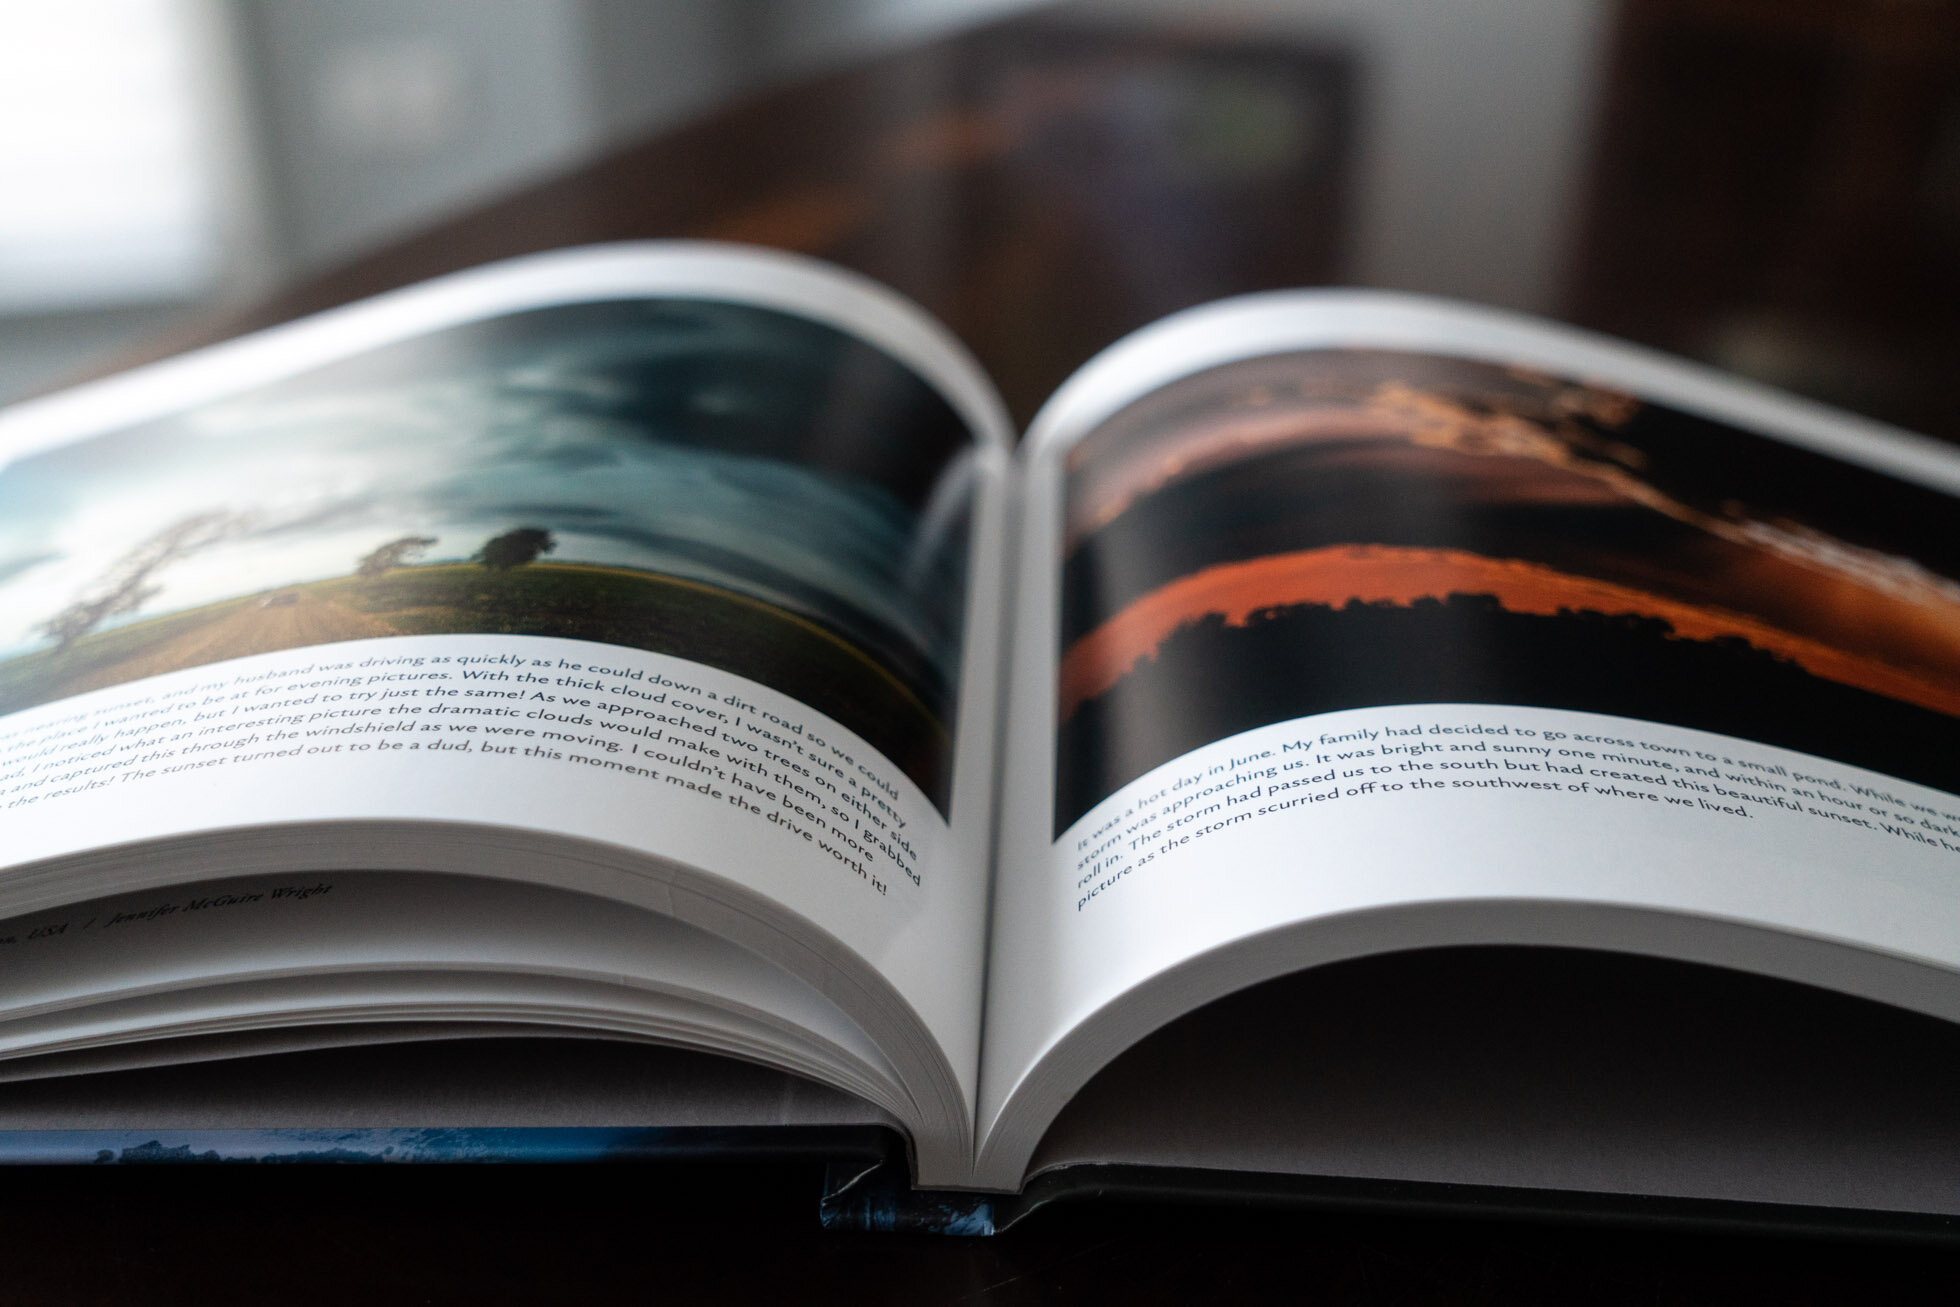
The Chasing Magic coffee table book is collaboration of 136 female photographers with images falling into 10 themes: Vast, In Motion, Intimate, Signs of the Season, Let’s Adventure, Dramatic, Into the Woods, Wild, Seeking Serenity, and After Dark. Each chapter is introduced with the words of one of the artists included in that theme. Each image is showcased on its own page and a selection of images within each theme share a “Behind the Shot” story of the image.
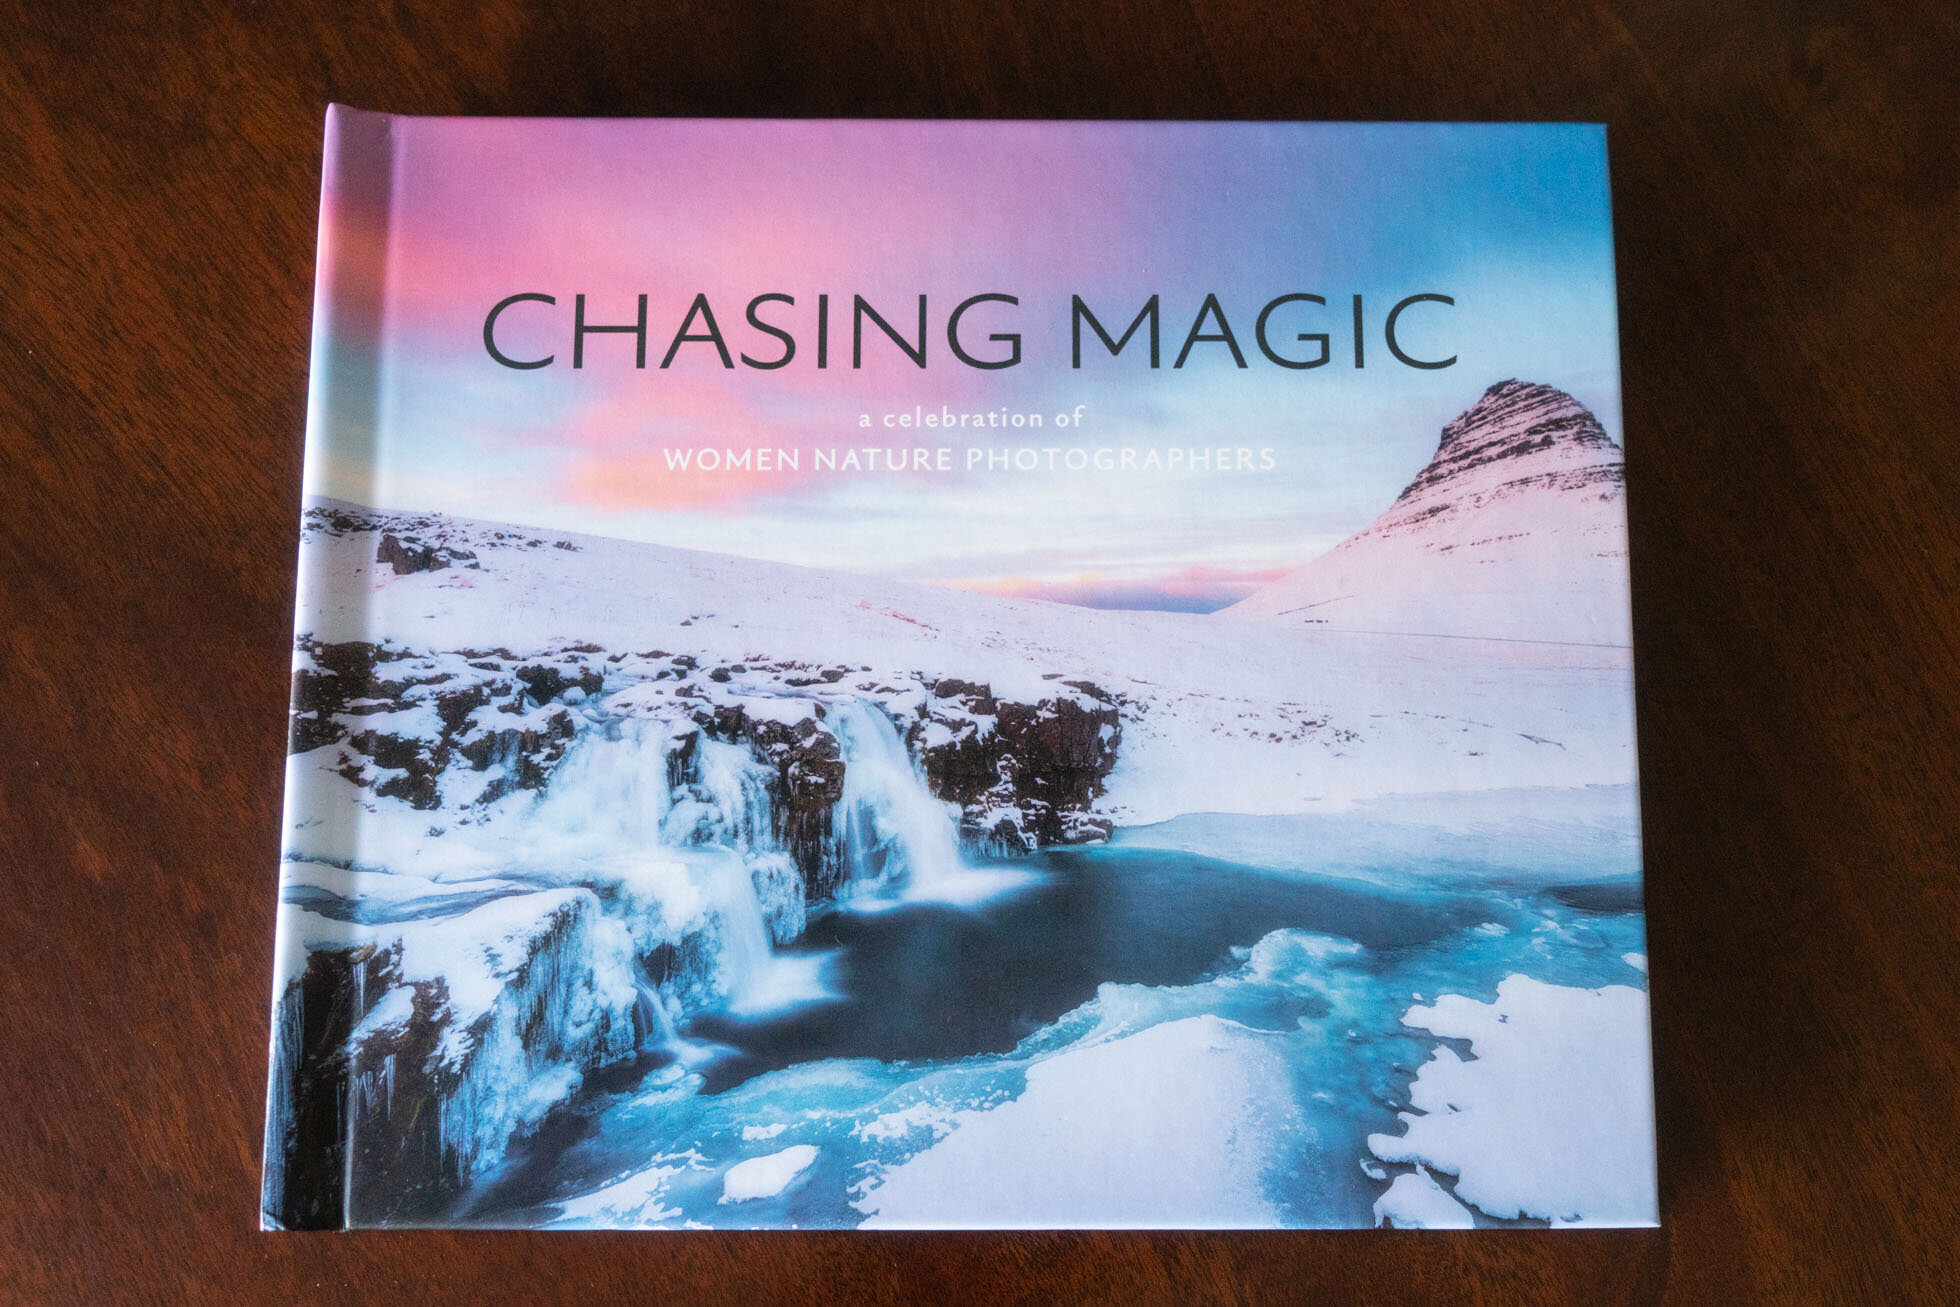
8 x 10 Hardcover book. 180 pages containing the art of 136 photographers around the world!
Amy and Megan were a dream to work with and we learned a tremendous amount about the process of putting a project like this together. The layout was beautifully designed by Amy and the final book exceeds all our expectations!
I am so happy to share a few images of the book and its contents but have to tell you my product imagery does NOT do it justice!

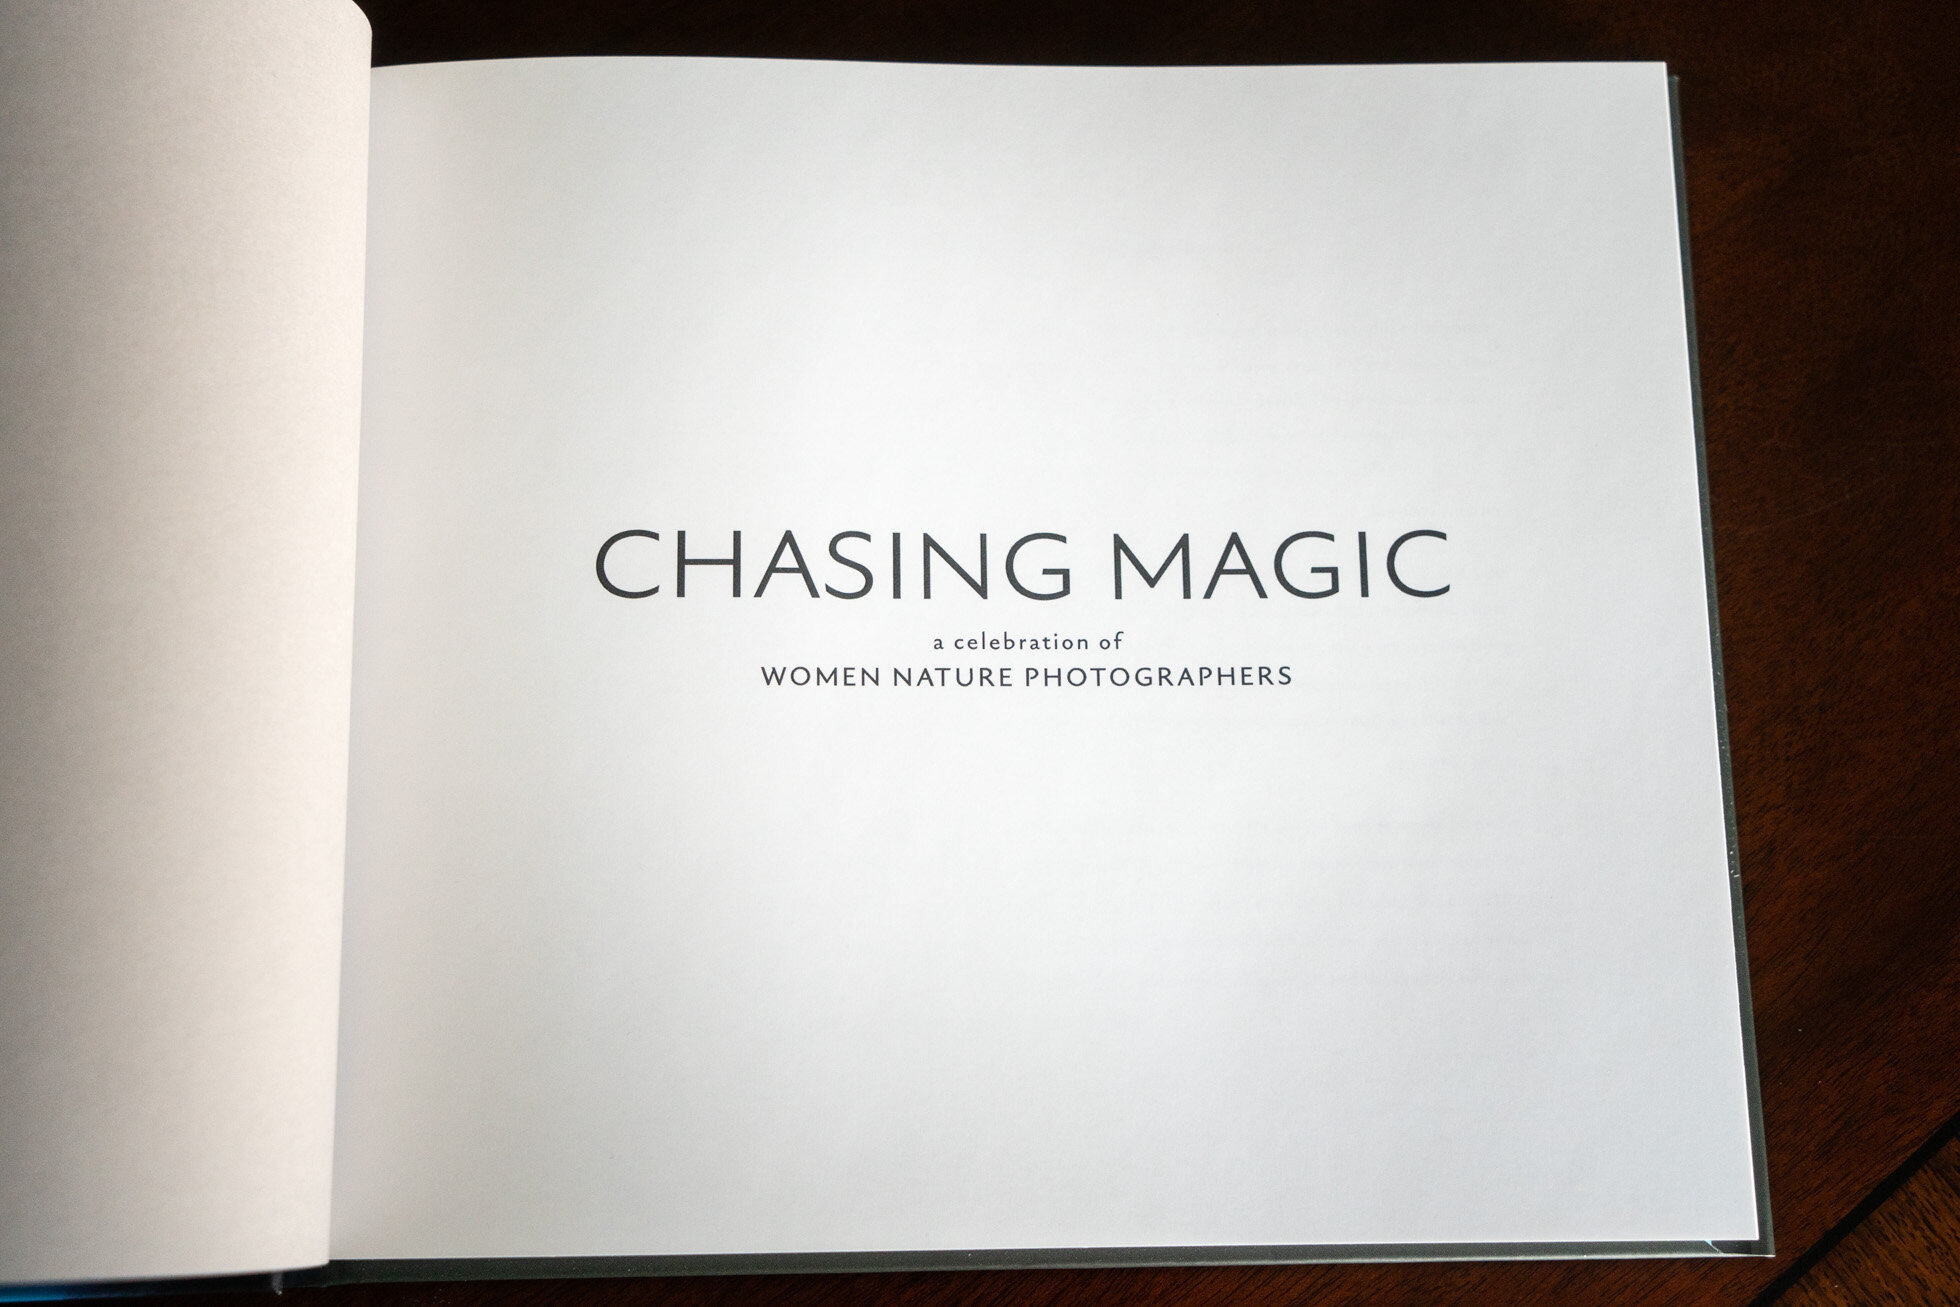


The book is available for sale in the Blurb Bookstore and a quick search of ‘Chasing Magic’ will bring up all 3 available versions of the book: our feature Hardcover Coffee Table book, a Softcover book and a luxury version printed on Pearl Paper.
Chasing Magic Hardcover features an Imagewrap cover with a durable matte finish and premium 100# lustre paper inside. See more of the Classic Hardcover Version Here.
Chasing Magic Softcover features a flexible, glossy cover and premium 100# lustre paper on the inside.
Find the Softcover Version Here
Chasing Magic Luxury features an Imagewrap cover with a durable matte finish and high-end 140# pearl photo paper inside. View the Luxury Version Here.
Special Note: Blurb frequently offers coupon codes for discounts in their bookstore.You can sign up on Blurb so you don’t miss these announcements if you are interested in saving on your purchase. Who doesn’t love a good promo code?!

Kristen Ryan is an award winning and published landscape photographer and educator residing in the Midwest suburbs of Chicago. All images are available for purchase in the Fine Art Store or by request. Kristen leads ladies landscape photography retreats in the Tetons, Chicago, and the Canadian Rockies, offers private mentoring and teaches an online landscape photography workshop, The World Around You.
The next run of The World Around You begins April 19th and is open for registration!

8 of my Favorite Things for my Photography
With the holidays coming up, I thought I’d take a few moments to share some of my favorite things that make my photography more successful and enjoyable! Perhaps one of these items will be a great addition to your wish list or a great gift for a loved one who is a photographer.
1) Sigma 150-600 f/5-6.3 DG OS HSM | Contemporary Lens - If you have read about my favorite lenses for landscape photography, you know that I use focal lengths from ultra wide to telephoto. When I began shooting landscapes, I was so drawn to dramatic skies and vast scenes that my wide angle lens was the one I reached for most. Several years ago, I purchased this telephoto lens, largely for wildlife and some of my kids’ sports. Gradually I also started using it for landscape photography and the more I used it, the more I reached for it. This lens lives on my Nikon Z6 most of the time and many of my favorite landscapes are captured with this combo. I love the way I can zoom into far off details and isolate small scenes that capture my eye. It is definitely my go to lens for photographing intimate landscapes and I used it to capture many of my favorite images this year.

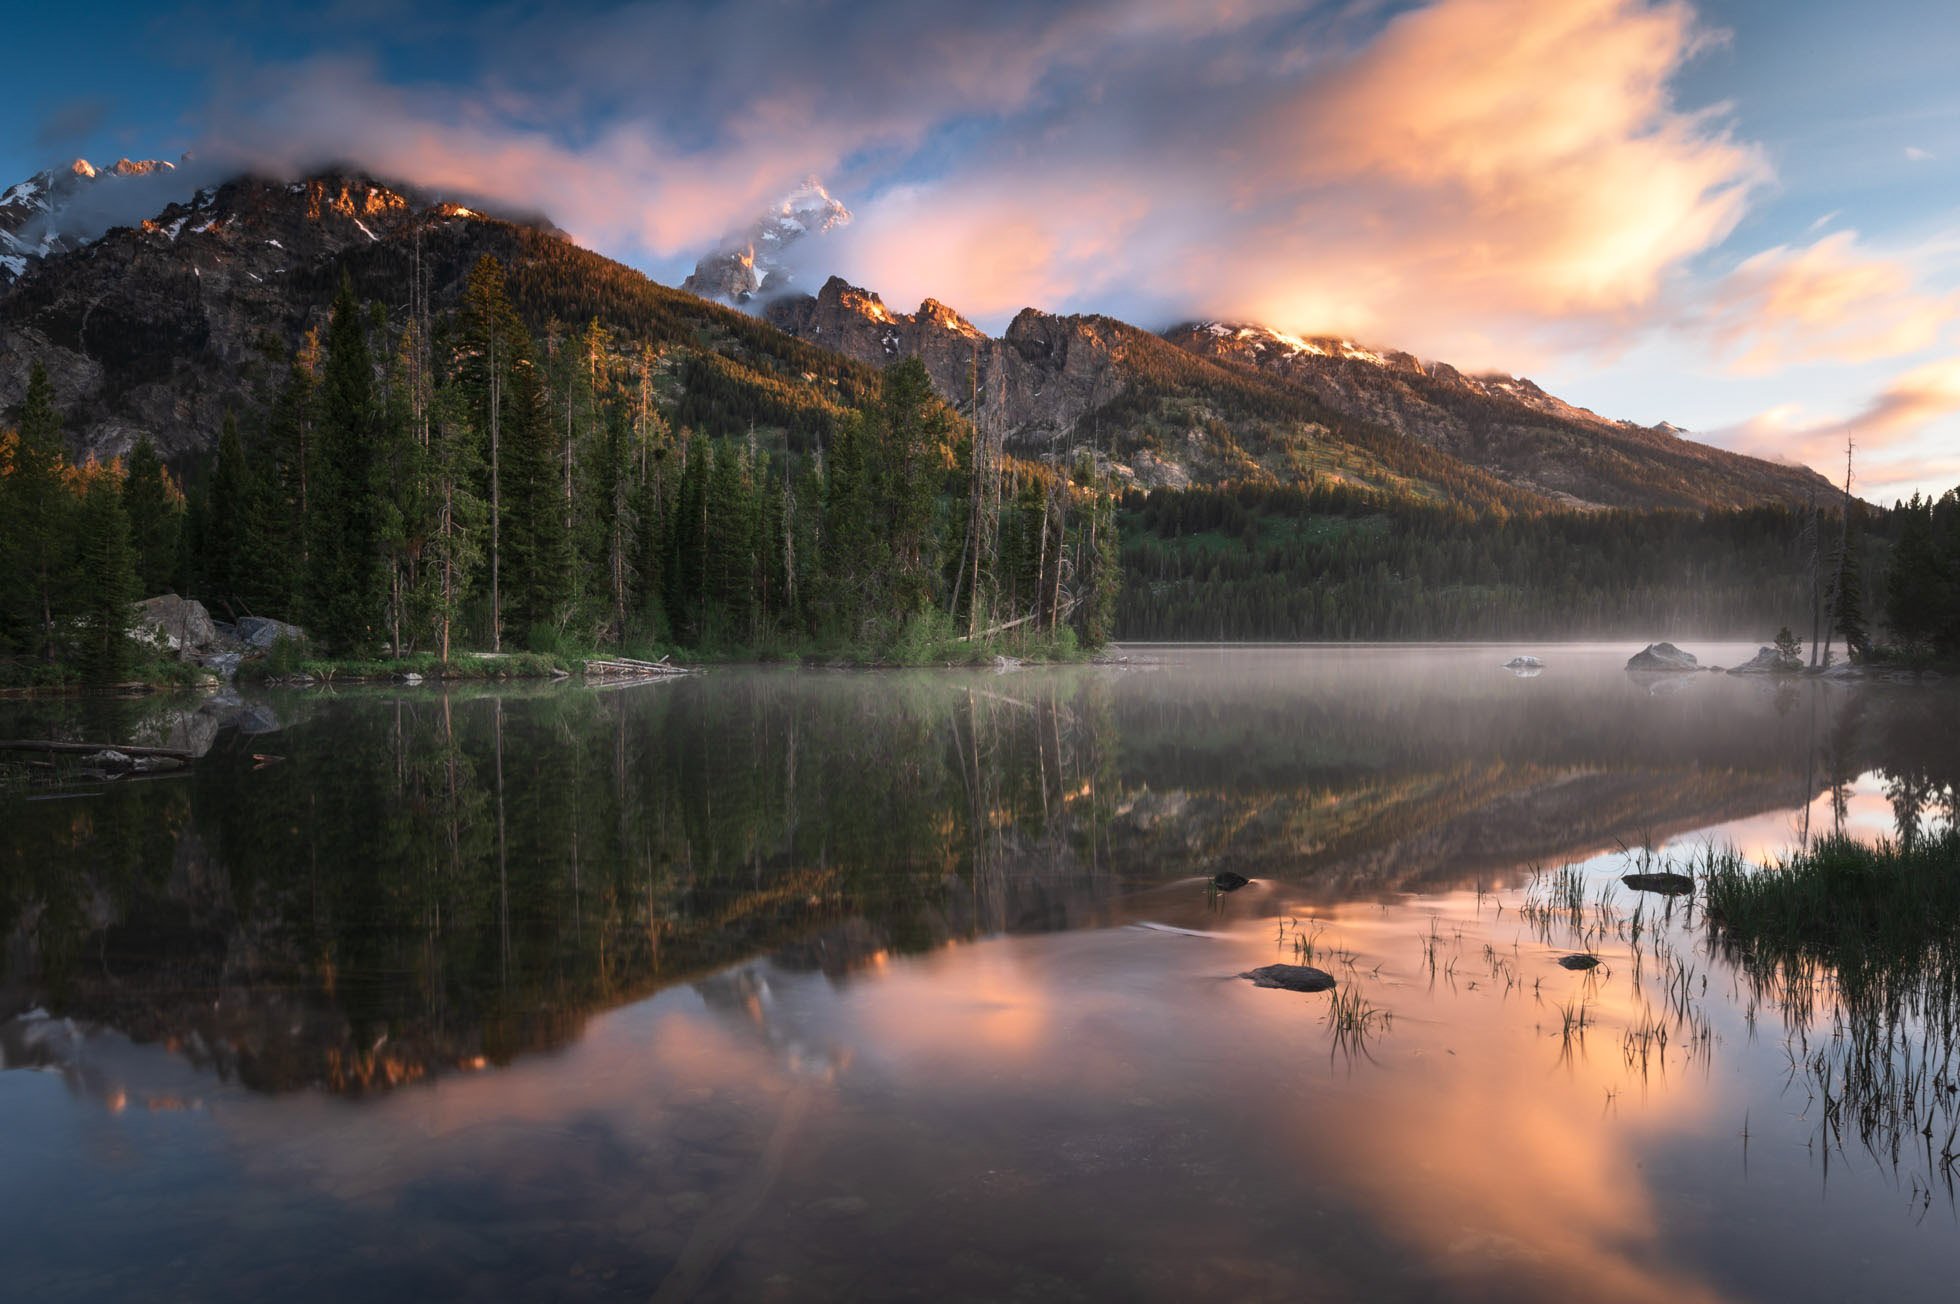
Light & clouds over the Tetons with the Sigma 150-600

Distant road in the Great Smoky Mountains at 600mm with the Sigma 150-600
2) Peak Design Carbon Fiber Travel Tripod - I received this tripod in the spring of this past year and I absolutely love it! I have used many tripods in my years of shooting landscapes and I have to say that this is one is my favorite for its size and ease of use. This tripod is light and compact for travel and hiking. The flip legs are simple to open and close for quick and easy set up or adjustment. It is sturdy for my heavy Nikon D850 and large lens. Putting the camera on this tripod head is the absolute easiest I have experienced. Additionally, adjusting the camera on this head is smooth and simple. This makes all set up and shooting easier but especially in low light and night. As a lover of long exposure photography, a sturdy tripod is essential to my work.

Long Exposure at Colter Bay, Grand Teton National Park with the Peak Design Travel Tripod
3) L Bracket - I have L Brackets on all my camera bodies and it is a true game changer. This makes shooting horizontally and vertically simple and no need to get multiple tripod plates for more than one camera either. I can’t believe I didn’t install these on my camera bodies earlier in my career. It has been so helpful in allowing me to capture vertical long exposures. (Note: The Kirk L Bracket is the one I have on both my Nikon D850 and Z6 but there are other brands you can explore)
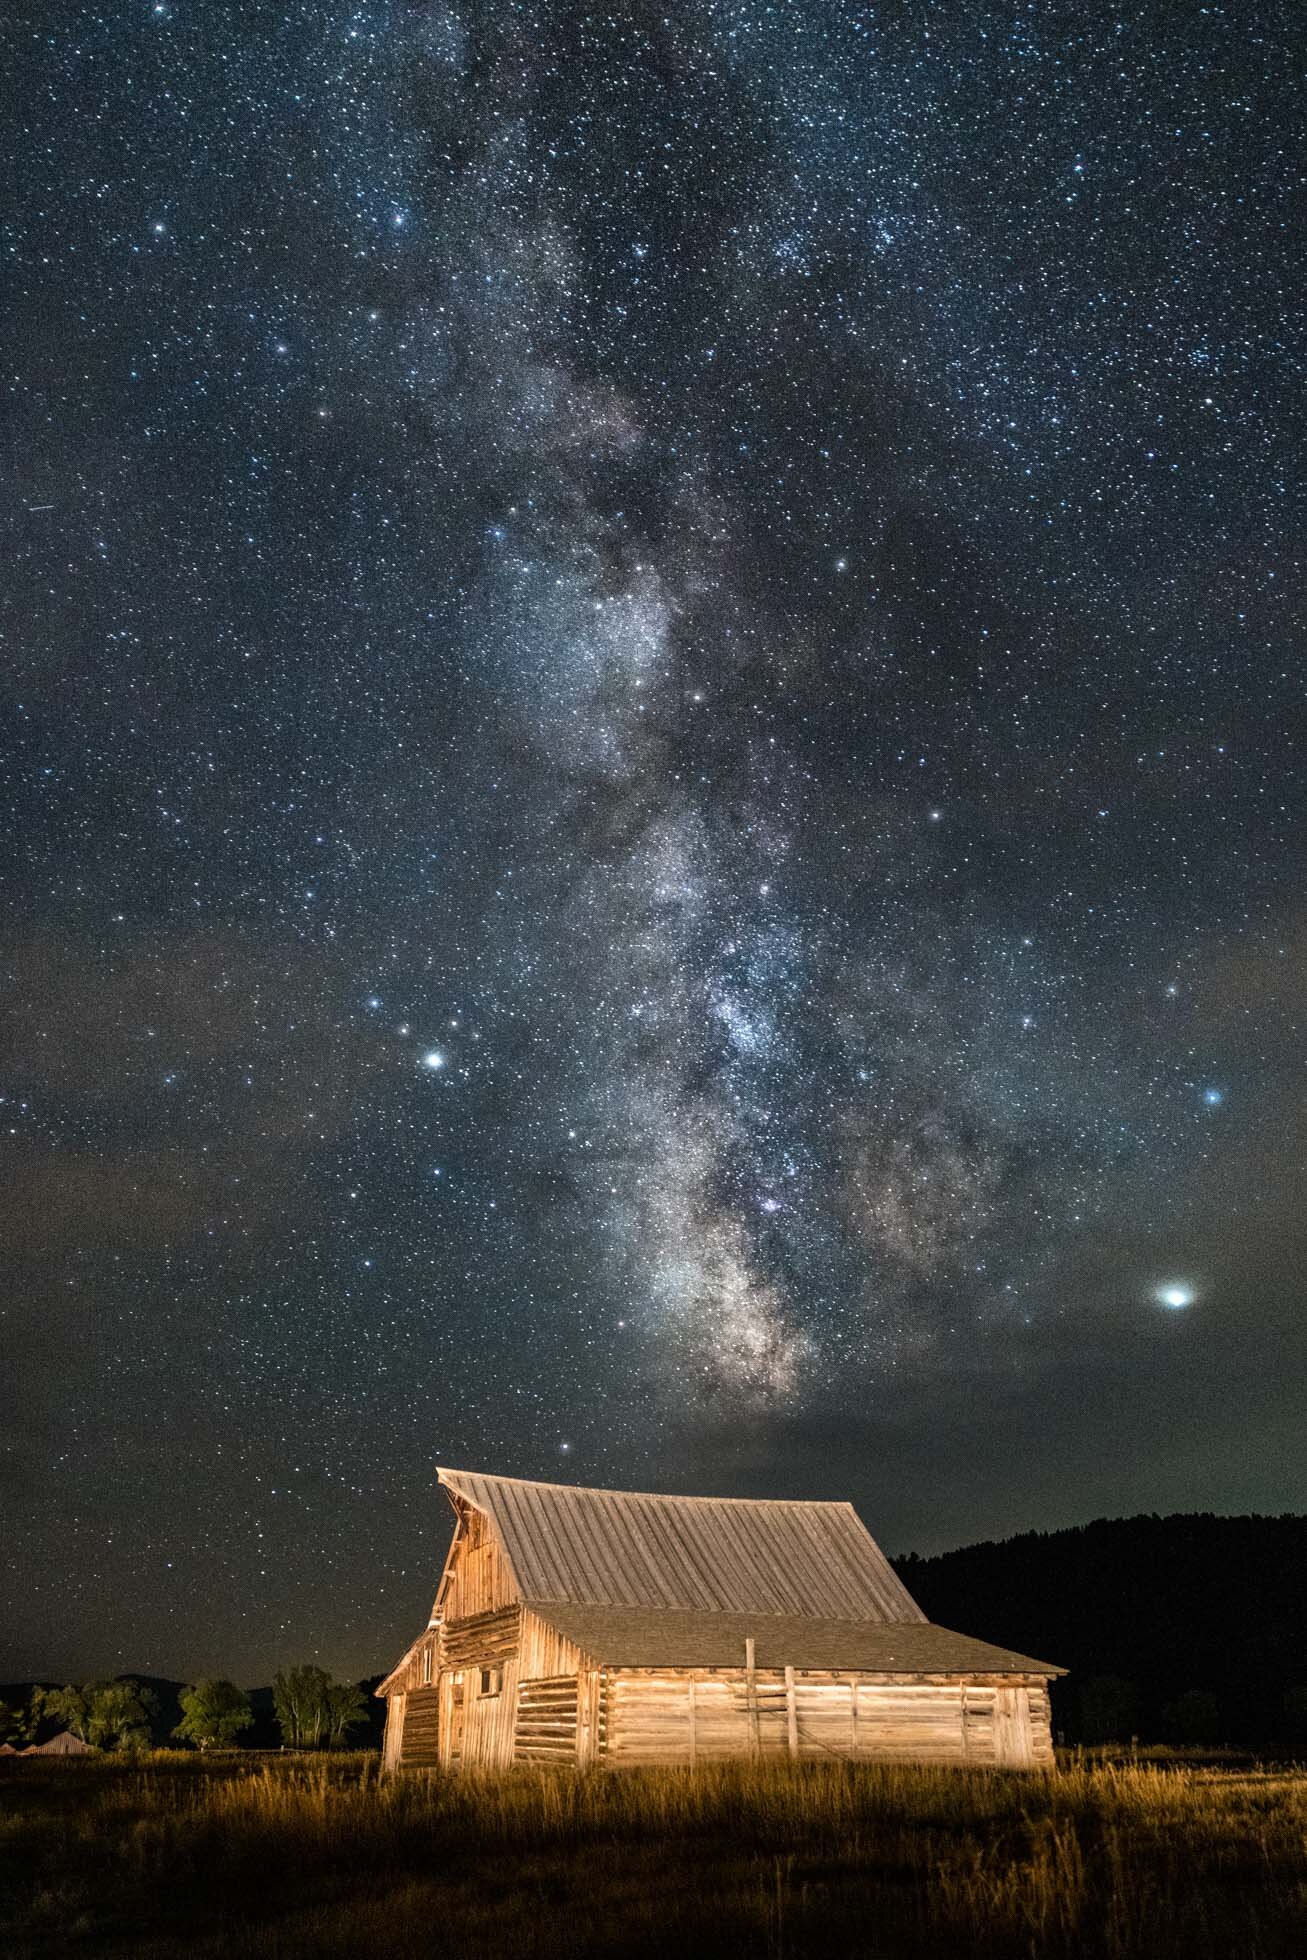
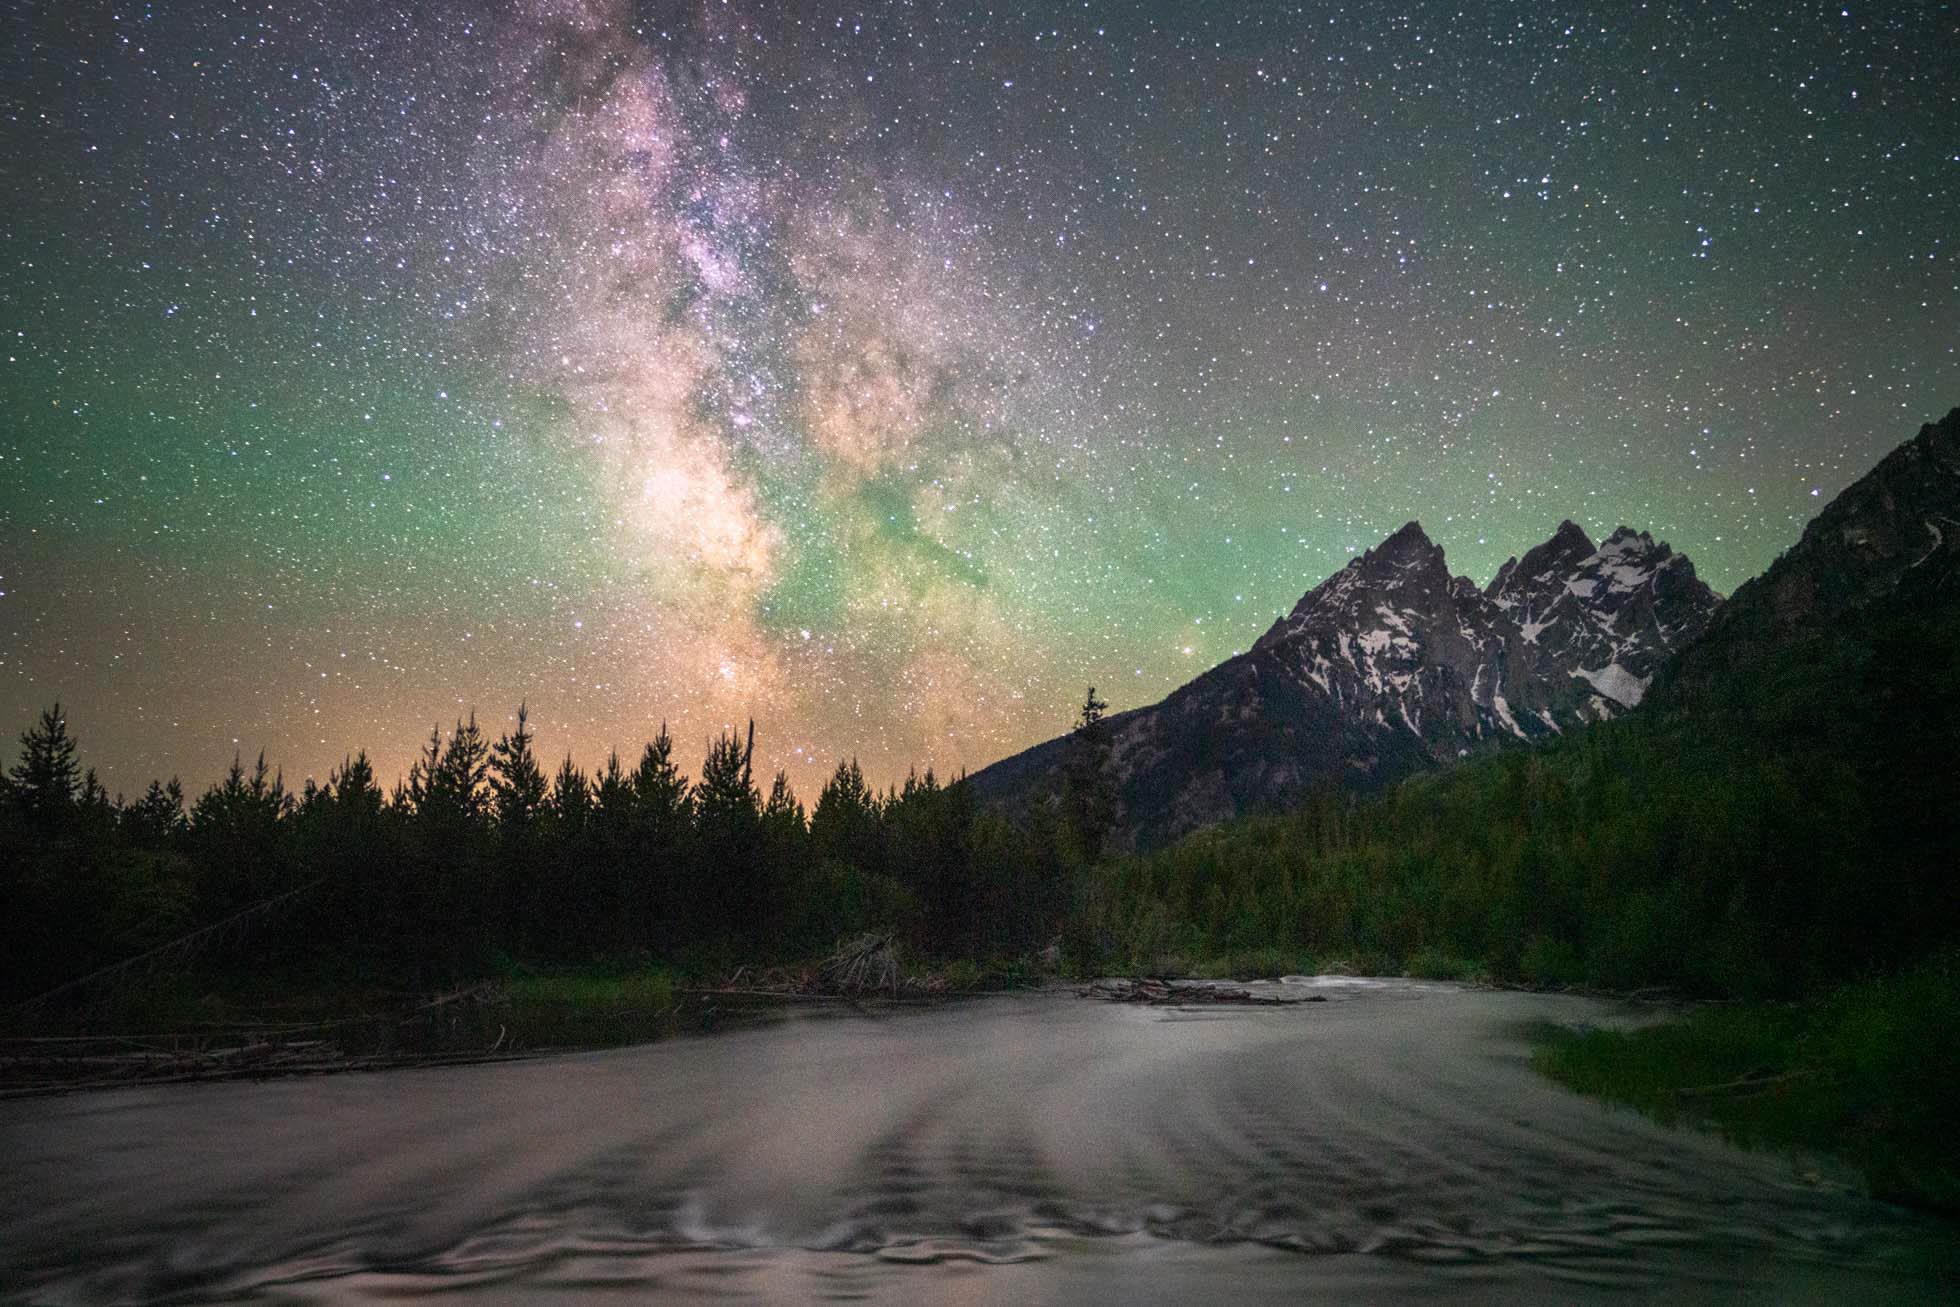
Vertical Milky Way capture over Moulton Barn in Grand Teton National park with my L Bracket
4) Zojirushi Thermos - While not photography gear, this thermos is a go-to for me in all my photography outings. It will keep my coffee hot for hours as I head out for sunrise. While they come in multiple sizes, the 20 oz thermos is perfect to keep me going for a long time. One of the best things about this thermos is the lock on the top. When it is locked, there is absolutely no leak which makes it perfect when I am carrying it with my camera gear or in a carryon with my laptop when I travel. (Just make sure the parts of the top are intact as if they are not, then it does leak!) Sometimes I even have two of these with me - one with coffee and one with ice water as it will keep your ice intact for a crazy long time as well! Each member of my family has one of these for our travels & hiking adventures. (Note: Link takes you to red thermos but various colors are available)
5) Breakthrough Photography Filters - Whether a polarizer or neutral density filter, Breakthrough Photography is my go to brand for my filters. I always carry a polarizer, 6 stop ND filter, 10 stop ND filter and 15 stop ND filter in my bag. I also love the X4 Dark Circular Polarizer for photographing waterfalls and other water scenes. When photographing water and clouds, my favorite thing is to shoot long exposures of various lengths and these filters make it possible. (Note: Link here is my affiliate link. If you choose to use it to order, thank you!)

Long exposure using a Breakthrough Photography 6 stop ND filter to smooth the water just a little
6) Heat Company Gloves - These gloves save my fingers when I am shooting in the cold winter weather. In truth, they make it possible for me to shoot in the frigid temperatures. I purchased these before my winter trip to the Tetons in 2016 and I discovered I could shoot for hours without my fingers getting frozen and numb as they always had before. These have thin tight linings for your fingers so you can easily maneuver your camera and then have a warm insulated mitten to cover your fingers. There is even a pocket to put hand warmers in. These are absolutely worth the investment if you want to capture those beautiful winter landscapes without frigid fingers. (Note: link goes to just one of various sizes on B&H photo’s website. Various sizes available)

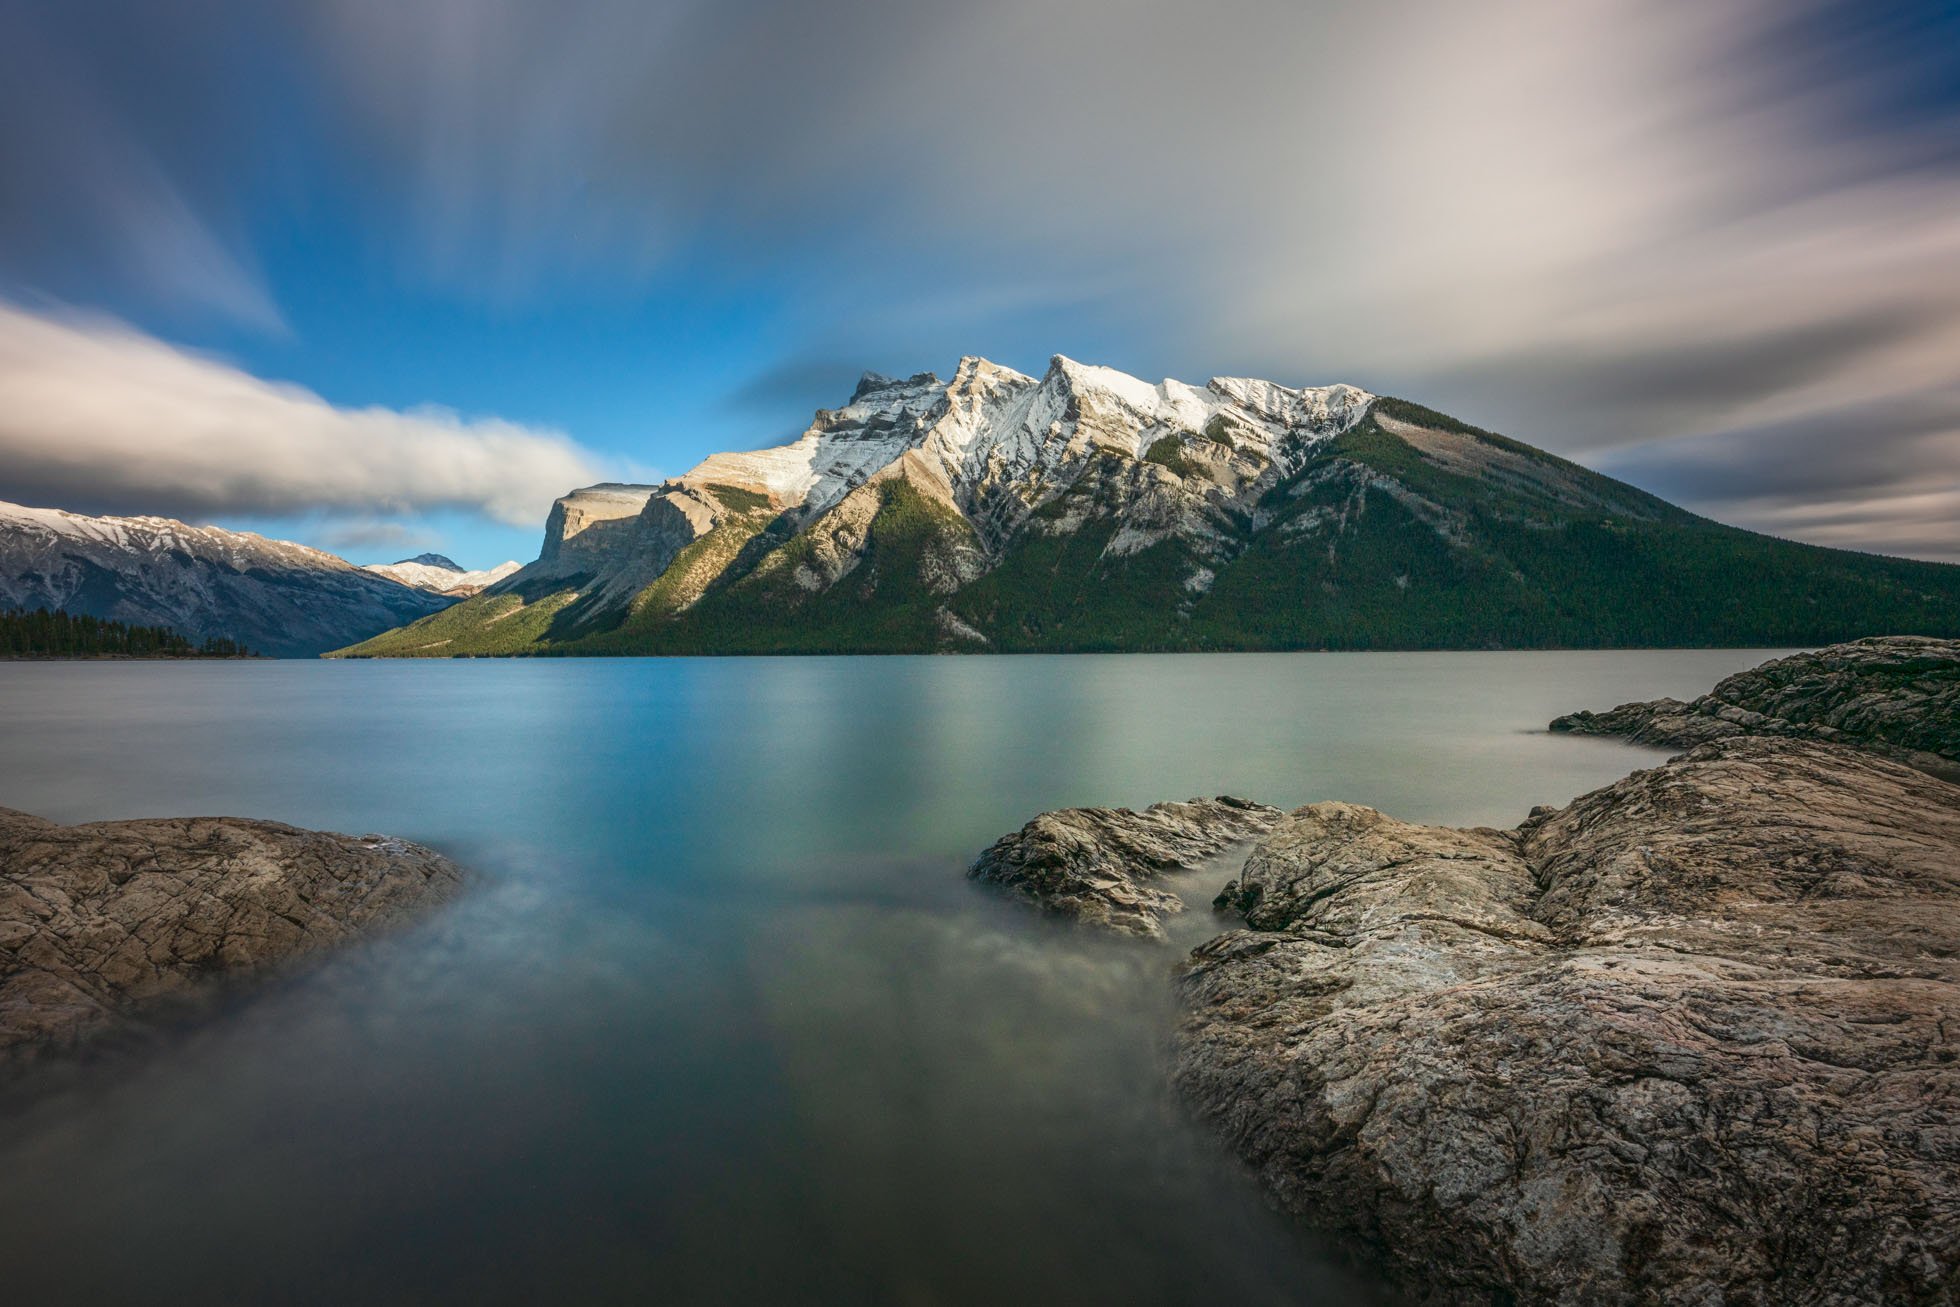
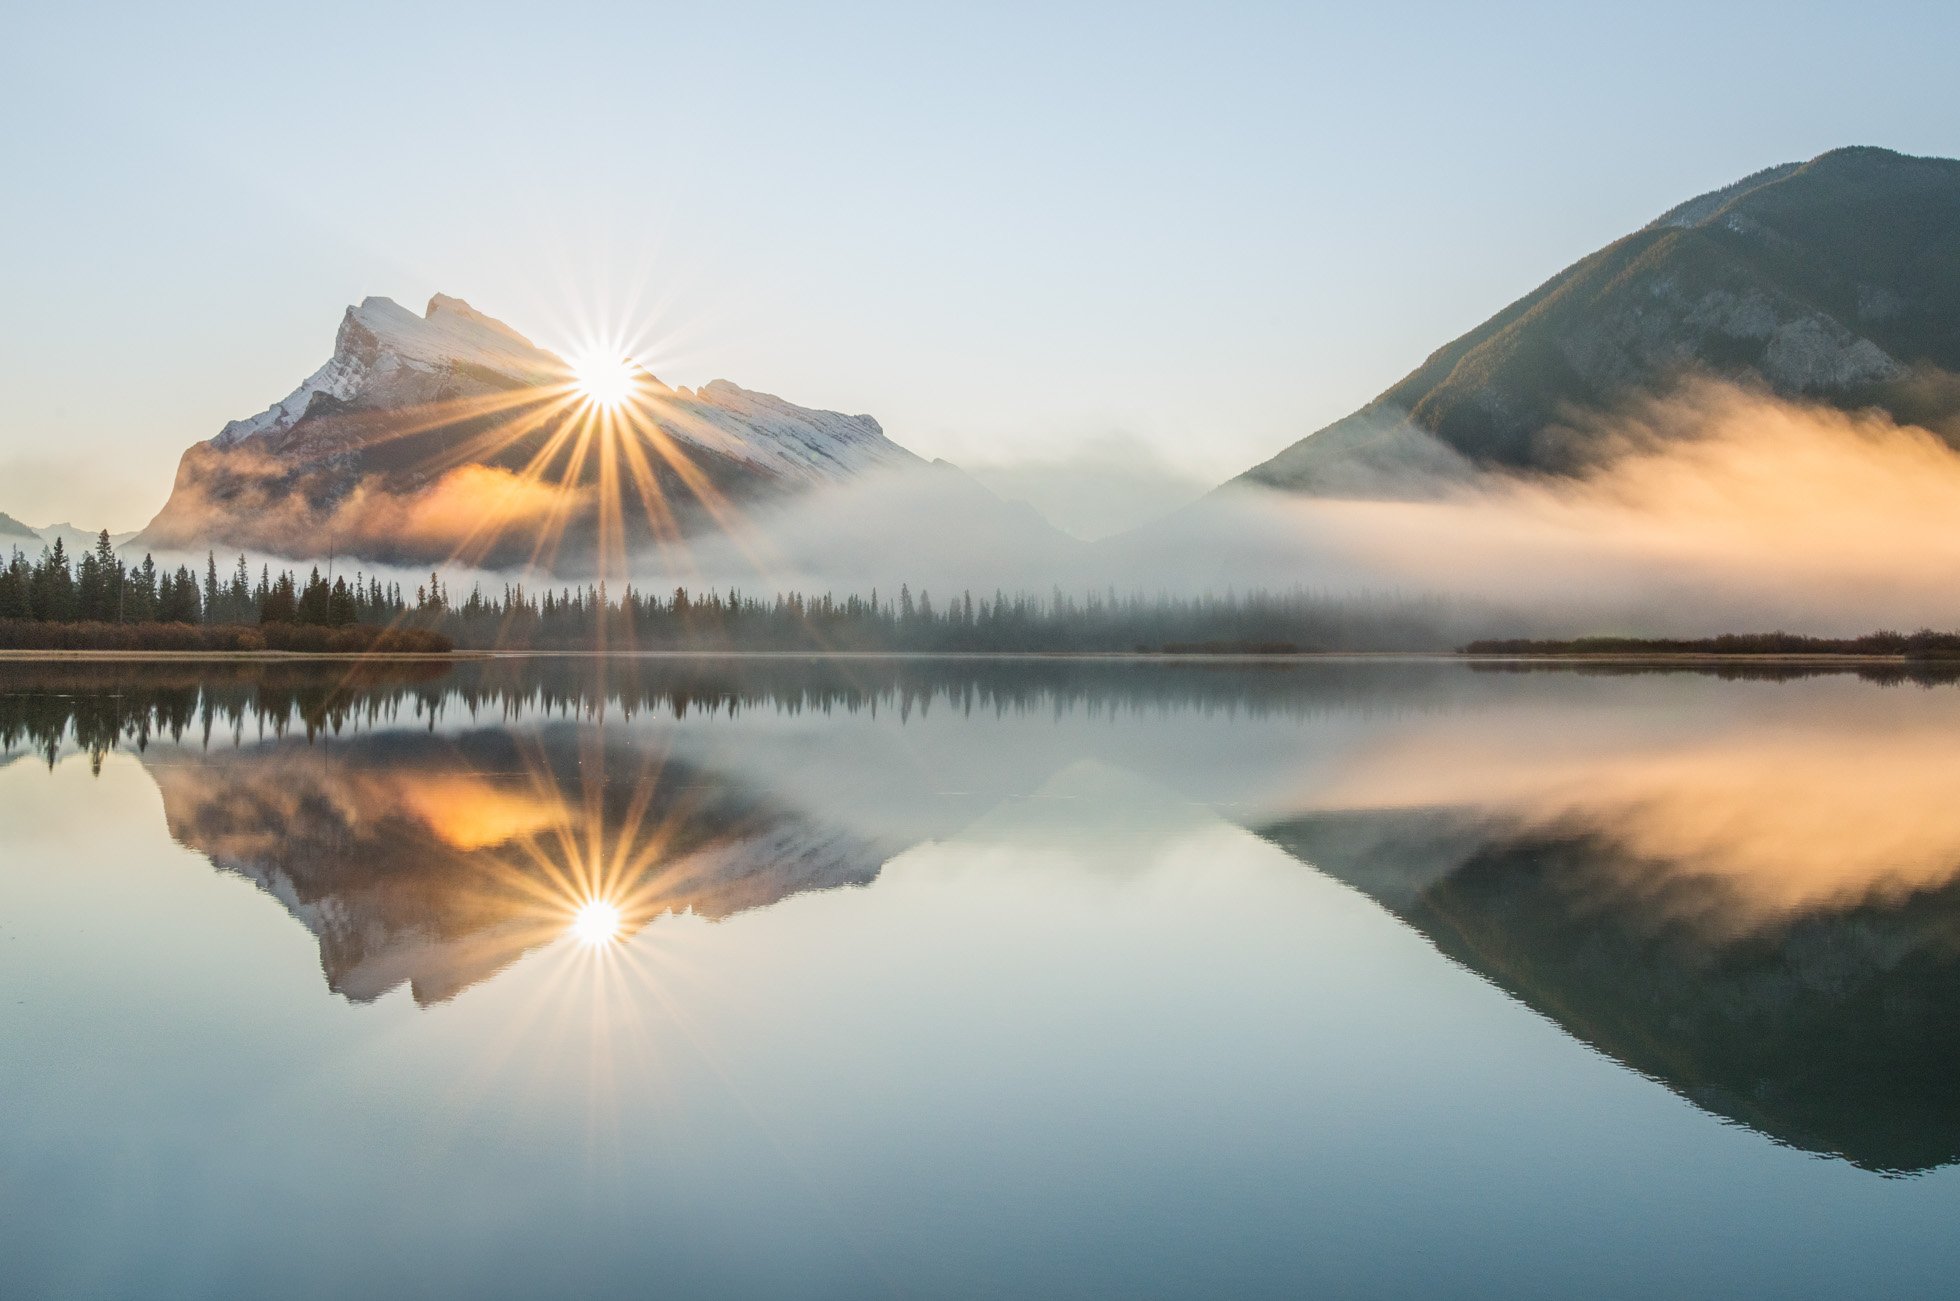
Misty sunrise at Vermilion Lakes in Banff National Park in negative temperatures. Thank good for my Heat Company gloves.
7) Lensbaby Velvet 56 - My Lensbaby Velvet 56 is a go to lens for me when shooting macro and small scenes. I love the creative blur and dreaminess it creates. It always leaves me feeling inspired and it sparks my creativity. When I shoot with this lens I am drawn into how I feel rather than worrying about technical execution. I also love this lens for seascapes and forest scenes.
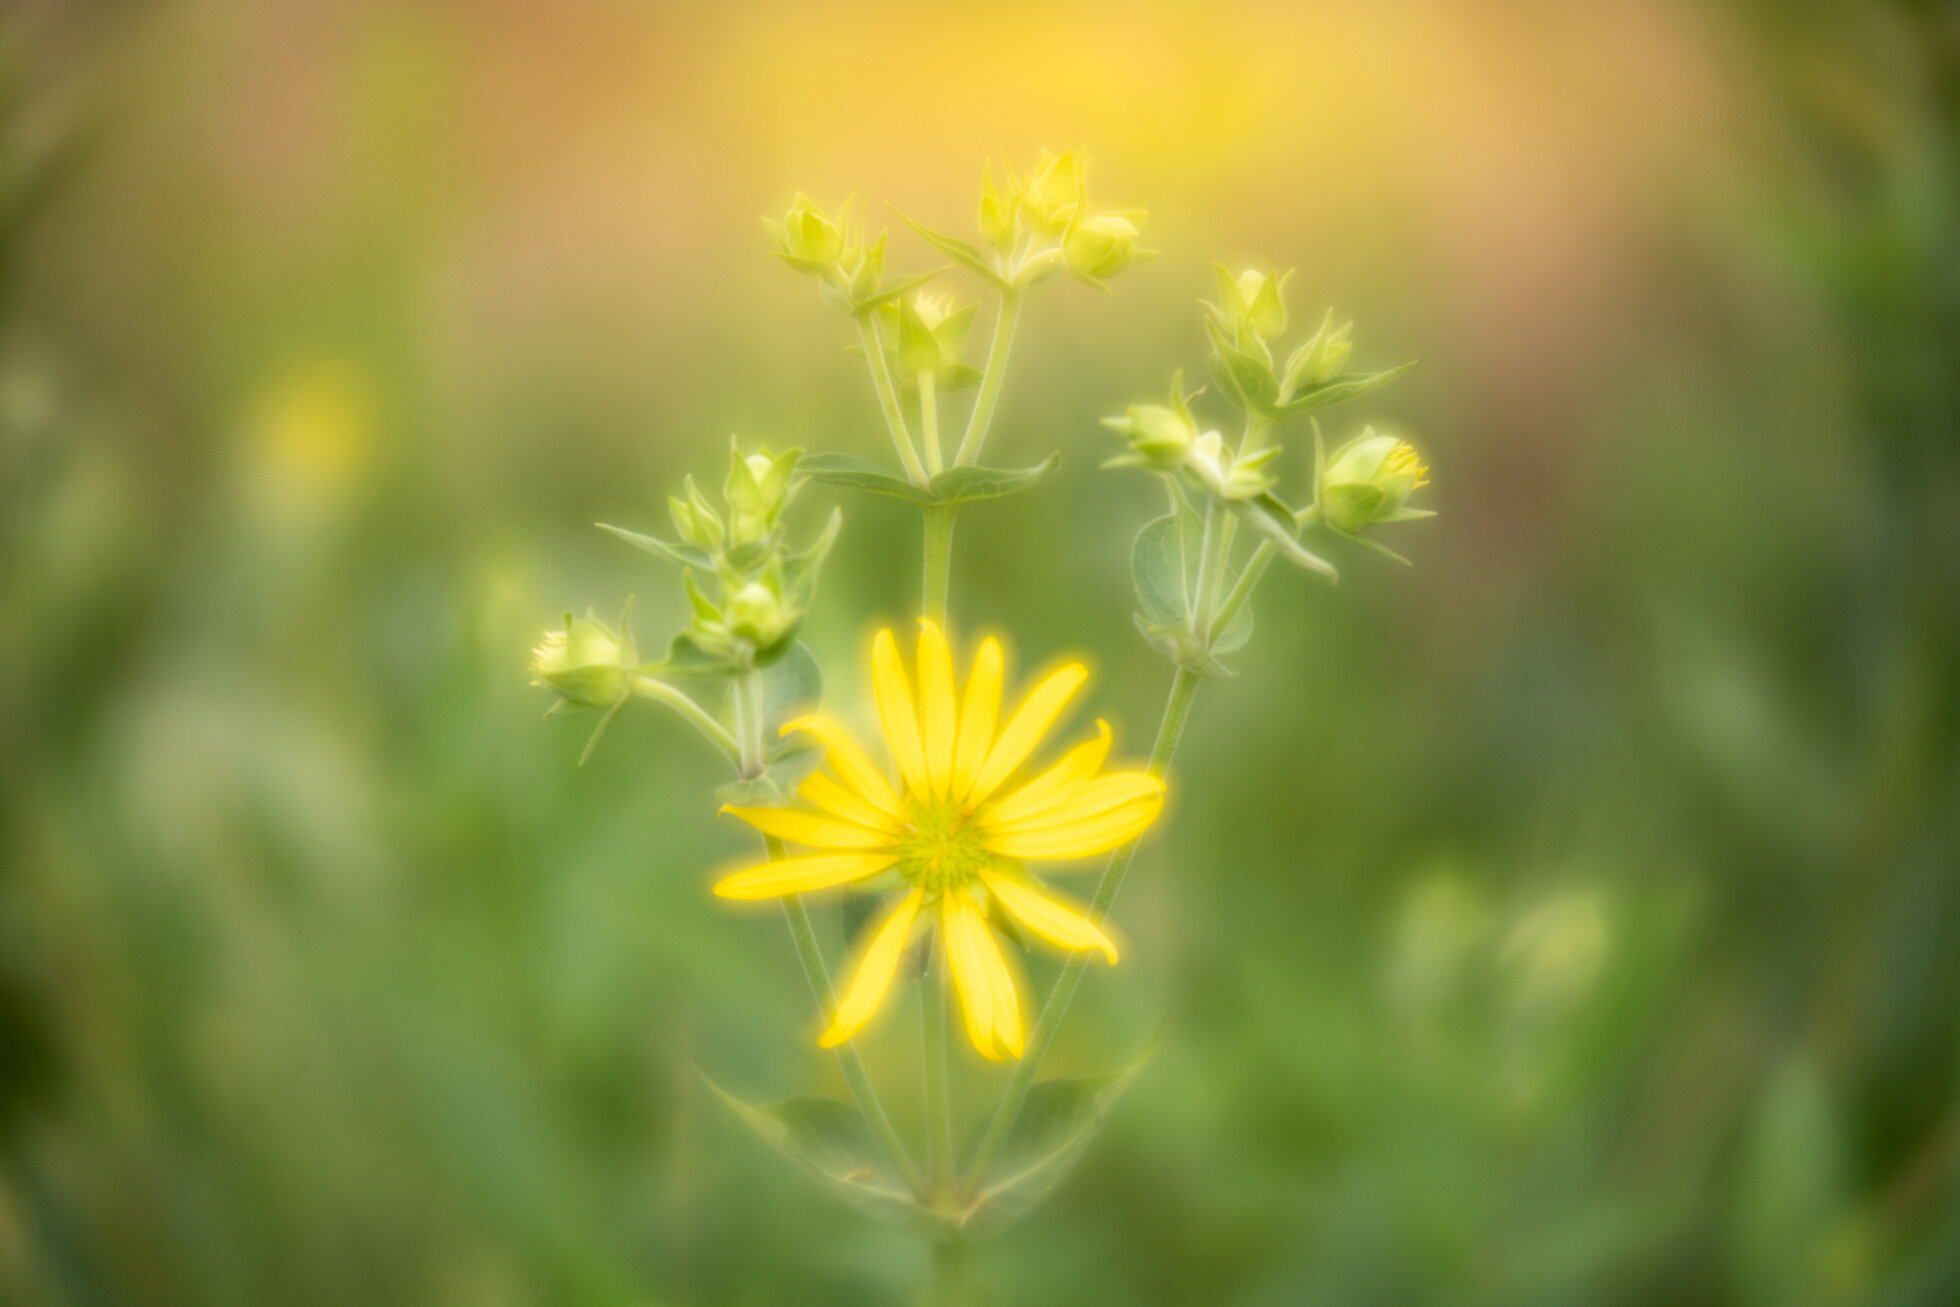
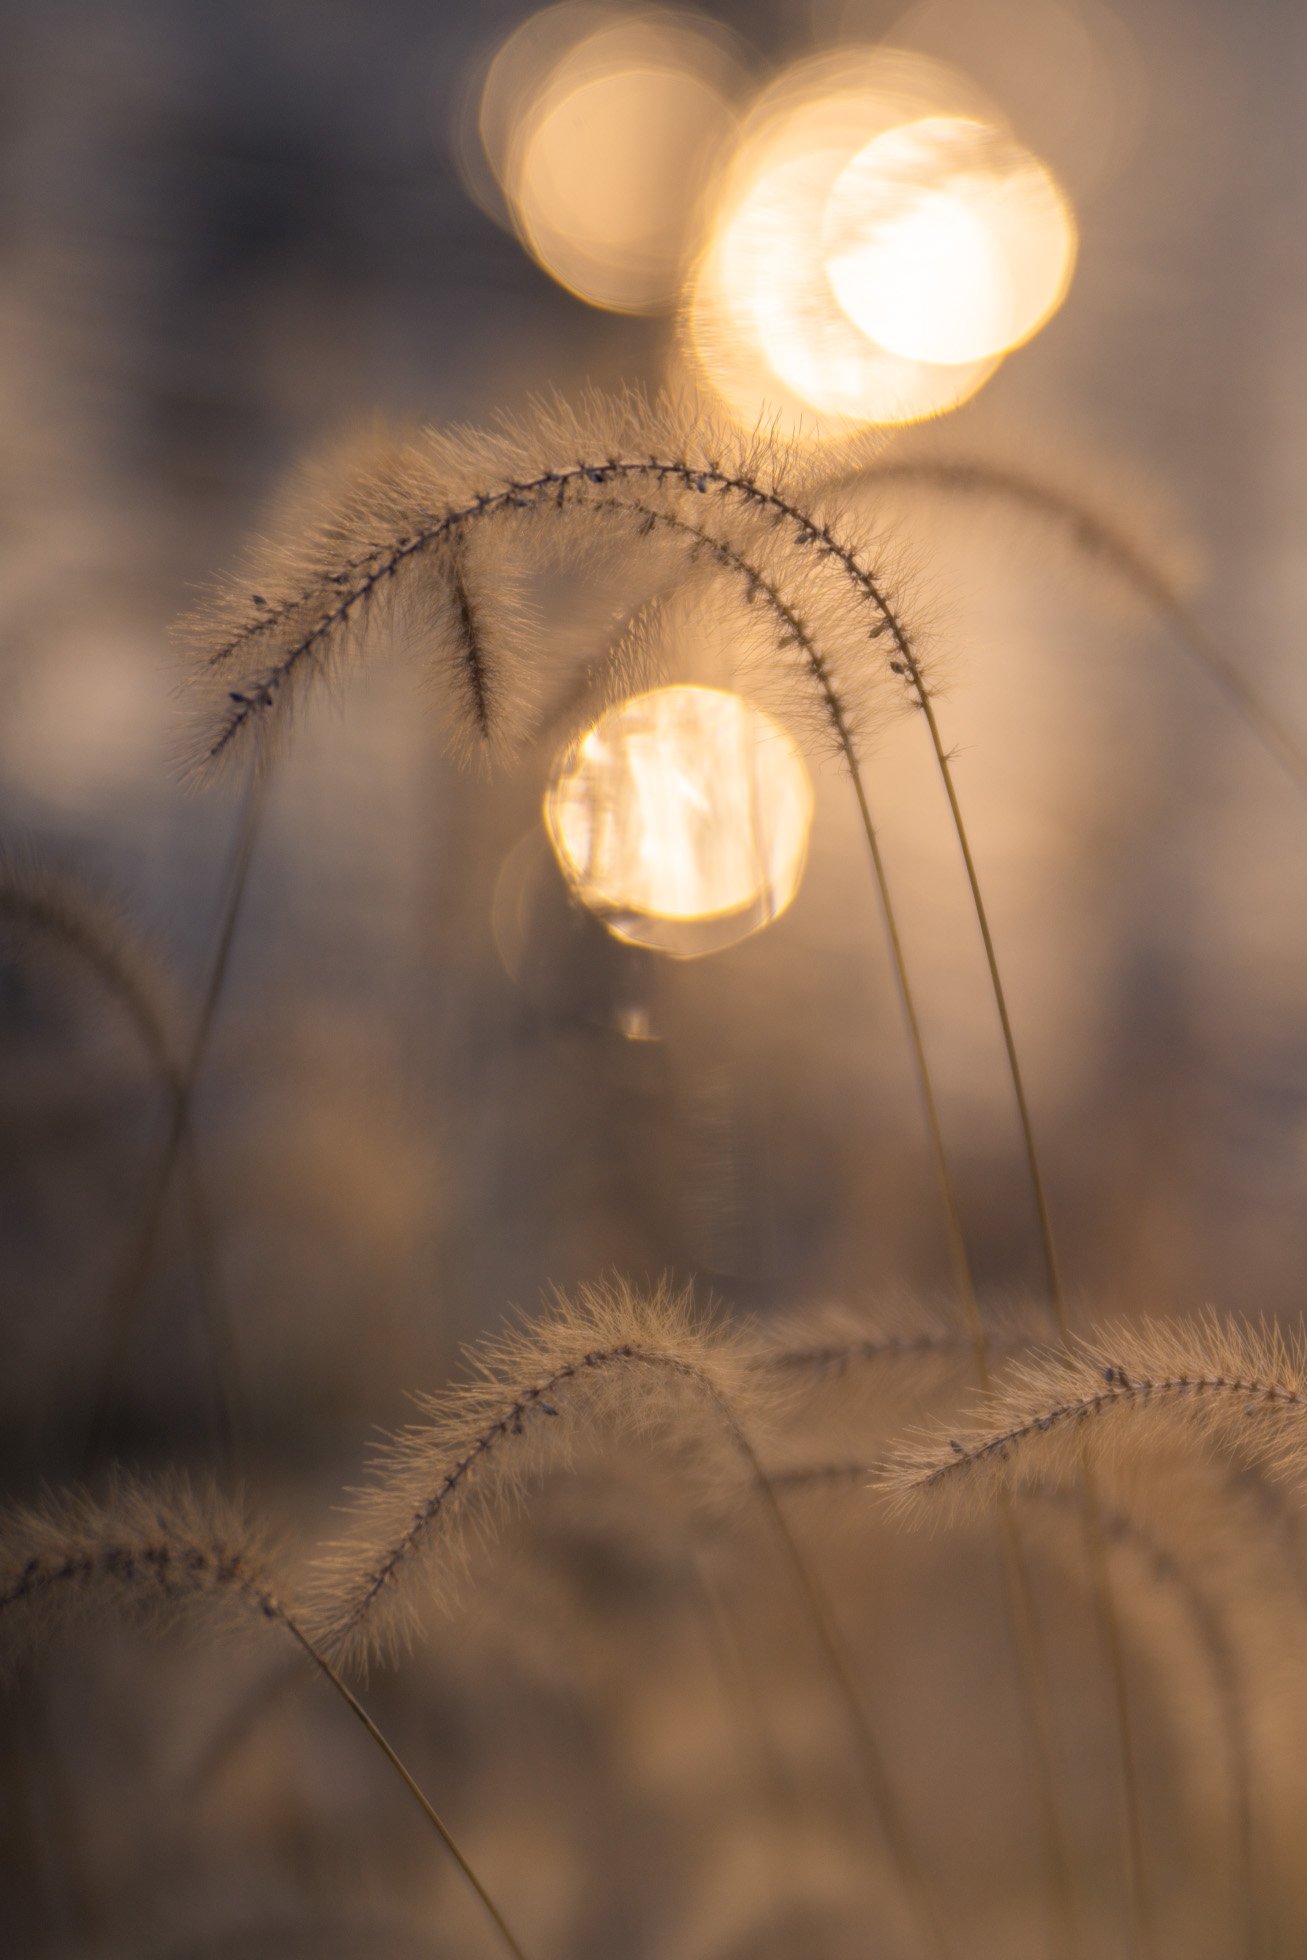
A flower by my pond with the Lensbaby Velvet 56

A gorgeous Turks & Caicos beach with the Lensbaby Velvet 56
8) Icebreaker Merino Wool Hoodie - As I began to do more winter shooting, I started looking for some nice warm clothing to layer under my puffy winter coat. I came across this hoodie and fell in love. It is so versatile. It is perfect to put over a base layer and thin enough to wear it under a fleece and outer winter coat. It is quite warm on its on as well and I love to wear it as an outer layer on a temperate spring or fall day. The pockets are zippered making it easy to stash keys or a phone in a pocket without worry of losing them. (Note: my first hoodie was the original Quantum hoodie though they seem to be harder to find now and this is the new one I just ordered. It’s not cheap but I love it that much!)
Thanks for reading! If you have any questions about my favorite things, don’t hesitate to reach out! Happy Shooting!
Kristen Ryan is an award winning and published landscape and fine art photographer and educator residing in the Midwest suburbs of Chicago. All images are available for purchase in the Fine Art Store or by request. Kristen leads ladies landscape photography retreats in the Tetons, Chicago, and the Canadian Rockies, offers private mentoring and teaches an online landscape photography workshop, The World Around You.

8 Tips for Capturing Fall Colors
Autumn is here and it is a glorious season! I wanted to share some tips for capturing all things fall. With its crisp air and golden foliage, autumn is the perfect time to get out on the trails or take a drive through nature with your camera. The light and colors of fall offer so many opportunities regardless of weather. Here are some technical and creative tips to consider while you capture the season.
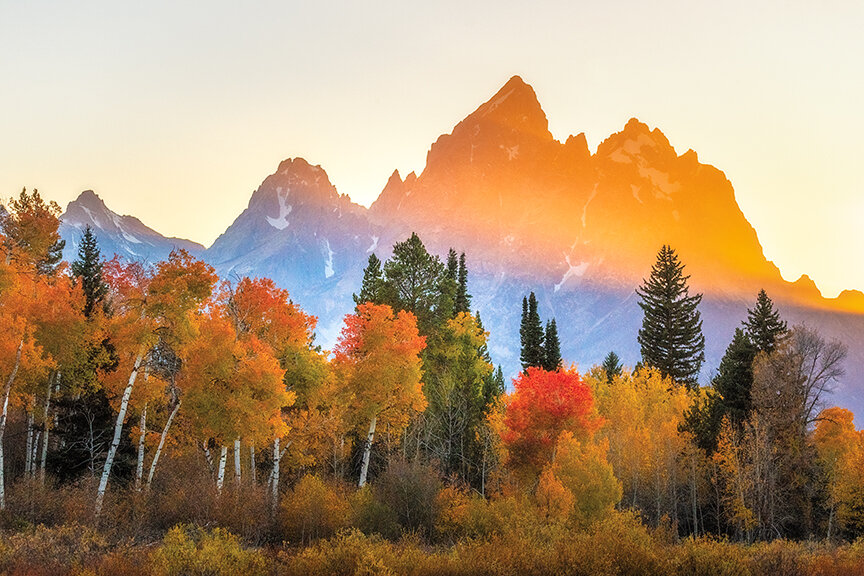
1) Emphasize Color - Obviously the first thing that comes to mind when we think of autumn is color. The autumn colors of yellow, orange and gold shine in sunlight and contrast so beautifully with a vibrant blue sky. When photographing the color, it can be effective to isolate the golden color and fill the frame with the beautiful fall colors. Or mix the golden colors with blue of skies or water to create stunning depth and striking contrast.

The warmth of the orange trees contrast with the cool tones of the mountains and blue sky in Grand Teton National Park.

The mix of yellow, orange and red drew my eye right into this scene.
2) Get out in Golden Hour - The golden hour light adds a beautiful warmth to all scenes but the way it makes autumn colors glow is just magical. Get out early for sunrise or at the end of day for sunset. A benefit is that during this season, the sunrise is getting later in the morning and sunset earlier in the evenings.
The setting sun lights the tips of the Tetons and illuminates the fall foliage in the foreground.
3) Grab a Telephoto Lens - A telephoto lens is a perfect choice for capturing details and intimate landscapes. Longer focal lengths can bring you closer to far away scenes or they can isolate details that get lost in the grander scene. A macro lens is also great for capturing details of closer subjects.

Captured from the parking lot at Oxbow Bend in Grand Teton National Park, a 260mm focal length with my Sigma 150-600 allowed me to isolate this beautiful hillside of fall color.
4) Consider Abstract - Consider using a slow shutter speed and intentional camera movement to create abstract images of the fall trees and foliage. Experiment with various focal lengths and with faster and slower movement for different looks. Use a vertical movement with trees. Try zoom blur for an intriguing look. For zoom blur, try a 1 second shutter speed starting at one focal length and twist through the focal lengths while the shutter is open.

Intentional Camera Movement in a grove of Aspens in Wyoming. A 1 second shutter speed with very slow movement created this painterly effect while maintaining some detail of the scene.
5) Bring A Polarizing Filter - I always keep a polarizing filter in my bag and I love it in the fall. A polarizer will cut glare and enhance the vibrance of the fall colors and blue sky. Be careful with wide angle lenses as the polarizing effect is inconsistent across the frame with wide angles.
6) Embrace a Mix of Seasons - The full glow of autumn is stunning but the clash of the seasons can also create wonderfully compelling images. Whether this is a golden tree glowing amongst a sea of green or an early snow that provides a mix of autumn and winter, embrace the atmosphere.

Immediately following peak fall color one year, a stunning snowfall clung to the trees. I used a 200mm focal length to isolate the details and clashing of winter and fall.

A single tree glows with gold amongst the green
7) Look for Reflections - Reflections are a favorite of mine to look for in all seasons, but especially in the fall. Colorful foliage reflecting in the water of lakes and ponds adds additional color and pop to any autumn scene. Look for reflections on days with minimal wind. Early mornings or late evening are the best time to find calm waters.

Fall colors reflect in the Snake River at Oxbow Bend in Grand Teton National Park Sept 2020.
8) All Weather brings unique opportunities! Sunny days offer beautiful blue skies to contrast with the golden color. The sun brings out the glow of autumn colors. Consider closing down your aperture to create a sunburst through the trees or in the sky.

The sun shines through the East Woods at Morton Arboretum on a perfect autumn day.
Stormy weather creates incredible atmosphere and dark storm clouds create a beautiful contrast with the warmth of red, yellow and orange fall foliage.

The stormy clouds create a dramatic atmosphere behind the Tetons as they contrast with the warmth of the golden trees and grasses in the foreground.
Overcast weather may hinder grand landscape opportunities but is an excellent opportunity to seek out waterfalls, rivers or streams for long exposure photography. The lack of bright sun eliminates dappled highlights and the soft lighting allows you to push vibrance of the fall colors in post processing. I always have a polarizer and a 6 stop ND filter with me when I shoot waterfalls and rushing water. I shared about one of my favorite tools, the X4 CPL by Breakthrough Photography, in this blog post.

A slow shutter speed captured the soft flow of the waterfall and a polarizer cuts the glare on the foreground leaves.
Hope these tips help you take advantage of the beauty of autumn. It is a wonderful time of year to get out and photograph all the days have to offer!
Kristen Ryan is an award winning and published landscape and fine art photographer and educator residing in the Midwest suburbs of Chicago. All images are available for purchase in the Fine Art Store or by request. Kristen leads ladies landscape photography retreats in the Tetons, Chicago, and the Canadian Rockies, offers private mentoring and teaches an online landscape photography workshop, The World Around You.
My Favorite Tool for Waterfall Photography
It’s no secret that long exposures are one of my very favorite techniques to use in my photography. Whether I’m photographing the movement of water or clouds, I will pull out my Breakthrough Photography * Neutral Density filters to slow my shutter speed a little, or quite a lot! Waterfalls are one location that I love to photograph with long exposures to create that ethereal mood of flowing water.
One tool that is invaluable to me when photographing waterfalls, as well as many other water scenes, is Breakthrough Photography’s X4 Dark CPL 6 Stop Filter. What is this filter, you ask? It is basically a circular polarizer and 6 stop neutral density filter in one!
Combining these two filters into one is genius in my opinion! When shooting waterfalls, both the circular polarizer and 6 stop neutral density filter are important for capturing my vision. A polarizer will cut glare from the water and intensify the colors in the environment surrounding the waterfall. The 6 stop ND filter will block light from the sensor so that I can slow my shutter speed to create the smooth flow I desire.

Having these two filters combined as one simplifies my set up process since I only need to put on one filter. Additionally, each filter you add is one more layer of glass that you have to check for dust and spots before shooting. So one filter instead of two means less layers of potential distracting elements getting in front of your sensor. I always carry the X4 Dark CPL 6 Stop Filter in my filter case and I highly recommend you add one to yours.

Read about more about Circular Polarizers here and How to Choose a Neutral Density Filter here.
Kristen Ryan is an award winning and published landscape and fine art photographer and educator residing in the Midwest suburbs of Chicago. All images are available for purchase in the Fine Art Store or by request. Kristen leads ladies landscape photography retreats in the Tetons, Chicago, and the Canadian Rockies, offers private mentoring and teaches an online landscape photography workshop, The World Around You.
Night Photography Part 4: Star Trails
Creating star trails can be a fun and creative way to add interest and intrigue to your night sky images. They do take quite a bit of time and patience to create in the field as well as in post processing, so keep that in mind as you prepare for the task. Below are a few tips as you shoot star trail images.

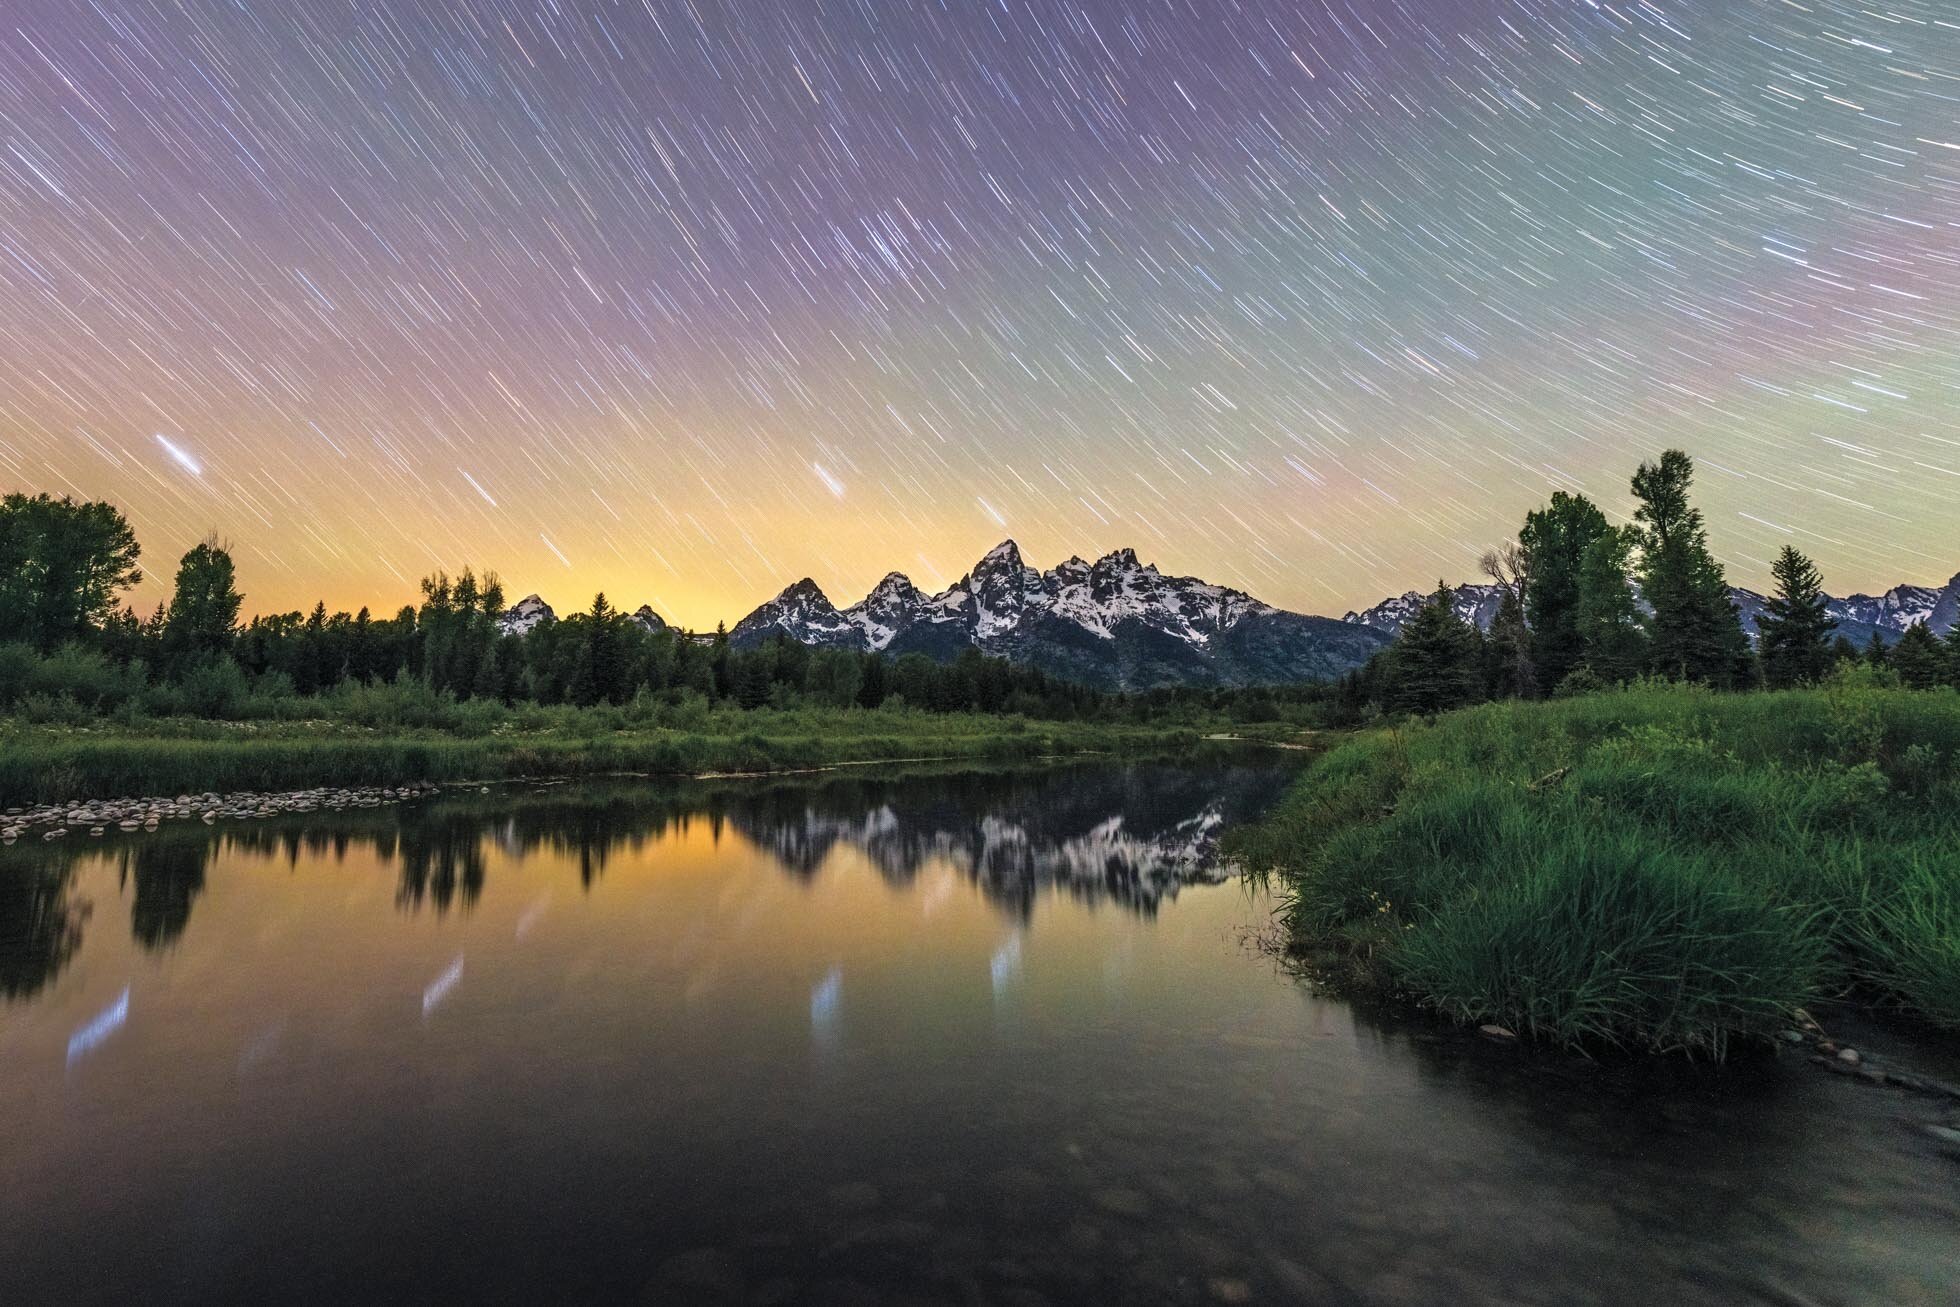
Star Trails at Oxbow Bend in June 2019
1) Prepare the right Gear: A sturdy tripod is essential for shooting star trails as you will need your tripod to stay solidly in one place for extended periods of time. An intervalometer is also a recommended tool for star trails. If shooting 30 second exposures, you can use your in camera intervalometer but if you want to shoot longer than 30 second exposures, you’ll need to be in bulb mode and use an external intervalometer. A wide angle lens will be the best choice for capturing those vast night skies.
2) Find Dark Skies & Clear Nights - Dark and clear skies are needed for bright star trails against a dark night. Look for nights without moon interference and no clouds. I love using the Sun Surveyor app to find information for the moon phase, rise and set. Despite clear skies being ideal, I wouldn’t shy away from shooting if there are a few clouds about. This image below is one of my very favorite star trail images and there were clouds interspersed with the stars.

Star trails amongst the clouds at Vermilion Lakes in Banff National Park
3) Long Trails or Short trails? Choose the effect you are going for. If you want to get many long and continuous trails of stars, you will need to shoot for a long time, at least 30 minutes but ideally an hour or longer. For shorter trails where the star trails are broken and just little lines across the sky, you can shoot a single exposure in the 8-15 minute range. (Such as the Vermilion Lakes shot above)
4) Exposure Time - To decide on your exposure time, consider what effect you are going for. You could shoot one very long exposure, or you could shoot many 30 second exposures and stack them together in Photoshop to create the trails. There are a few benefits to the shorter exposures. First, you can more easily check your exposure with a test shot and adjust before you set the camera to shoot for minutes, or hours. Second, if random light comes in and messes up an exposure, it can be easier to fix than if you have had your exposure running for an hour’s time. And third, you also have static star shots in addition to the trails. This leaves you more options for using these various exposures in post processing from static star images, short trails, longer trails or even a time lapse.

Star trails captured over an hour of time in Wyoming. 30 second exposures stacked into one image.
5) Turn off in Camera Noise Reduction - While the in camera long exposure noise reduction can be helpful for avoiding hot spots, it must be off when shooting star trails because the exposures need to be continuous with the least amount of time between them as possible to avoid breaks in the trails.
6) Switch to Manual Focus - Make sure you have your camera in manual focus so that your camera is not trying to focus during the many star captures.
7) Scout Location during the Day - Use the daytime to find a great location with interesting foreground to add to your star trail image. Heading out with a plan will greatly increase your chances of success!
8) Be Creative! While there are techniques that will help you succeed in getting focused and well exposed star trail images, don’t be afraid to experiment and be creative.
For more tips on Astrophotography see Astrophotography Tips Part 1 and Part 2. Also check out Part 1 in the Night Photography Series: Preparation for more general tips.
Kristen Ryan is an award winning and published landscape and fine art photographer and educator residing in the Midwest suburbs of Chicago. All images are available for purchase in the Fine Art Store or by request. Kristen leads ladies landscape photography retreats in the Tetons, Chicago, and the Canadian Rockies, offers private mentoring and teaches an online landscape photography workshop, The World Around You. The next run of The World Around You begins August 17!

Night Photography Part 3: Light Trails
Before heading out for night photography, it is great to be prepared, so check out Part 1: Preparation if you missed it! This week’s tips are all about capturing light trails, a creative and dynamic way to capture the night and movement of lights. So here are some tips for capturing quality images of light movement in your night photography.
1) Find a Moving Subject with Lights - This is pretty obvious of course but light trails require moving lights through your frame. So look for a spot where you can capture the movement of cars, buses, a train, or any other moving light. The movement must be consistent, not stop and go!
2) Aperture - Choose a mid range aperture that allows you to achieve the desired depth of field somewhere between f/5.6 and f/11. This range is generally sharp and in the sweet spot for most lenses. Depending on your scene you may need to close down more for greater depth of field or you may need more light. In some cases you may want to close down to f/16 in order to create starbursts of street lamps or other lights in the scene.
3) Shutter Speed - A shutter speed of 10-20 seconds is usually the sweet spot that I find for most light trails. However, you may have to adjust this if the trails are blowing out or if the moving vehicle is moving particularly slow.

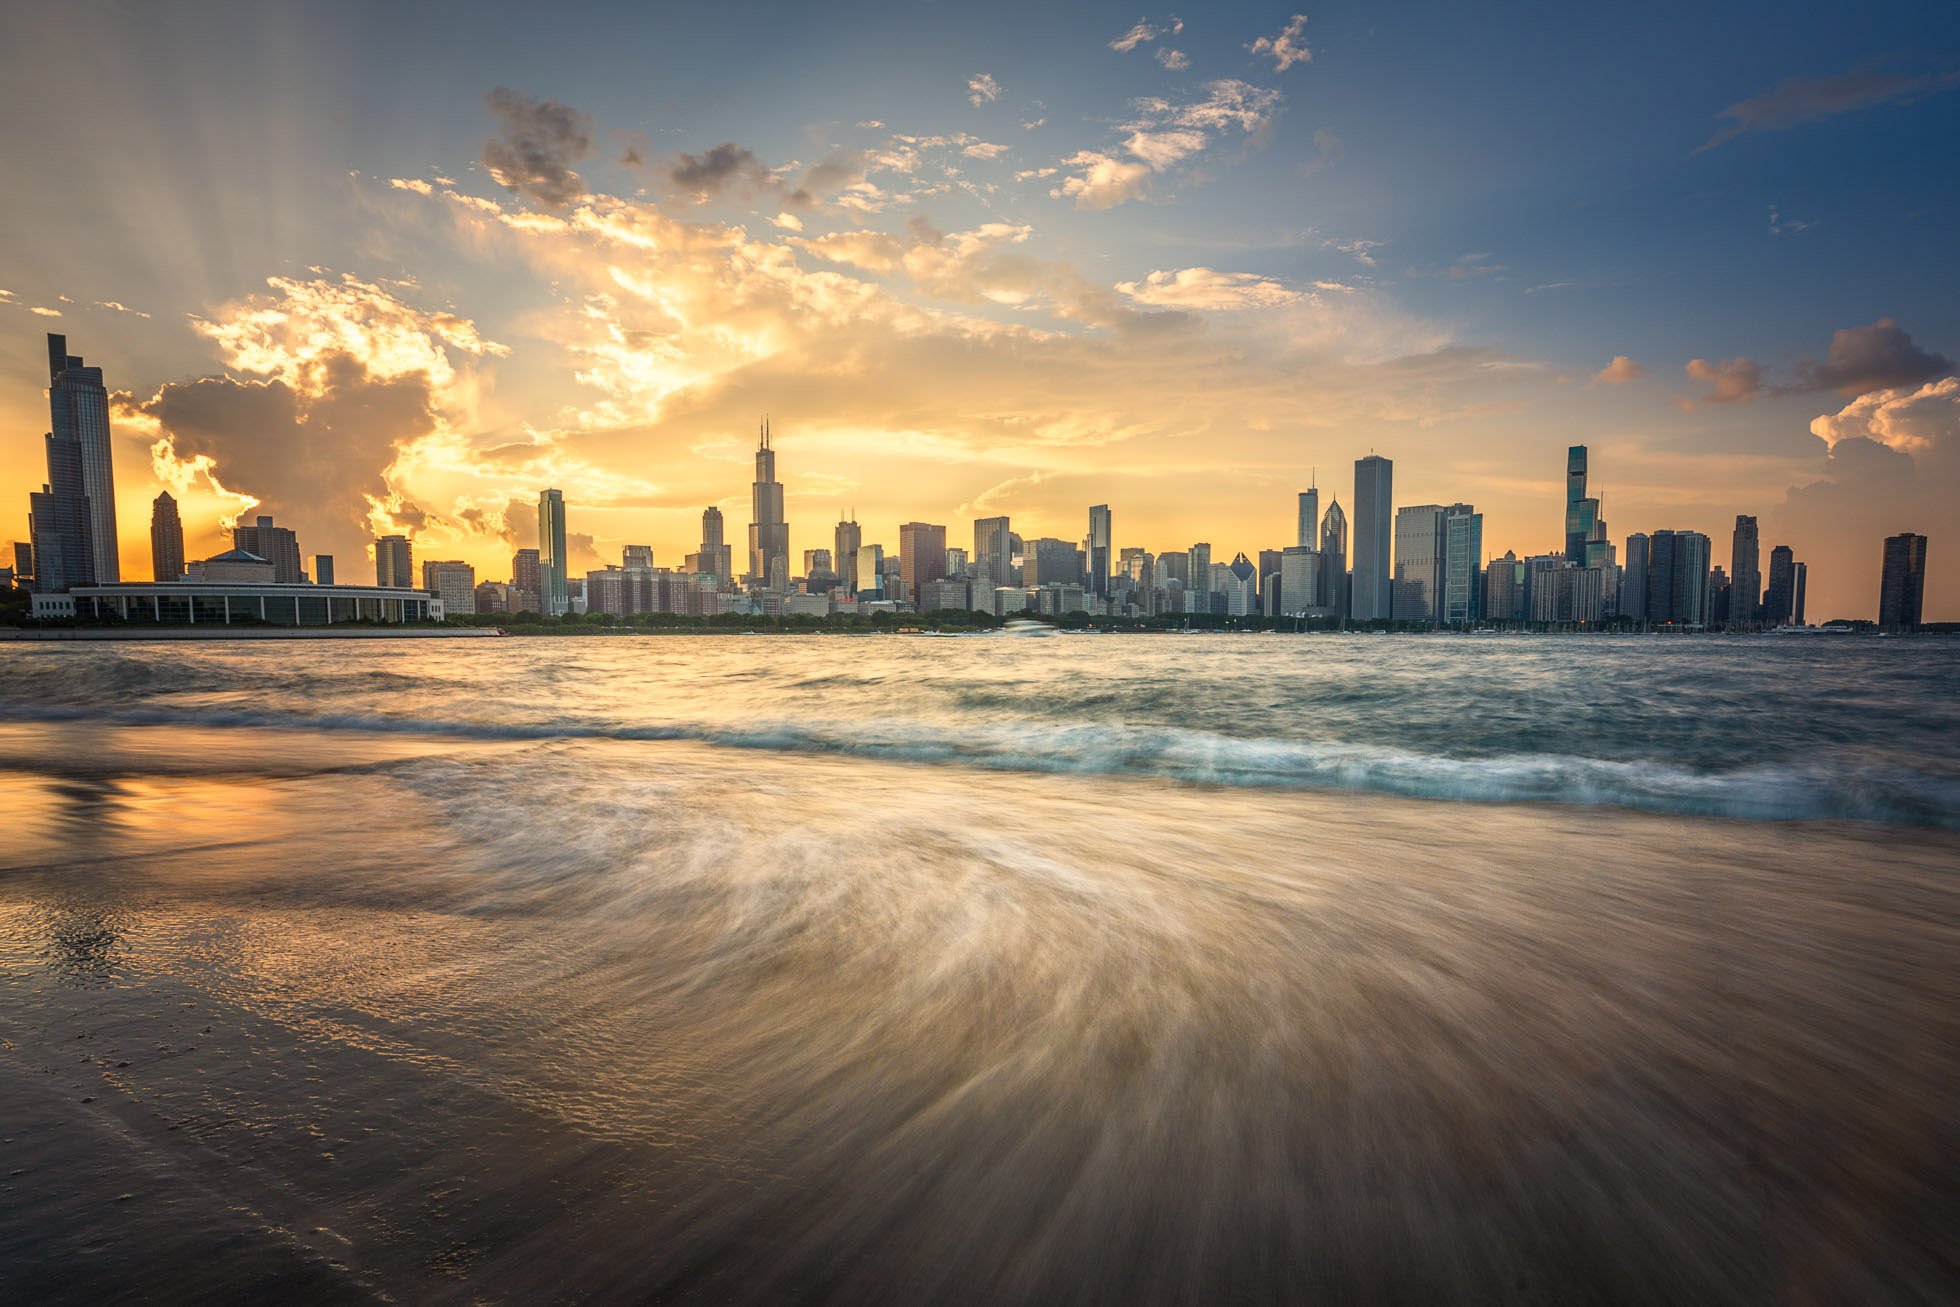
Captured from the foot bridge near Lincoln Park in Chicago during blue hour.
4) Histogram & Highlight Warning - Pay attention to your histogram and highlight warnings after you shoot to ensure you are capturing the detail in the dynamic range. This is particularly important in the highlights since those will be the focus of your scene.
5) Timing - Timing can be everything when it comes to light trails. Starting your exposure when the lights come into the frame and will move through it is critical to the success of light trail images. Set up your frame and base exposure and be ready to click the shutter when the movement begins. For example, if you are near a stoplight, wait for the light to turn green before you start your exposure. If you are shooting over a highway, wait until there is enough traffic to fill the frame with trails. Shooting in Chicago one time, I found that buses created interesting light trails, so I waited until I saw a bus coming along before starting the exposure.
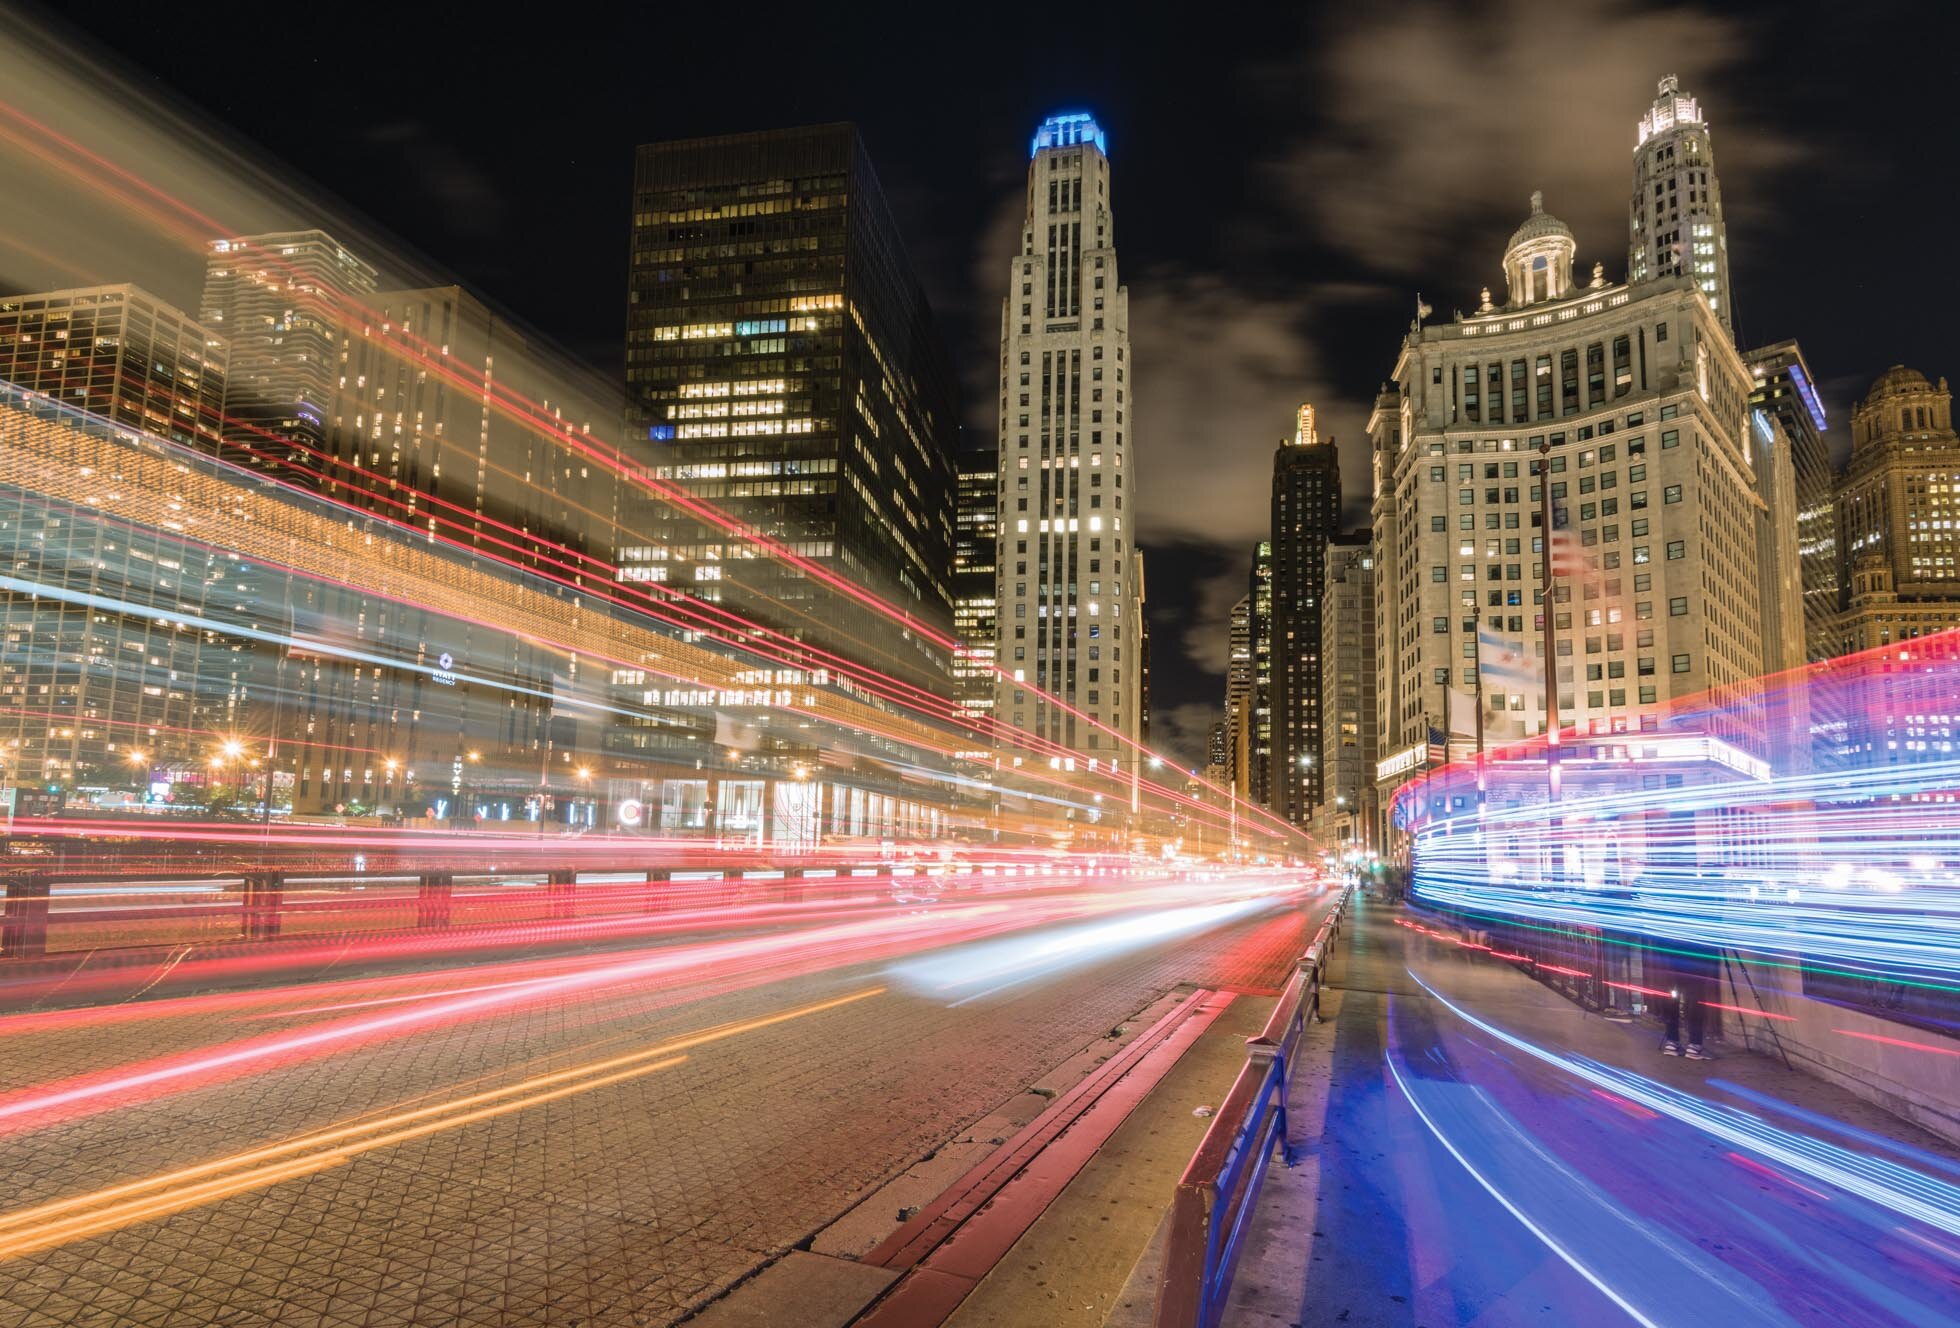
The high light trails here are created by waiting for the bus to come along before starting my exposure. Captured on Michigan Avenue in Chicago.
6) Lighting - It might seem you need to wait until dark to shoot light trails but it doesn’t have to be completely dark. Lights will start coming on as sunset approaches. Blue hour can be a great time to shoot light trails with the warm lights contrasting with the deep blue sky.
7) Location - Pick a location where the light trails can be the main focus of the frame, or a strong supporting element, depending on your goal. Think about how the lines of the trails will lead through the frame to create a pleasing or intriguing scan path for the viewer.
8) Be Safe - Make sure to position yourself safely when shooting. If you are near traffic, be sure you are not risking your safety for the shot.

A bus turns the corner along Michigan Avenue in Chicago
Hope these tips help you have fun, be creative and find success shooting light trails!
Want to shoot light trails with a group of ladies in Chicago? Check out my Magic in Chicago Ladies Retreat and sign up for the Ladies Retreat newsletter for all the newest information.
Kristen Ryan is an award winning and published landscape and fine art photographer and educator residing in the Midwest suburbs of Chicago. All images are available for purchase in the Fine Art Store or by request. Kristen leads ladies landscape photography retreats in the Tetons, Chicago, and the Canadian Rockies, offers private mentoring and teaches an online landscape photography workshop, The World Around You. The next run of The World Around You begins August 17!
Night Photography Part 2: Cityscapes
Last week I shared some tips for getting prepared for night shooting whether cityscapes or astrophotography. Night is one of the most beautiful and dynamic times to shoot in the city. I hope these technical tips will help you to capture some incredible night city scenes.
1) Shoot in RAW - The best way to get the most information in your files and therefore the best quality photographs is to shoot RAW. Exposure and white balance both can be tricky with night photography and the more information you collect while shooting, the more leeway you will have when you get into post processing for adjustments.
2) Low ISO - While astrophotography generally calls for a high ISO since it requires very dark skies for visible stars, the lights of towns and cities create an overall brighter scene. This allows for a low ISO to help reduce noise in your images. Depending on the available light as well as my aperture and shutter speed choices, my ISO is typically between 200 and 800.

Buckingham Fountain during Blue Hour
3) Manual Focus - Focusing manually is the best way to ensure sharp focus in night photography. If you are close enough to lights and points of contrast, I find autofocus can work quite well, but as it gets darker, when you are further away from the scene, or when you are using a wide angle lens, autofocus will often miss the mark. Even if you think autofocus is working for you, I recommend using live view and zooming in on a point of contrast and manually tweaking the focus until sharp.
4) White Balance - Choice of white balance at night can be a bit tricky. The night shadows tend to be very cool but the city lights are very warm. Be aware of this dichotomy and try to balance out the intensity of the warm lights with the cool shadows. Like all imagery, choice of white balance is subjective for the look and mood you want to portray so you may have a preference for warmer or cooler tones. Using live view can often help me find my happy place with the color. If your camera’s auto white balance does a good job, that can often be a great choice as well.

Telephoto capture of part of the Chicago skyline
5) Bracket exposures - Night city scenes present a challenge as they have a high dynamic range to capture. The lights of buildings and vehicles are quite bright while the shadows are dark, making the dynamic range more than cameras can capture in a single exposure. Bracketing exposures by programming your camera or by adjusting your settings manually is the best way to ensure you capture detail in both the shadows or highlights.
6) Histogram - Use your histogram to help you evaluate your exposure. Your LCD screen is not a great way to check exposure which is why I recommended in Part 1: Preparation to turn the brightness down. This way it won’t trick you into thinking you have proper exposure when you don’t. With the high dynamic range, check your highlights and your shadows to ensure you have detail in both. Refer back to those bracketed exposures. If your brightest bracketed exposure still has clipped shadows, brighten it up. If your darkest bracketed exposure still has blown highlights, reduce the exposure. While sometimes you may find you can recover enough information to make a single exposure work, it is always best to gather as much information in the field as you can.

Williamsburg Bridge from Brooklyn
7) Take Test Shots - Don’t be afraid to take test shots and examine them for focus, exposure and white balance. Examine them to consider your composition as well to see if you have included distracting elements or cut off important lines or features. Zoom in to check for sharp focus. Check your histogram for the dynamic range. Check to see if your images are excessively warm or cool.
8) Create Starbursts of City Lights - Close your aperture down to capture starbursts of those city lights. F/16 its a great number to aim for. If you need more light, in this image below I was able to get the starburst of this rotating lighthouse light at f/13.

Harbour Town at night with an aperture of f/13 to get the starburst of the lighthouse light!
9) Arrive Early - Getting to your location for sunset will allow you to take your time in setting up and evaluating different compositions. This will also give you the opportunity to shoot through varying lighting situations of sunset, blue hour and true night skies. A stunning time to capture is when the lights first come on in the city!

Part of the Chicago skyline as the sky transitions to night and the city lights are turning on!
These tips can also be used in a smaller downtown or even in a rural area when shooting a lit up building amongst darker skies such as this scene below at Emerald Lake.
Next week’s topic in the Night Photography Series is Light Trails, so keep an eye on your inbox!
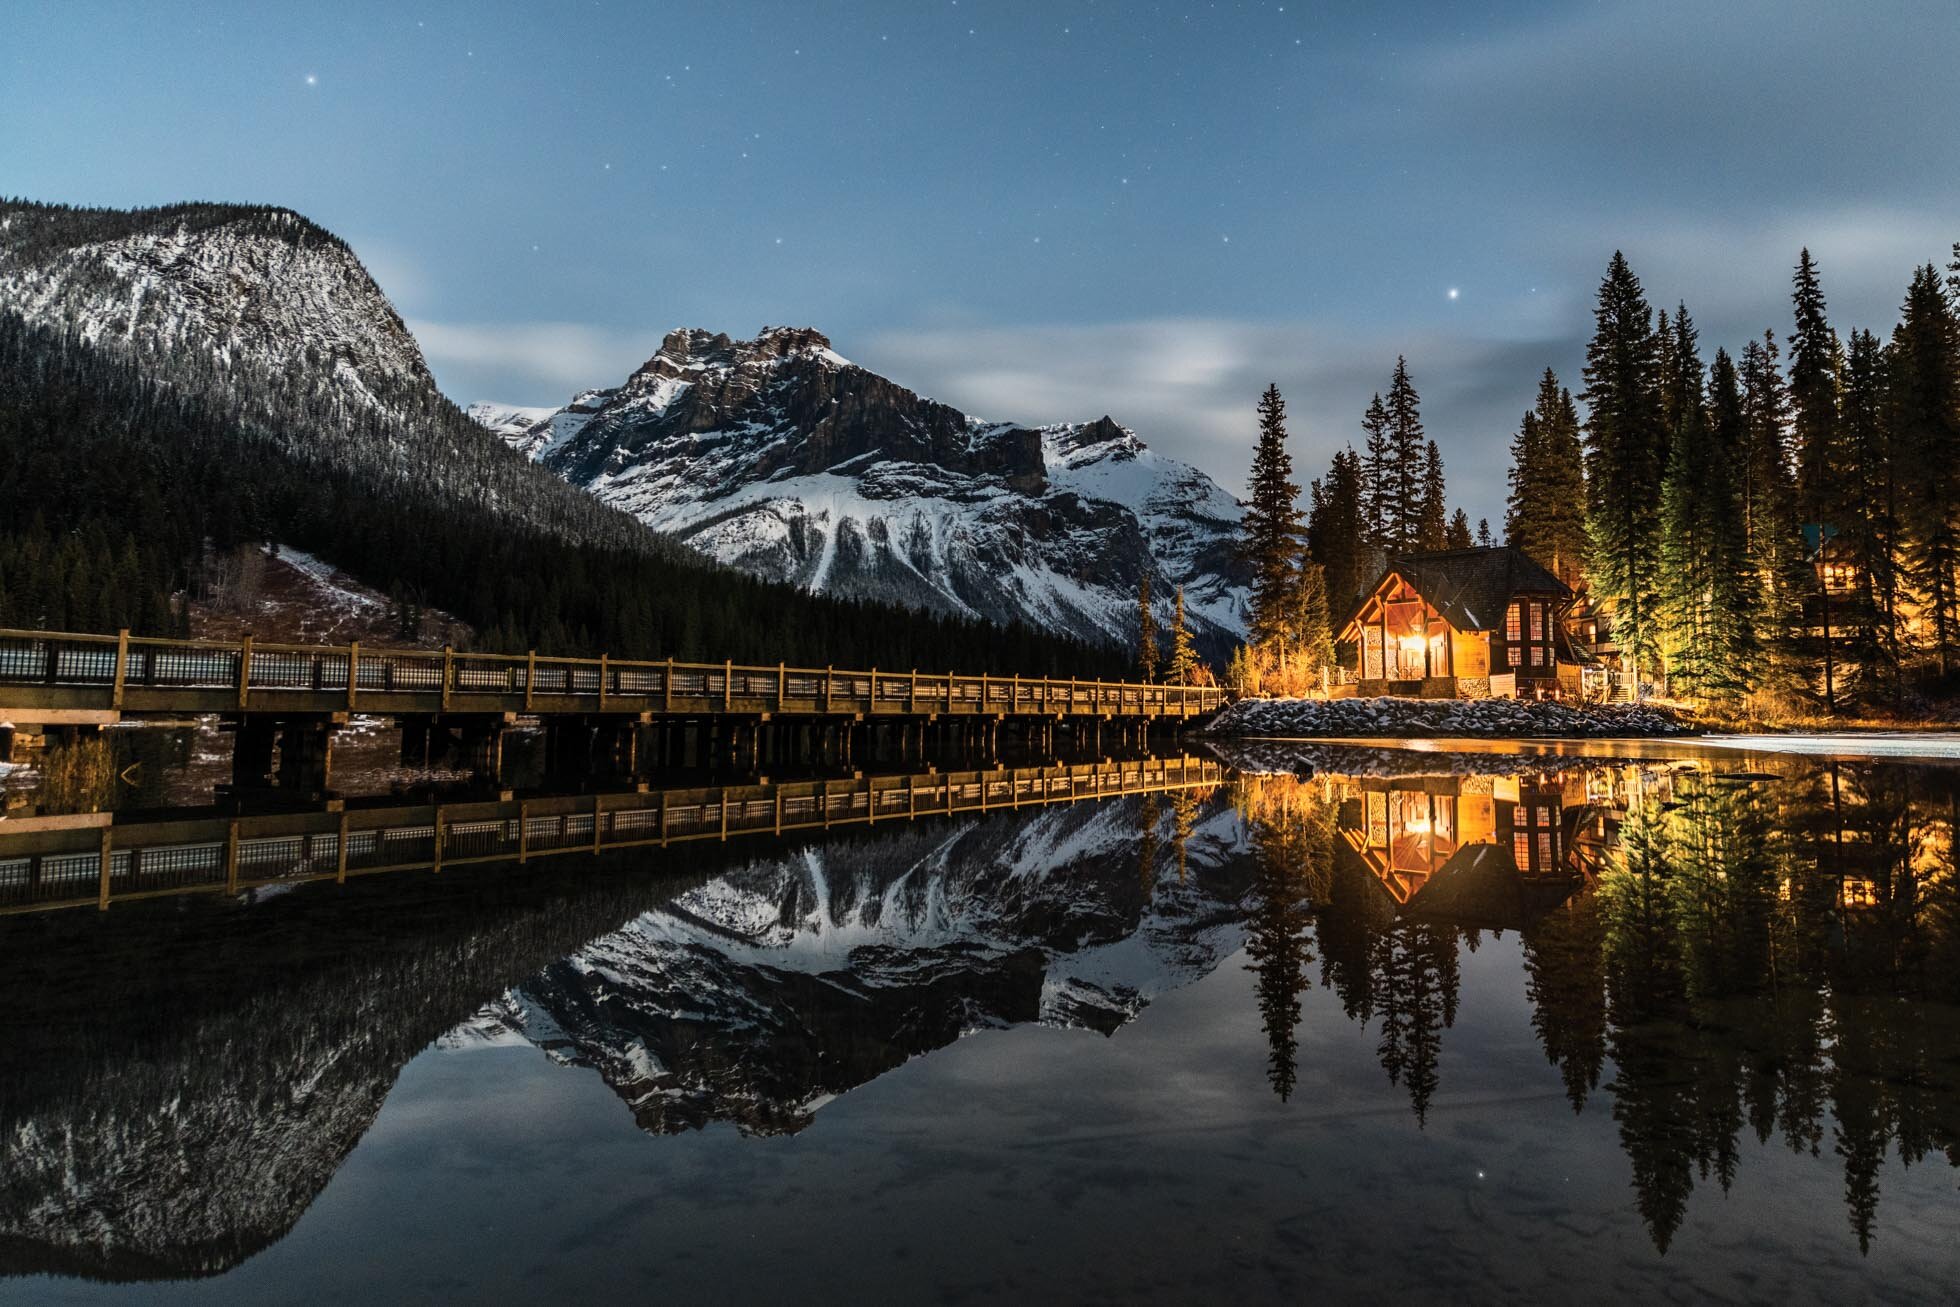
This kind of environment mixes an astrophotography approach with a city scene approach. The ISO in this image is 800. Shooting in this kind of scene without the bright restaurant would require a much higher ISO. Additionally, this is a situation of merging exposures and balancing white balance for the cool sky and the warm restaurant lights.
Kristen Ryan is an award winning and published landscape and fine art photographer and educator residing in the Midwest suburbs of Chicago. All images are available for purchase in the Fine Art Store or by request. Kristen leads ladies landscape photography retreats in the Tetons, Chicago, and the Canadian Rockies, offers private mentoring and teaches an online landscape photography workshop, The World Around You. The next run of The World Around You begins August 17!

