


My last blog post, toward the end of June, shared tips for Astrophotography. Summer travel and family life occupied all my time in the last month and a half, but as promised, here is part 2 with 9 more tips for shooting those starry night skies!
1) Check the Moon Phase calendar when planning your Astrophotography. The less moonlight, the more stars you will see and the brighter the Milky Way will be. New Moon will be the darkest time of the month. This is when there is no moonlight at all. During other moon phases, you may still be able to shoot the stars and Milky Way without moon interference, but you’ll need to check the moonrise and moonset times. I love to use the Sun Surveyor app to find out the moon phase plus rise and set times. Sun Surveyor also gives the times the Milky Way core will rise and set and when it is visible without moon interference in your location. I highly recommend checking out this helpful app.
2) Use an app like Photopills to plan your Milky Way shooting. Photopills will help you to find out where the Milky Way will be located at any time in any location. At home or away, you can put the pin on any location and see where the Milky Way will be at midnight, 1:00 a.m, 3:00 a.m., etc. For this June’s Teton Retreat, I had our 2:00 a.m. String Lake Milky Way shoot planned when I chose the dates of the retreat knowing the Milky Way would be in the ideal position from 2:00-3:00 a.m. Using an app such as Photopills allows you to know what to expect and plan for success.

Milky Way over the Grand Teton at String Lake in June 2019 at the Magic in the Tetons Retreat
3) Get To Know Your Gear In The Dark - The very dark skies are great for capturing millions of stars, but this also means you can’t see your gear without a flashlight. If you are shooting with a friend or a group, turning on flashlights can ruin the exposures of your fellow photographers. Being able to put your camera on your tripod in the dark, adjust your tripod and check your LCD without turning on your flashlight is extremely helpful. Additionally, the longer you keep lights off, the more your eyes adjust to the dark.
4) Watch Your Histogram & Expose To The Right - In evaluating your exposure, check your histogram rather than relying on your LCD screen. Exposing as bright as you can without blowing the highlights will produce the best quality image with the least noise. Noise is inevitable in the dark conditions with high ISO. The better exposure you have, the less noise there will be. Check to see that your histogram is as far toward the right as it can be without it climbing up the right wall. There will be more tones toward the left because it is so dark, but keeping them as far as possible off the left wall of the histogram will capture a better quality image.
5) Consider Foreground Exposure - The foreground of your scene will be much darker than the sky full of stars. There are a couple options for getting a well exposed foreground image to composite with a great exposure of the sky. The first is to get out before the sun sets and capture the frame you want with a well exposed foreground before sunset or during blue hour when a little more light will light the scene. Be sure to choose your composition and leave the frame and focus where it is before shooting the night sky. The second option depending on the foreground scene is to light the foreground with a flashlight or headlamp. The foreground will need to be close enough, and your light strong enough, to be lit with your supplemental light source. Light painting must also be allowed where you are shooting. Grand Teton National Park, for example, does not allow light painting so during my retreats we do not light the foreground. The third option, if you arrive in the dark, is to take a brighter exposure of the foreground to composite with the sky by taking a longer exposure. This will create star trails in the sky, but you can composite your longer foreground exposure with your static star exposure in Photoshop.

A starry evening at the Three Sisters in Canmore, Alberta Canada
6) Consider Stacking to Reduce Noise - One technique to try for less noise in astrophotography is taking multiple exposures of the same frame and stacking them in a program called Starry Landscape Stacker. This program is very easy to use and stacks multiple exposures of the sky into one by lining up the sky. The resulting image has less noise than editing one single exposure. For example, you can capture 10 exposures at ISO 6400, f/2.8, 15 seconds and stack them in Starry Landscape Stacker. The program is $40 but very worth it!
7) Consider Composition - Just as with landscape images, composition matters in astrophotography too. It can be easier to find a pleasing composition in the daylight, so it can be helpful to scout out a location ahead of time, or get there before dark as mentioned above in the Foreground Exposure tip. Even in daylight, you can use your Photopills app to see where the Milky Way will be in the Night AR part of the app so if you will be shooting the Milky Way, you can think about composition ahead of time. Consider where other aspects of the scene may be comfortably placed in the frame and how you can create balance between the left and right sides of the frame as well as the top and bottom.
8) Look for Interesting Foreground - As you consider composition, look for a location that will have interesting foreground to be part of the scene. Mountain peaks, rock formations, barns, trees, and oceans all are examples of foreground spaces that will add impact to your night sky images.
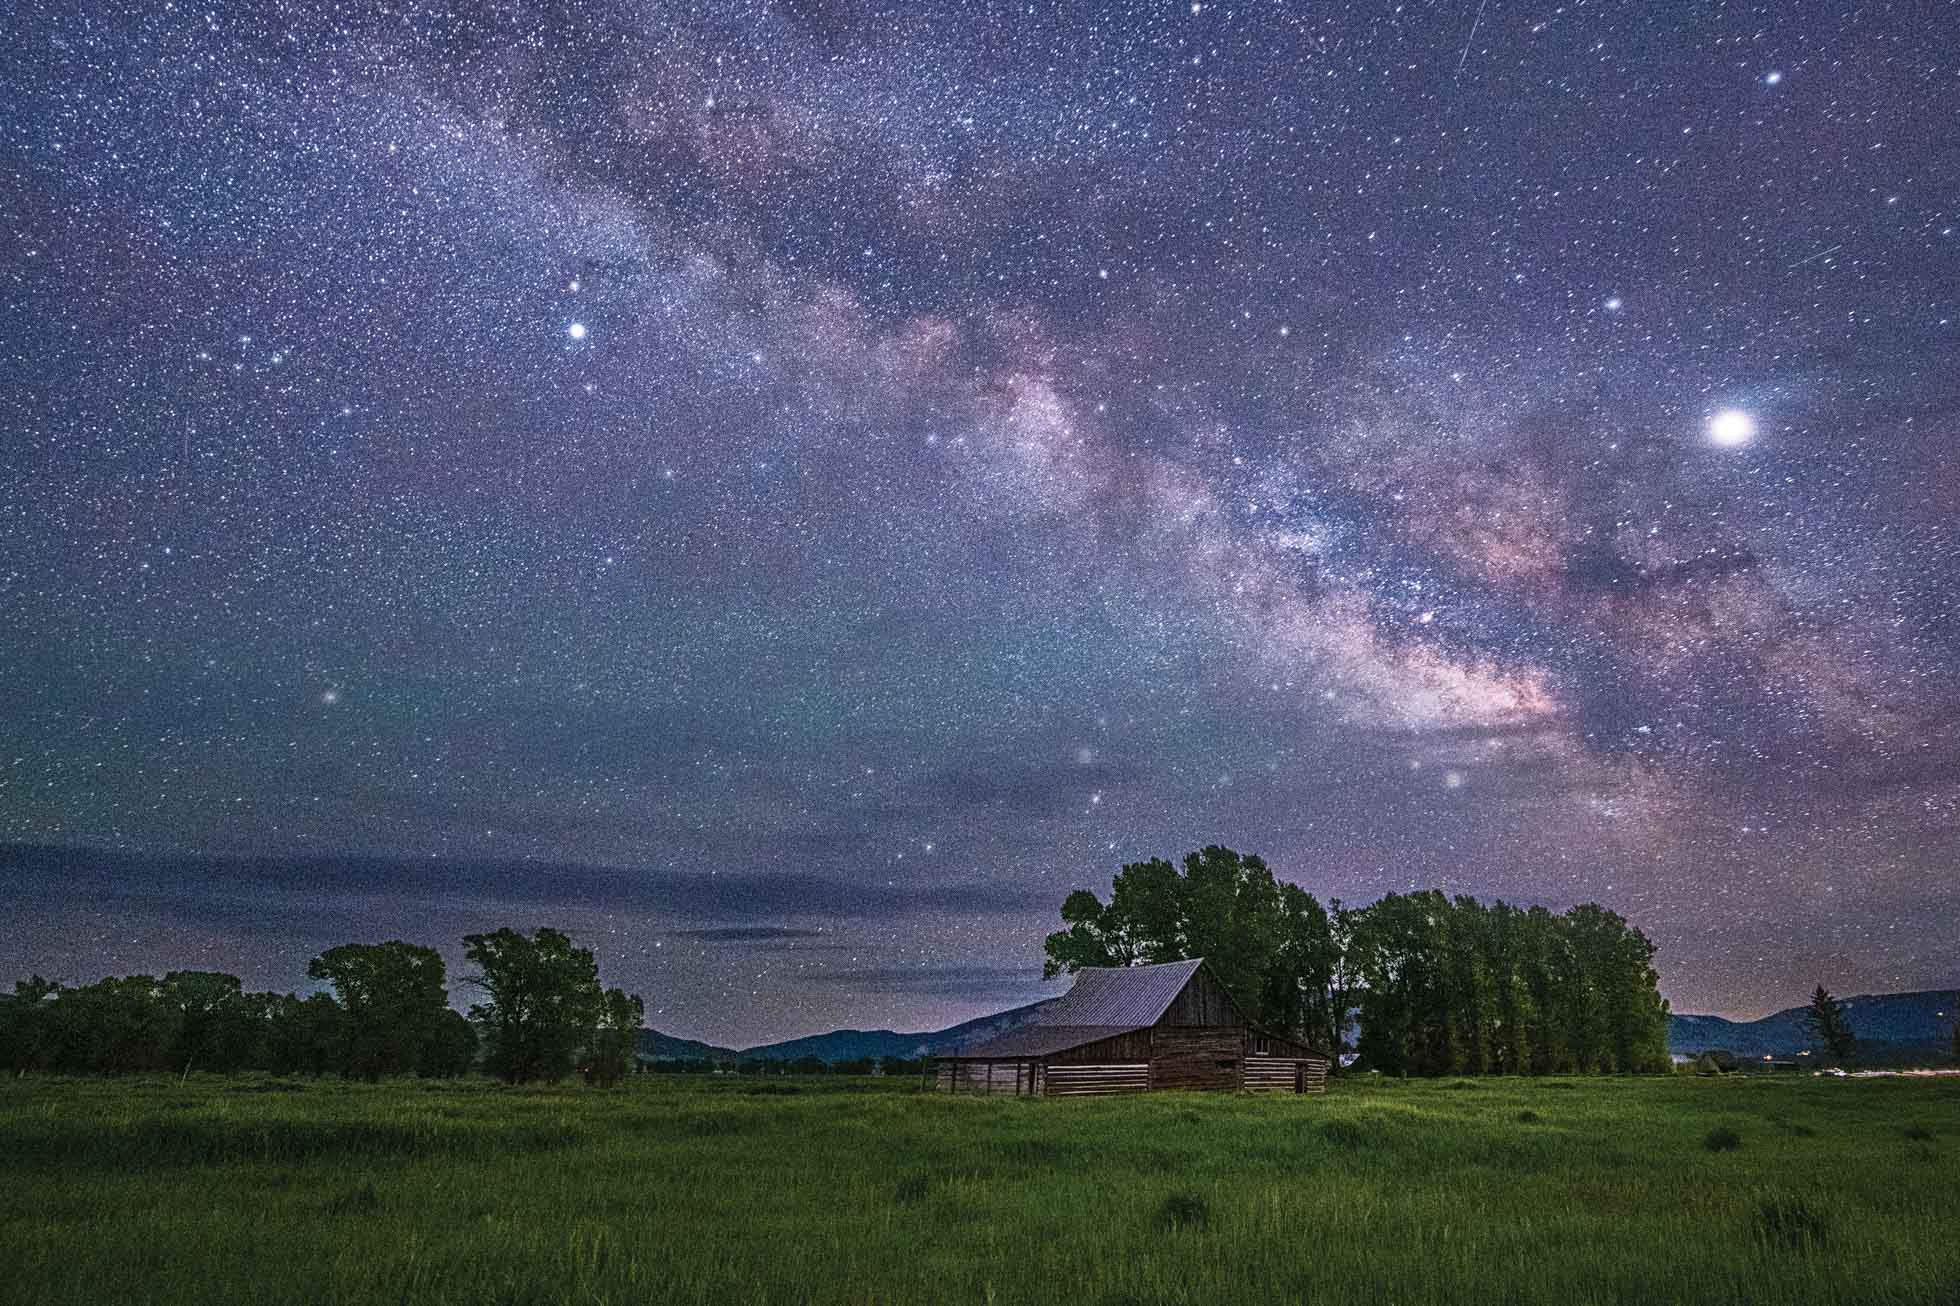
Milky Way over the Moulton Barn in Jackson Hole, Wyoming at the June 2019 Magic in the Tetons Retreat
9) Pack Extra Batteries - A final gear recommendation for shooting astrophotography is to make sure to have at least 1 or 2 extra batteries. With (often) cooler temperatures and long exposures, batteries drain more quickly and it is disappointing to be capturing amazing images only to be thwarted by a dead camera battery! Make sure to head out prepared.
It can be challenging to get out to shoot at night, especially when it means giving up your sleep, but I promise it is worth it when you see the Milky Way on the LCD, or even just some beautiful stars!
Kristen Ryan is a landscape and fine art photographer residing in the Midwest suburbs of Chicago. All images can be purchased in the Fine Art Store. Kristen leads ladies landscape photography retreats in the Tetons, Chicago, and the Canadian Rockies, offers private mentoring and teaches an online landscape photography workshop twice a year.