Kase Magnetic Filters

Shortly before leaving for Spain in late March I received a package with the Kase Magnetic Revolution ND Kit on my doorstep! I had heard great things about these filters and I was so excited to bring these filters along on my trip.  Although this trip was family (not photography) focused, I knew I would be capturing the sights and experiences of our trip and hopefully even get out for a couple sunrises or sunsets.

The Revolution Kit is perfect for me as it includes all of the filters that I use in my work. This kit includes a circular polarizer, 3 stop ND filer, 6 stop ND filter, 10 stop ND filter, and the ring for the filters to attach to the lens. All of these come in a compact filter case. An added bonus that I am really excited about is a magnetic front lens cap. This is a great addition because it means I can cover up and protect the filter when I’m taking a break or moving to a new spot. In the past, I have always had to remove the filter to put on a lens cap.

Case and magnetic lens cap

Another thing I love about these filters is that in addition to the written label on the filter ring to distinguish between the filters, they are also color coded, making it so much easier to grab the filter that I want to use. The 3 stop ND filter is Blue, 6 stop is yellow, the 10 stop is red, and the polarizer ring is silver. For someone whose eyesight is diminishing with age, it is extra helpful to have a way to differentiate the filters without having to try to read the fine print, especially in low light! When trying to grab the right filter as the light is quickly fading or changing, being able to easily identify the one I need means that I don’t miss the shot fumbling with gear.

Color coded filters inside the case

Most importantly, in addition to being easy to use, their quality is fantastic. The color is neutral so they don’t add a color cast to my images. Also, with this magnetic set, there is a magnetic inlaid ring hidden inside the lens screw thread to improve and minimize vignetting.  

I used the filters singularly and stacked during my trip to Spain and was so happy with the results.

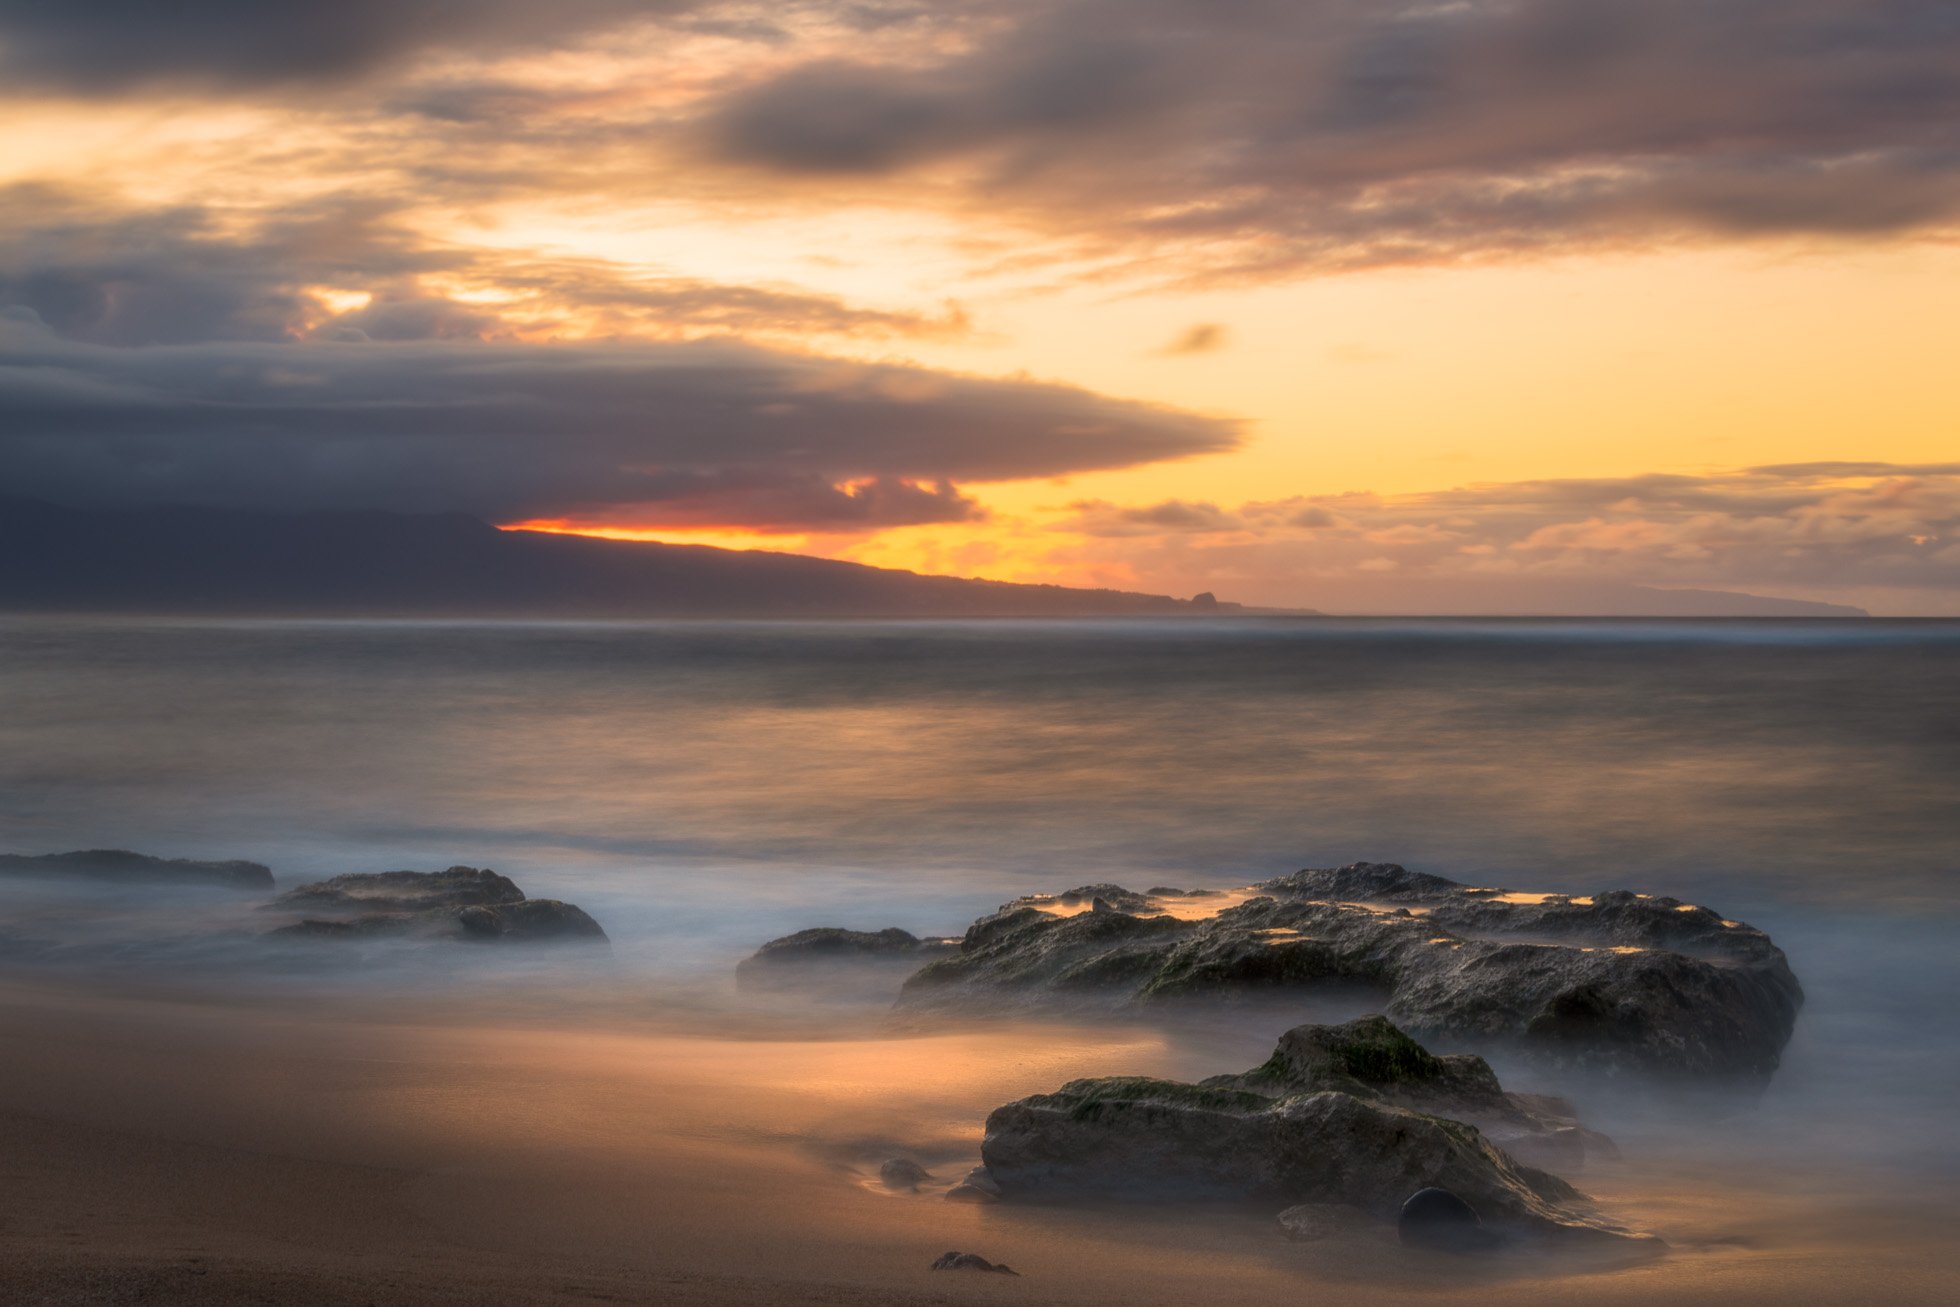
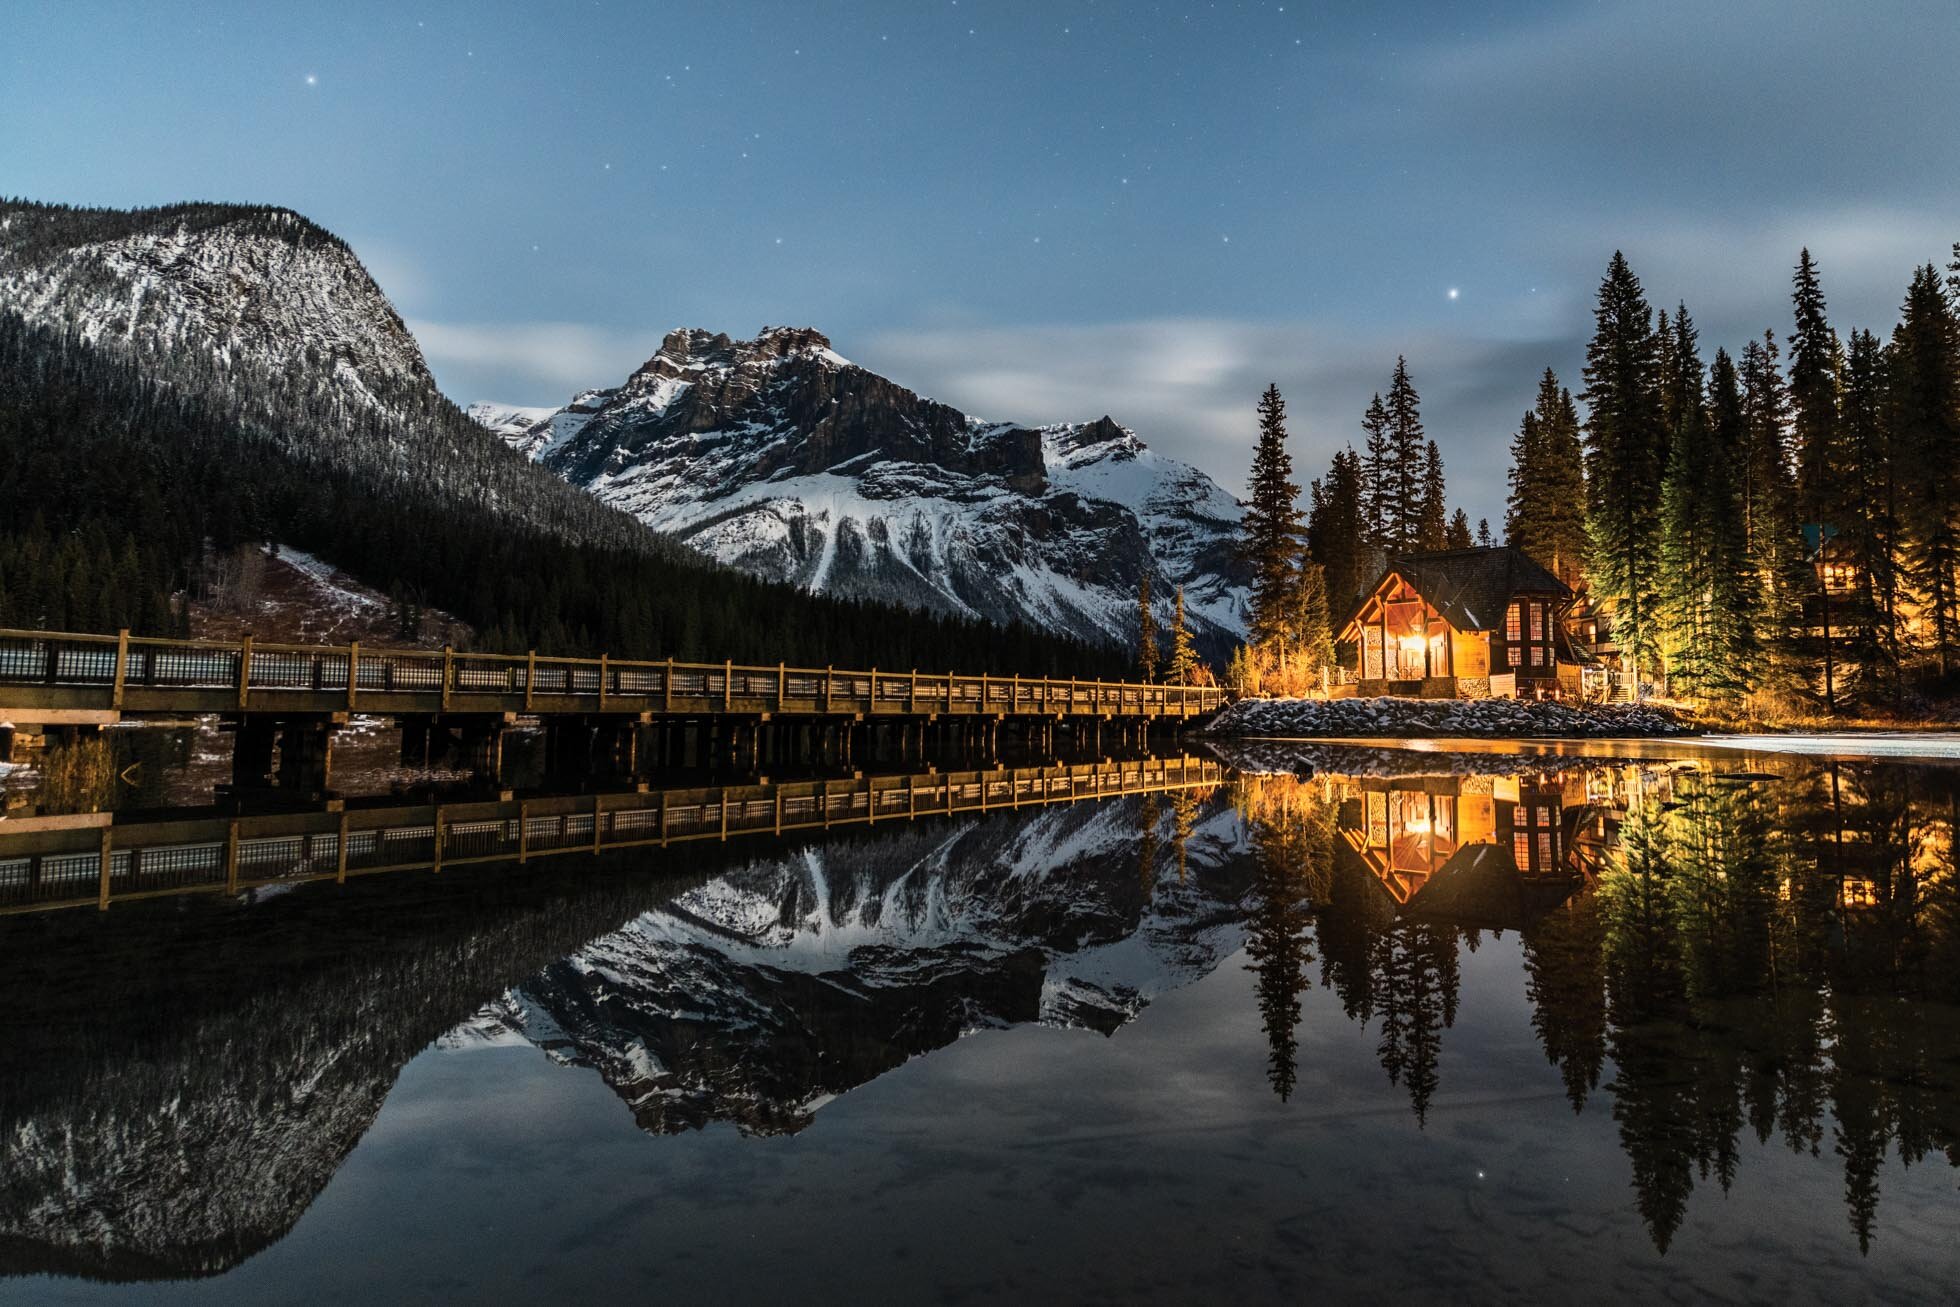
30 seconds with the 10 stop neutral density filter in Malaga, Spain

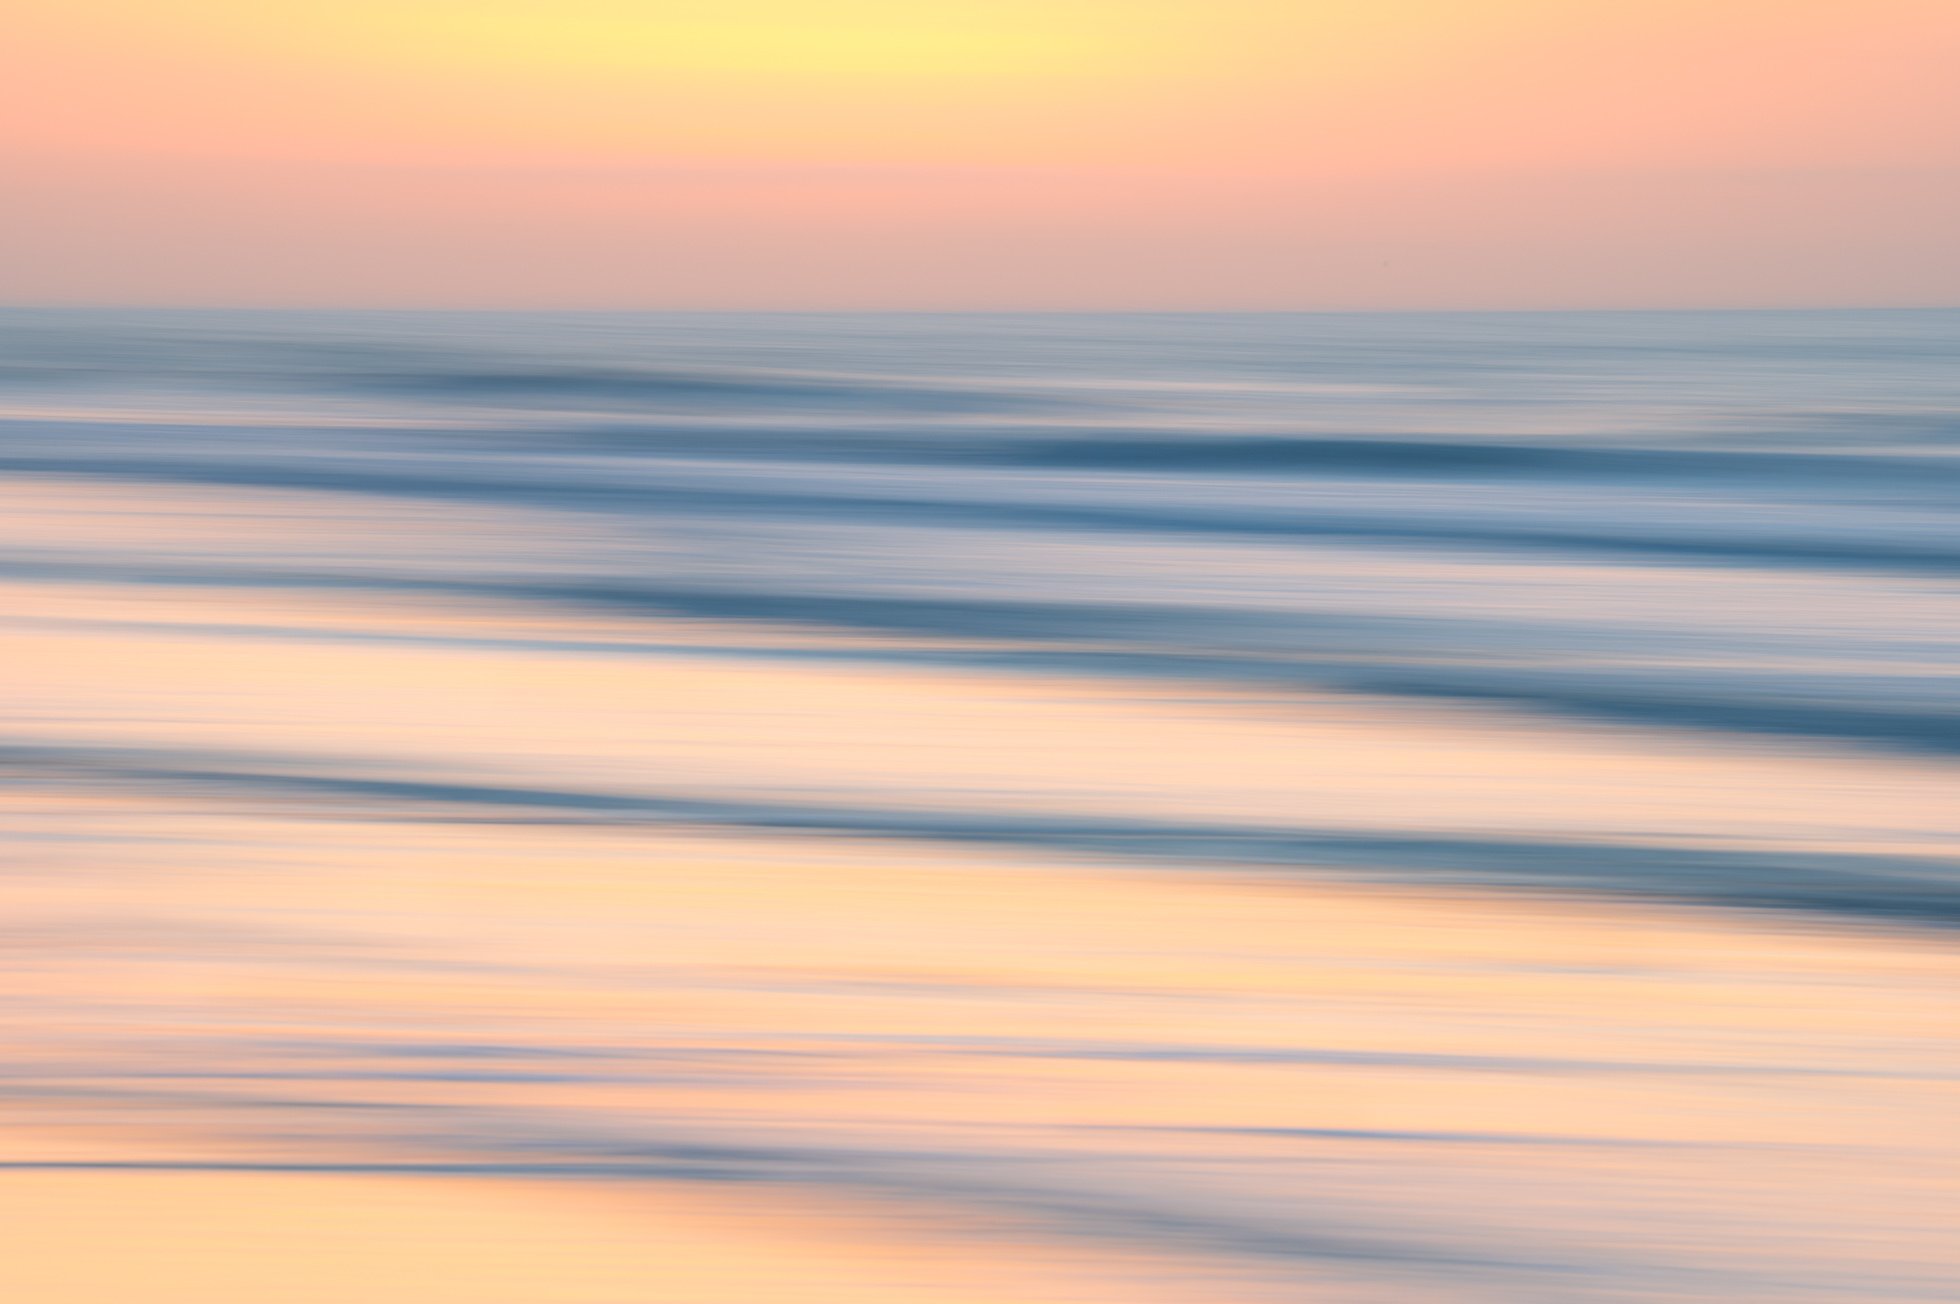
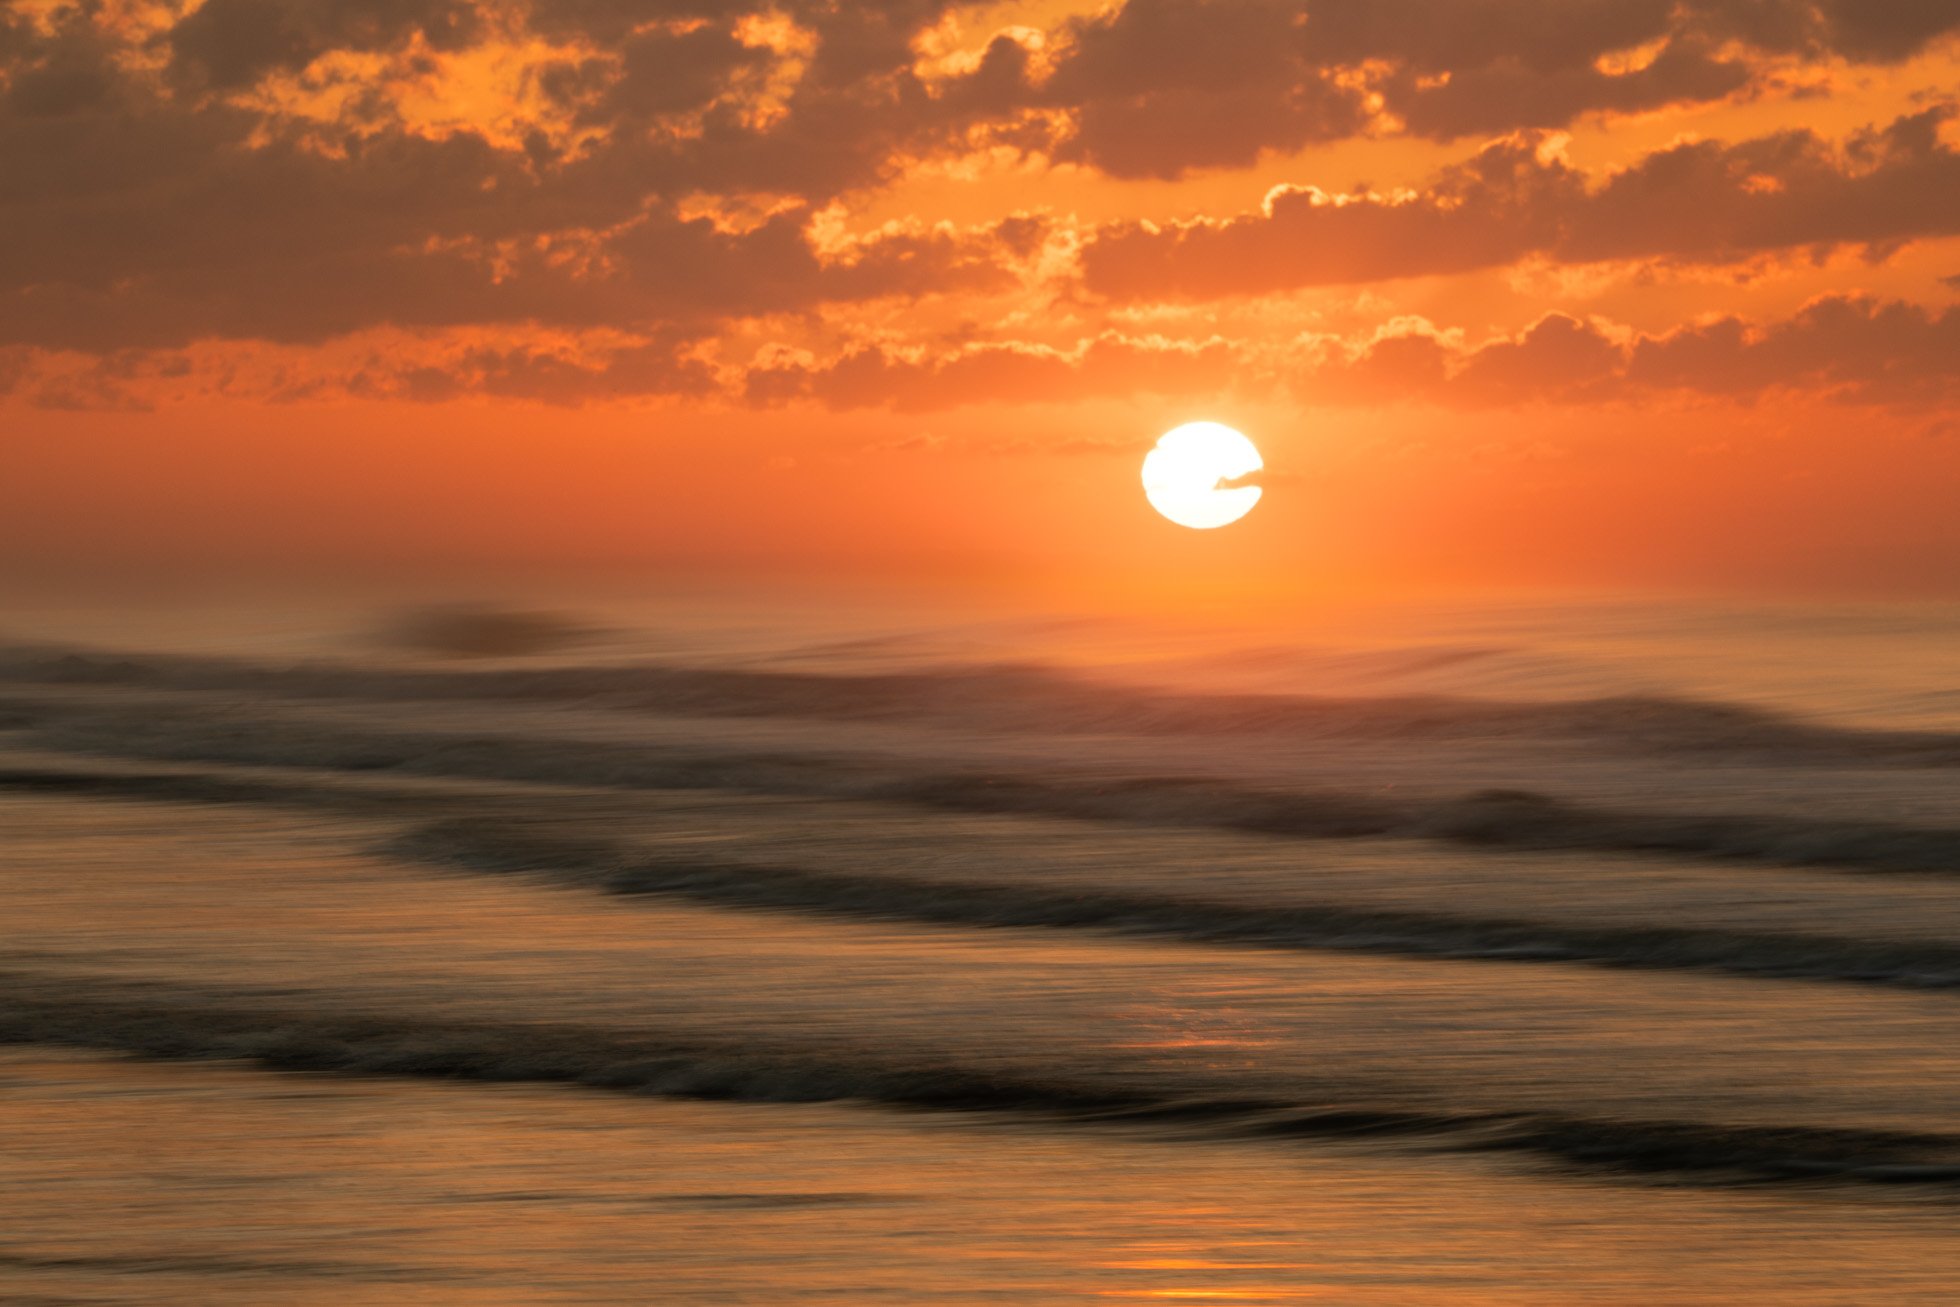
.6 second exposure with the 6 stop Neutral Density filter and using intentional camera movement

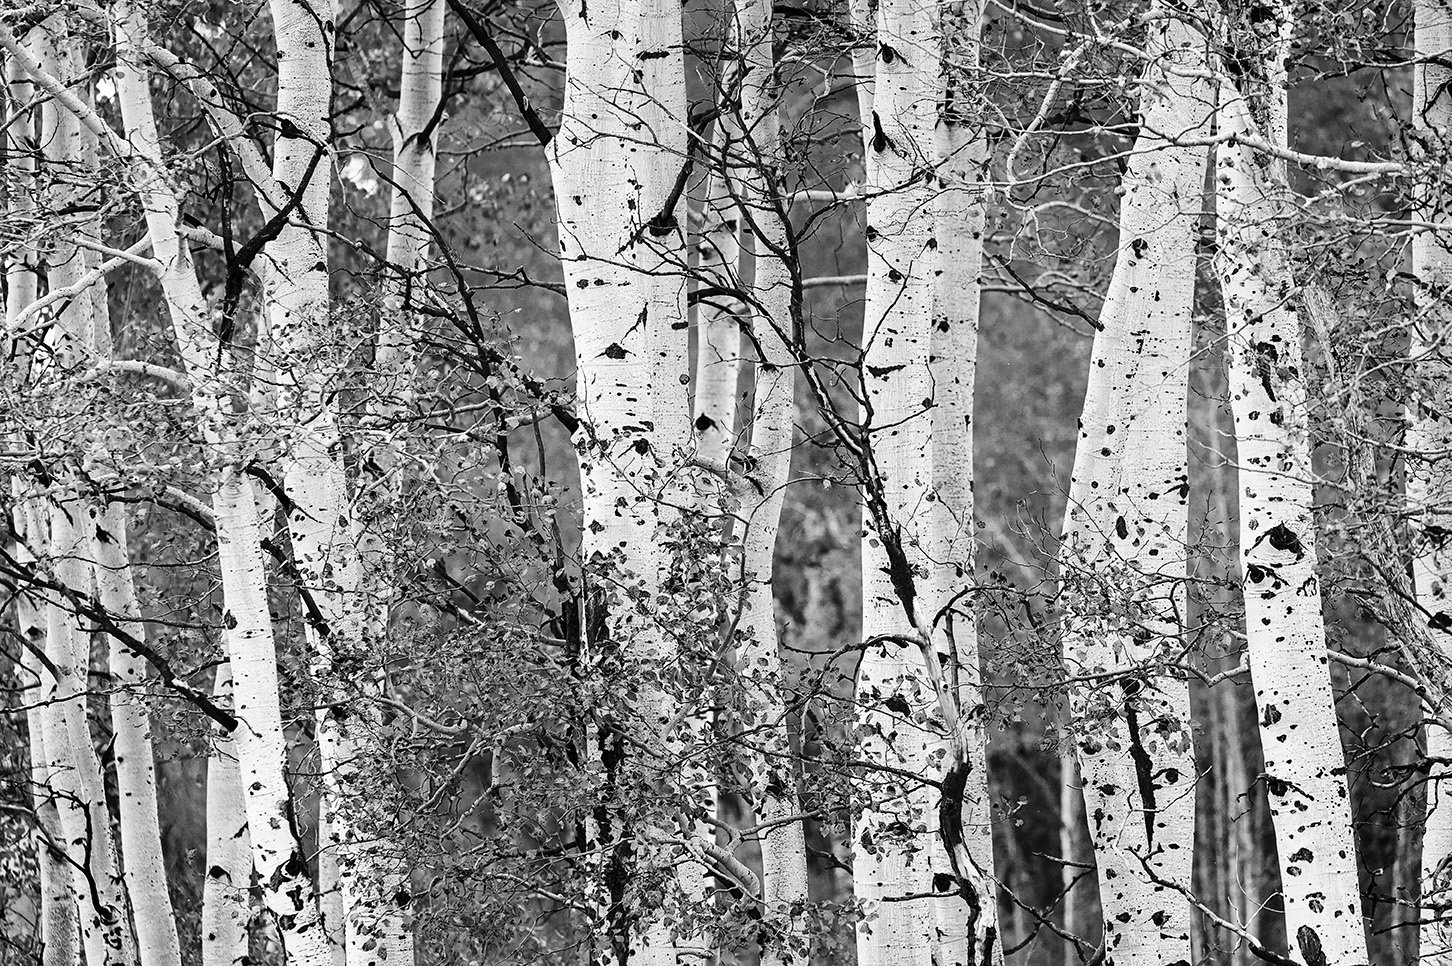
Using the circular polarizer to reduce glare and enhance the colors on this gorgeous sunny day in Ronda, Spain

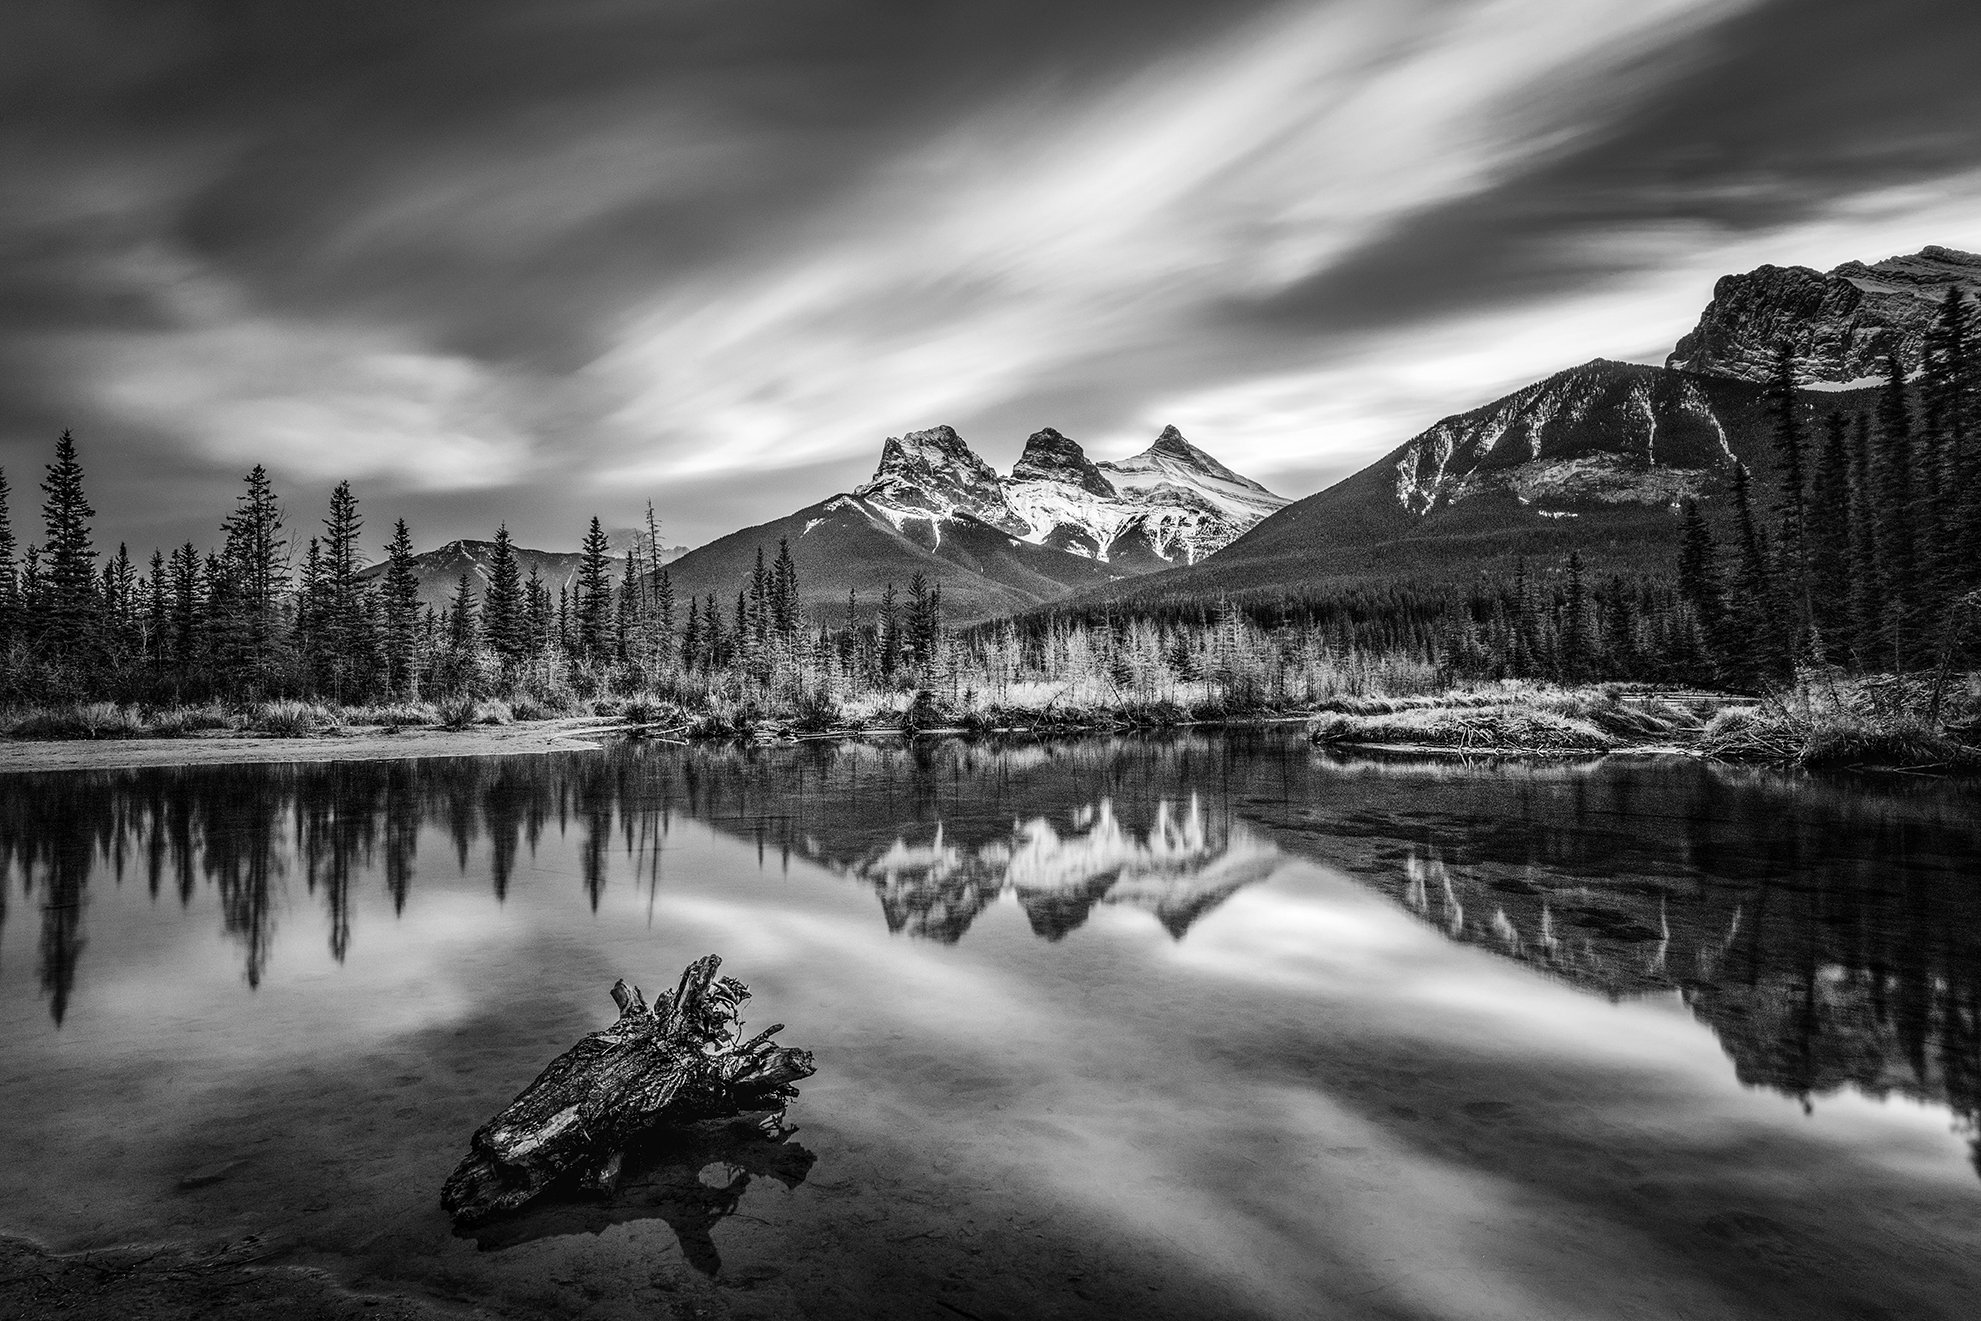
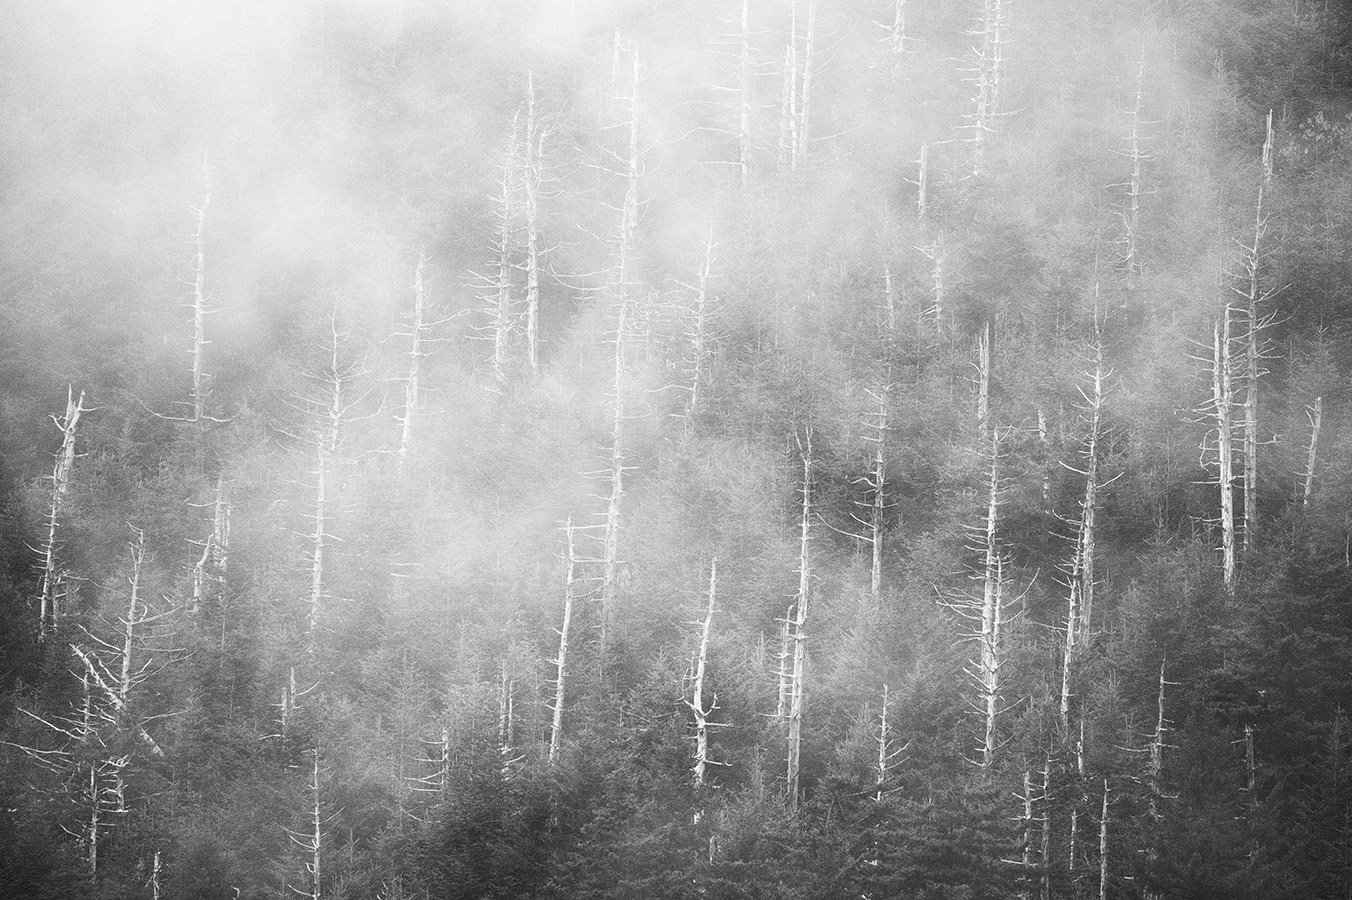
These filters are incredibly easy to stack when you want to use a polarizer and ND filter or to stack more than one ND filter to block more light like in this image below where I stacked the 10 stop and 3 stop neutral density filters to get a 3 minute exposure of these clouds.

After Spain, I traveled to South Carolina in mid April to host my Magic in Hilton Head ladies retreat. This filter kit was a dream to use while on the beaches of Hilton Head Island.

1/2 second exposure with the 6 stop ND filter

1/2 second exposure with the 6 stop ND filter

I cannot recommend this filter set enough. Have questions? Don’t hesitate to reach out to me. I’m happy to share any information I can.


Kristen Ryan is an award winning and published landscape photographer and educator residing in the Midwest suburbs of Chicago. All images are available for purchase in the Fine Art Store or by request. Kristen leads ladies landscape photography retreats in the Tetons, Glacier NP, Hilton Head,  Chicago, and the Canadian Rockies, offers private mentoring .

4 Ways To Use Shutter Speed For Creative Seascapes

There is something truly magical about the ocean! The movement and sound of the waves crashing along the shore is mesmerizing. The ocean is one of my favorite subjects to photograph because getting creative with shutter speed can keep me experimenting for hours.

There are 4 ways I used shutter speed to create different effects with my seascapes!

1) Fast Shutter Speed - Sometimes the texture of the crashing or cresting waves grabs my eye and instead of softening the water, I want to emphasize the texture and power of the ocean by freezing the movement with a fast shutter speed.

1/2000s shutter speed to freeze the motion of the crashing wave. Photographed at 360mm with the Sigma 150-600mm Contemporary Lens.

2. Slow Shutter - One of my favorite shutter speed choices with ocean waves is in the range of .4 seconds to 2 seconds. In this range, the movement of the water is softened somewhat but texture and shape is still evident. With these shutter speeds, the look of the water can change with just small changes in exposure length.

With these shutter speed ranges, a 6 stop ND filter is my go to choice and a tripod is necessary for keeping the camera stable.

1/4 second exposure capturing the movement and texture in the crashing waves

3) Much Longer Exposures - A third creative choice photographing the ocean is to use much longer exposures to smooth out the water completely and create a really soft and dreamy look. Here I am referring to shutter speeds generally of 10 seconds and longer. When we get even longer, with shutter speeds of 30 seconds and more for example, we also get the benefit of getting dreamy movement in the clouds too. When I photograph exposures from 10 to 30 seconds, a 10 stop filter is my go to ND filter. If working in bright daylight hours, more than 10 stops may need to be blocked to get 30 seconds or longer. In these situations, I will use a 15 stop filter or stack filters to extend the time. Be sure to make sure your tripod is stable for these longer exposures. If the water flows up over the legs, it can move just enough to blur the image.

15 second exposure for a dreamy and soft feel in the water

4) Intentional Camera Movement - the fourth way I love to shutter speed creatively is to combine a slower shutter speed with intentional camera movement. This movement creates an abstract and painterly feel to the ocean. My preferred shutter speed range for ICM is .5 seconds to 1 second because it allows me to control if I move fast or slow as well as how much I move the camera over this time period. I generally use a 6 stop ND filter to get my shutter speed in this range. If I am without a filter, it is possible to use intentional camera movement with somewhat faster shutter speeds with success and I don’t hesitate to do so. I simply prefer the .5s to 1 second range . Check out Seascape Panning for more information on using this technique.

1/4 second of intentional camera movement with the Sigma 150-600mm Contemporary Lens at 220mm

Experimenting with all these different ways of photographing the water can keep me busy with the ocean for hours! Can’t wait to get back there again!


Kristen Ryan is an award winning and published landscape photographer and educator residing in the Midwest suburbs of Chicago. All images are available for purchase in the Fine Art Store or by request. Kristen leads ladies landscape photography retreats in the Tetons, Glacier NP, Hilton Head,  Chicago, and the Canadian Rockies, offers private mentoring . New online educational materials are coming soon!


The Neutral Density Filter I use to photograph long exposures are from Breakthrough Photography.**


** affiliate link

4 Tips for Creating Compelling Black and White Landscape Imagery

Color is everywhere around us! Nature’s color  wows us with its vivid sunrises and sunsets, deep blue skies, forests of green, and rainbows of flowers. Landscape photographers seek golden hour light and the vibrant burn of the red setting sun for good reason. Our eyes are drawn to intense and contrasting colors. It can be hard to understand why one would want to strip that color out of a landscape photograph. 

While color is a compelling element in many images, color can also draw the eye so strongly that other aspects of a photo are minimized or even lost to a viewer. Elements such as light, texture, pattern and shape take center stage when color no longer competes for attention. A black and white landscape will tell a different story than the very same image in color.  There is a classic and timeless quality to black and white images as they draw focus to the mix of light and shadow, contrast and texture in a scene.

1) Learning to see in Black & White To create compelling black and white landscape images, we must find scenes with compositional elements and light that tell a strong story without the use of color. When color is no longer a focal point or supporting element, we are forced to find the other components of a scene that make it interesting.

When we previsualize in black and white we have to learn to see tonality in terms of shades of gray. Black and white is not only black and white but all the values of gray between true black and true white.  A wide range of tones throughout the histogram will create the strongest images. This means having tones that are bright white, various shades of gray, and black. When an image has too many of the same tones, the image will lack depth and distinction because everything blends together.

Learning to understand and see how the colors and areas of a landscape will translate into shades of gray comes from practice and experience. For example, deep blues and forest green colors will translate to darker gray or near black while yellow and light greens will be lighter shades of gray. These tonalities will also be influenced by the exposure you choose at capture and how you adjust them in post processing.

2 ) LOOK FOR THE LIGHT: 

Compelling black and white landscape imagery can be created in varying lighting situations. Dramatic light and scenes with a high dynamic range including bright highlights and dark shadows will naturally introduce strong contrast. I love to look for scenes where there are pockets of light across the landscape. Choosing black and white in a scene like this creates a story all about the dance of light and shadow.  

Harsh daytime light is often considered unfavorable for color landscape photography but this kind of light can work well in black and white imagery. Bright sunlight is extremely effective in bringing out the detail of various textures by emphasizing the various tones across a surface.  Deep blue skies turn dark in a black and white conversion and highlight lighter toned subjects. Stormy skies are a great opportunity for grand black and white landscapes as they create a dramatic and foreboding mood.

3) Find the Contrast: 

Contrast is important in black and white landscapes both for tonal range and visual balance. The main subject must stand out amongst its surroundings. A dark subject needs to be set against a lighter background or a light subject against a darker background to be successful. For example, a bright waterfall flowing over dark rocks, or dark trees amidst light misty clouds. Through the frame, also look for areas of micro-contrast where light and dark tones contrast to highlight textures and patterns, such as in layers of rocks or in the movement of waves. The mix of tonality works to bring attention to these textures and shapes and creates depth. 

With the way that black and white imagery emphasizes texture and form so beautifully, one way to elevate and balance the visual interest in an image is to use the contrast between various textures of the landscape. Using post processing tools to enhance these contrasting details will elevate an image from average to outstanding. 

Contrast areas of detailed and rough textures with soft and smooth creates layers and depth. For example, consider an image with several layers including rocks in the foreground of smooth water, jagged mountains, and then soft wispy clouds in the sky. Using neutral density filters and slow shutter speeds is a great technique to use for creating the softness in the water or sky. 

4) Emphasize Lines, Texture, and Patterns

Black and white landscape and nature photographs are a great way to emphasize lines, textures and patterns in a scene. The stripping of light brings out the beauty of these elements. Look for repetitive lines or shapes naturally occurring in the landscape. Notice how the light can bring out micro contrast in textures such as rock, sand and trees.  And as mentioned above, look for those texture contrasts between smooth and rough as this creates visual interest and depth. 

Next time you’re out photographing, give a little thought to black and white! I hope these tips help you out!


Kristen Ryan is an award winning and published landscape photographer and educator residing in the Midwest suburbs of Chicago. All images are available for purchase in the Fine Art Store or by request. Kristen leads ladies landscape photography retreats in the Tetons, Glacier NP, Hilton Head,  Chicago, and the Canadian Rockies, offers private mentoring . New online educational materials are coming soon!

Make Your Tripod Work For You

As landscape photographers, our closets and bags are filled with gear and gadgets to help us photograph the beauty of the world around us. Among these, a tripod is one of the most useful tools we use, but one of the most cumbersome as well. We often have a love/hate relationship with our tripod. It adds weight to carry and can be annoying to set up, adjust, and pack back up! But it helps us to stabilize the camera and create sharper images especially when we are photographing with slow shutter speeds or shooting focus stacked or bracketed exposures. 

In many cases, the tripod is crucial for the success of creating our visions. But it can also get in our way and hold us back in some ways if we don’t use it right. And I don’t mean whether we tighten the legs properly or adjust the ballhead right. 

When we walk up to a location, it can be really easy to take out the tripod and set it up at the first thing we see. Then proceed to put the camera on the tripod and get stuck right there in that spot, at that height, and then forget to move around and change our perspective. Because it can be cumbersome at times to adjust the tripod, sometimes we get stuck in that one position we set it up in the first place. No doubt when I started out in landscape photography, I made this mistake, only to kick myself later as I reviewed my images.

As I learned to explore my locations more thoroughly before setting down my tripod, I have also learned to make my tripod work FOR me rather than against me. Using all my senses and my camera (handheld), I look around and find the perspective, height and composition that satisfies my vision. Then if my vision requires the use of the tripod, I set it up to put my camera in the position that I found through my exploration. 

Additionally, after exploring a particular area or composition for a bit, make sure to pick up your tripod and go explore other compositions, once again using your tripod as a tool to photograph what calls to you.

So next time you head out, don’t work in the constraints of the tripod, make sure your tripod is one of the tools helping you photograph the composition that speaks to you! While you’re at it, there are MANY tripods out there - if the one you use makes you want to throw it in a lake, find a camera store and play with some until you find one that you’ll be happy to take along on your next hike or photo outing!


Kristen Ryan is an award winning and published landscape photographer and educator residing in the Midwest suburbs of Chicago. All images are available for purchase in the Fine Art Store or by request. Kristen leads ladies landscape photography retreats in the Tetons, Glacier NP, Hilton Head,  Chicago, and the Canadian Rockies, offers private mentoring . New online educational materials are coming soon!

My Favorite Tool for Waterfall Photography

It’s no secret that long exposures are one of my very favorite techniques to use in my photography. Whether I’m photographing the movement of water or clouds, I will pull out my Breakthrough Photography * Neutral Density filters to slow my shutter speed a little, or quite a lot! Waterfalls are one location that I love to photograph with long exposures to create that ethereal mood of flowing water.

One tool that is invaluable to me when photographing waterfalls, as well as many other water scenes, is Breakthrough Photography’s X4 Dark CPL 6 Stop Filter. What is this filter, you ask? It is basically a circular polarizer and 6 stop neutral density filter in one!

Combining these two filters into one is genius in my opinion! When shooting waterfalls, both the circular polarizer and 6 stop neutral density filter are important for capturing my vision. A polarizer will cut glare from the water and intensify the colors in the environment surrounding the waterfall. The 6 stop ND filter will block light from the sensor so that I can slow my shutter speed to create the smooth flow I desire.

Hidden Falls Kristen Ryan Photography.jpg

Having these two filters combined as one simplifies my set up process since I only need to put on one filter. Additionally, each filter you add is one more layer of glass that you have to check for dust and spots before shooting. So one filter instead of two means less layers of potential distracting elements getting in front of your sensor. I always carry the X4 Dark CPL 6 Stop Filter in my filter case and I highly recommend you add one to yours.

Waterfall Glen KRP-001.jpg

Kristen Ryan is an award winning and published landscape and fine art photographer and educator residing in the Midwest suburbs of Chicago. All images are available for purchase in the Fine Art Store or by request. Kristen leads ladies landscape photography retreats in the TetonsChicago, and the Canadian Rockies, offers private mentoring and teaches an online landscape photography workshop, The World Around You.

Night Photography Part 4: Star Trails


Creating star trails can be a fun and creative way to add interest and intrigue to your night sky images. They do take quite a bit of time and patience to create in the field as well as in post processing, so keep that in mind as you prepare for the task. Below are a few tips as you shoot star trail images.

Star Trails at Oxbow Bend in June 2019

Star Trails at Oxbow Bend in June 2019

1) Prepare the right Gear: A sturdy tripod is essential for shooting star trails as you will need your tripod to stay solidly in one place for extended periods of time. An intervalometer is also a recommended tool for star trails. If shooting 30 second exposures, you can use your in camera intervalometer but if you want to shoot longer than 30 second exposures, you’ll need to be in bulb mode and use an external intervalometer.  A wide angle lens will be the best choice for capturing those vast night skies.

2) Find Dark Skies & Clear Nights - Dark and clear skies are needed for bright star trails against a dark night. Look for nights without moon interference and no clouds. I love using the Sun Surveyor app to find information for the moon phase, rise and set. Despite clear skies being ideal, I wouldn’t shy away from shooting if there are a few clouds about. This image below is one of my very favorite star trail images and there were clouds interspersed with the stars. 

Star trails amongst the clouds at Vermilion Lakes in Banff National Park

Star trails amongst the clouds at Vermilion Lakes in Banff National Park

3) Long Trails or Short trails?  Choose the effect you are going for. If you want to get many long and continuous trails of stars, you will need to shoot for a long time, at least 30 minutes but ideally an hour or longer. For shorter trails where the star trails are broken and just little lines across the sky, you can shoot a single exposure in the 8-15 minute range. (Such as the Vermilion Lakes shot above)

4) Exposure Time - To decide on your exposure time, consider what effect you are going for. You could shoot one very long exposure, or you could shoot many 30 second exposures and stack them together in Photoshop to create the trails. There are a few benefits to the shorter exposures. First, you can more easily check your exposure with a test shot and adjust before you set the camera to shoot for minutes, or hours. Second, if random light comes in and messes up an exposure, it can be easier to fix than if you have had your exposure running for an hour’s time. And third, you also have static star shots in addition to the trails. This leaves you more options for using these various exposures in post processing from static star images, short trails, longer trails or even a time lapse.

Star trails captured over an hour of time in Wyoming. 30 second exposures stacked into one image.

Star trails captured over an hour of time in Wyoming. 30 second exposures stacked into one image.

5) Turn off in Camera Noise Reduction - While the in camera long exposure noise reduction can be helpful for avoiding hot spots, it must be off when shooting star trails because the exposures need to be continuous with the least amount of time between them as possible to avoid breaks in the trails. 

6) Switch to Manual Focus - Make sure you have your camera in manual focus so that your camera is not trying to focus during the many star captures. 

7) Scout Location during the Day - Use the daytime to find a great location with interesting foreground to add to your star trail image. Heading out with a plan will greatly increase your chances of success! 

8) Be Creative! While there are techniques that will help you succeed in getting focused and well exposed star trail images, don’t be afraid to experiment and be creative.

Schwabacher Star Trails.jpg

For more tips on Astrophotography see Astrophotography Tips Part 1 and Part 2. Also check out Part 1 in the Night Photography Series: Preparation for more general tips.


Kristen Ryan is an award winning and published landscape and fine art photographer and educator residing in the Midwest suburbs of Chicago. All images are available for purchase in the Fine Art Store or by request. Kristen leads ladies landscape photography retreats in the TetonsChicago, and the Canadian Rockies, offers private mentoring and teaches an online landscape photography workshop, The World Around You. The next run of The World Around You begins August 17!

Night Photography Part 3: Light Trails

Before heading out for night photography, it is great to be prepared, so check out Part 1: Preparation if you missed it!  This week’s tips are all about capturing light trails, a creative and dynamic way to capture the night and movement of lights.  So here are some tips for capturing quality images of light movement in your night photography. 

1) Find a Moving Subject with Lights - This is pretty obvious of course but light trails require moving lights through your frame. So look for a spot where you can capture the movement of cars, buses, a train, or any other moving light. The movement must be consistent, not stop and go!

2) Aperture - Choose a mid range aperture that allows you to achieve the desired depth of field somewhere between f/5.6 and f/11.  This range is generally sharp and in the sweet spot for most lenses. Depending on your scene you may need to close down more for greater depth of field or you may need more light. In some cases you may want to close down to f/16 in order to create starbursts of street lamps or other lights in the scene. 

3) Shutter Speed - A shutter speed of 10-20 seconds is usually the sweet spot that I find for most light trails. However, you may have to adjust this if the trails are blowing out or if the moving vehicle is moving particularly slow. 

Captured from the foot bridge near Lincoln Park in Chicago during blue hour.

Captured from the foot bridge near Lincoln Park in Chicago during blue hour.

4) Histogram & Highlight Warning - Pay attention to your histogram and highlight warnings after you shoot to ensure you are capturing the detail in the dynamic range. This is particularly important in the highlights since those will be the focus of your scene. 

5) Timing - Timing can be everything when it comes to light trails. Starting your exposure when the lights come into the frame and will move through it is critical to the success of light trail images. Set up your frame and base exposure and be ready to click the shutter when the movement begins. For example, if you are near a stoplight, wait for the light to turn green before you start your exposure. If you are shooting over a highway, wait until there is enough traffic to fill the frame with trails. Shooting in Chicago one time, I found that buses created interesting light trails, so I waited until I saw a bus coming along before starting the exposure. 

The high light trails here are created by waiting for the bus to come along before starting my exposure. Captured on Michigan Avenue in Chicago.

The high light trails here are created by waiting for the bus to come along before starting my exposure. Captured on Michigan Avenue in Chicago.

6) Lighting - It might seem you need to wait until dark to shoot light trails but it doesn’t have to be completely dark. Lights will start coming on as sunset approaches. Blue hour can be a great time to shoot light trails with the warm lights contrasting with the deep blue sky. 

7) Location - Pick a location where the light trails can be the main focus of the frame, or a strong supporting element, depending on your goal. Think about how the lines of the trails will lead through the frame to create a pleasing or intriguing scan path for the viewer.

8) Be Safe - Make sure to position yourself safely when shooting. If you are near traffic, be sure you are not risking your safety for the shot. 

A bus turns the corner along Michigan Avenue in Chicago

A bus turns the corner along Michigan Avenue in Chicago

Hope these tips help you have fun, be creative and find success shooting light trails!

Want to shoot light trails with a group of ladies in Chicago? Check out my Magic in Chicago Ladies Retreat and sign up for the Ladies Retreat newsletter for all the newest information.


Kristen Ryan is an award winning and published landscape and fine art photographer and educator residing in the Midwest suburbs of Chicago. All images are available for purchase in the Fine Art Store or by request. Kristen leads ladies landscape photography retreats in the TetonsChicago, and the Canadian Rockies, offers private mentoring and teaches an online landscape photography workshop, The World Around You. The next run of The World Around You begins August 17!

Night Photography Part 2: Cityscapes

Last week I shared some tips for getting prepared for night shooting whether cityscapes or astrophotography. Night is one of the most beautiful and dynamic times to shoot in the city. I hope these technical tips will help you to capture some incredible night city scenes.

1) Shoot in RAW - The best way to get the most information in your files and therefore the best quality photographs is to shoot RAW. Exposure and white balance both can be tricky with night photography and the more information you collect while shooting, the more leeway you will have when you get into post processing for adjustments. 

2) Low ISO - While astrophotography generally calls for a high ISO since it requires very dark skies for visible stars, the lights of towns and cities create an overall brighter scene. This allows for a low ISO to help reduce noise in your images. Depending on the available light as well as my aperture and shutter speed choices, my ISO is typically between 200 and 800.

Buckingham Fountain during Blue Hour

Buckingham Fountain during Blue Hour

3) Manual Focus - Focusing manually is the best way to ensure sharp focus in night photography.  If you are close enough to lights and points of contrast, I find autofocus can work quite well, but as it gets darker, when you are further away from the scene, or when you are using a wide angle lens, autofocus will often miss the mark. Even if you think autofocus is working for you, I recommend using live view and zooming in on a point of contrast and manually tweaking the focus until sharp. 

4) White Balance - Choice of white balance at night can be a bit tricky. The night shadows tend to be very cool but the city lights are very warm. Be aware of this dichotomy and try to balance out the intensity of the warm lights with the cool shadows. Like all imagery, choice of white balance is subjective for the look and mood you want to portray so you may have a preference for warmer or cooler tones. Using live view can often help me find my happy place with the color. If your camera’s auto white balance does a good job, that can often be a great choice as well. 

Telephoto capture of part of the Chicago skyline

Telephoto capture of part of the Chicago skyline

5) Bracket exposures - Night city scenes present a challenge as they have a high dynamic range to capture. The lights of buildings and vehicles are quite bright while the shadows are dark, making the dynamic range more than cameras can capture in a single exposure. Bracketing exposures by programming your camera or by adjusting your settings manually is the best way to ensure you capture detail in both the shadows or highlights. 

6) Histogram - Use your histogram to help you evaluate your exposure. Your LCD screen is not a great way to check exposure which is why I recommended in Part 1: Preparation to turn the brightness down. This way it won’t trick you into thinking you have proper exposure when you don’t. With the high dynamic range, check your highlights and your shadows to ensure you have detail in both. Refer back to those bracketed exposures. If your brightest bracketed exposure still has clipped shadows, brighten it up. If your darkest bracketed exposure still has blown highlights, reduce the exposure. While sometimes you may find you can recover enough information to make a single exposure work, it is always best to gather as much information in the field as you can. 

Williamsburg Bridge from Brooklyn

Williamsburg Bridge from Brooklyn

7) Take Test Shots - Don’t be afraid to take test shots and examine them for focus, exposure and white balance. Examine them to consider your composition as well to see if you have included distracting elements or cut off important lines or features. Zoom in to check for sharp focus. Check your histogram for the dynamic range. Check to see if your images are excessively warm or cool. 

8) Create Starbursts of City Lights - Close your aperture down to capture starbursts of those city lights. F/16 its a great number to aim for. If you need more light, in this image below I was able to get the starburst of this rotating lighthouse light at f/13.

Harbour Town at night with an aperture of f/13 to get the starburst of the lighthouse light!

Harbour Town at night with an aperture of f/13 to get the starburst of the lighthouse light!

9) Arrive Early - Getting to your location for sunset will allow you to take your time in setting up and evaluating different compositions. This will also give you the opportunity to shoot through varying lighting situations of sunset, blue hour and true night skies.  A stunning time to capture is when the lights first come on in the city!

Part of the Chicago skyline as the sky transitions to night and the city lights are turning on!

Part of the Chicago skyline as the sky transitions to night and the city lights are turning on!

These tips can also be used in a smaller downtown or even in a rural area when shooting a lit up building amongst darker skies such as this scene below at Emerald Lake.


Next week’s topic in the Night Photography Series is Light Trails, so keep an eye on your inbox! 

This kind of environment mixes an astrophotography approach with a city scene approach. The ISO in this image is 800. Shooting in this kind of scene without the bright restaurant would require a much higher ISO. Additionally, this is a situation of …

This kind of environment mixes an astrophotography approach with a city scene approach. The ISO in this image is 800. Shooting in this kind of scene without the bright restaurant would require a much higher ISO. Additionally, this is a situation of merging exposures and balancing white balance for the cool sky and the warm restaurant lights.


Kristen Ryan is an award winning and published landscape and fine art photographer and educator residing in the Midwest suburbs of Chicago. All images are available for purchase in the Fine Art Store or by request. Kristen leads ladies landscape photography retreats in the TetonsChicago, and the Canadian Rockies, offers private mentoring and teaches an online landscape photography workshop, The World Around You. The next run of The World Around You begins August 17!

One Piece of Gear that is a Game Changer

One thing we discover as we get into landscape photography is that it tends to encourage more and more gear accumulation. Tripods, filters, remotes, etc. It seems there is always something more to purchase and add to our ‘need’ or ‘want’ list! It can be hard to decide which gear is truly worth the expense.

If you are into long exposure photography or astrophotography, there is one piece of gear that is a total game changer. That item is an “L Bracket”. This little piece of metal is in the shape of an L and it screws onto the bottom of your camera where you would screw on the tripod plate. It replaces the plate and stays on your camera tightly unless you take it off. It adds a small amount of weight and bulk but minimally so and is well worth the benefit. 

The L Bracket allows you to place your camera securely in either horizontal OR vertical orientation. In my experience, long exposures with a typical tripod plate are frequently lacking sharpness, especially with a heavy camera and lens combination. This is because when the ball head is turned to shoot vertically, the weight of the camera causes it to slip and even the slightest movement will create blurriness in our images. The L bracket allows the camera to sit securely on top of the tripod without moving during long exposures.

The ability to shoot portrait orientation long exposures is especially helpful in situations such as shooting tall waterfalls or astrophotography when you want to capture the height of the sky and Milky Way. It is also helpful in keeping the camera composition steady when utilizing focus stacking in a vertical orientation. As a bonus, I find my camera is more secure on my tripod with the L bracket than the tripod plate regardless of whether I’m shooting horizontally or vertically.

The L bracket also means you don’t have to worry about forgetting your tripod plate because it will always be ready to mount on the tripod. The little allen wrench fits in a space at the bottom of the L bracket so it is always there if an adjustment is needed. Be sure to purchase an L bracket specific to your camera model and make sure it works with the ball head on the tripod. Just check the details online when you purchase or ask the camera store you are purchasing from. 

Milky Way capture in September 2019 using my D850 and Kirk L bracket

Milky Way capture in September 2019 using my D850 and Kirk L bracket

I hope you find using an L bracket to be helpful in your landscape and night photography!


Kristen Ryan is an award winning and published landscape and fine art photographer and educator residing in the Midwest suburbs of Chicago. All images are available for purchase in the Fine Art Store or by request. Kristen leads ladies landscape photography retreats in the TetonsChicago, and the Canadian Rockies, offers private mentoring and teaches an online landscape photography workshop, The World Around You.

The next run of ‘The World Around You’ beings April 20th! Registration opens in early March!

5 Tips for Shooting in Overcast Weather

It’s no secret that I love clouds, as most landscape photographers do. Clouds make a sky far more interesting than a clear blue sky. They create mood and atmosphere. But sometimes the clouds are so thick that the sky becomes gray and overcast, which is not any more interesting than a clear blue sky. What do you do in those situations? I suppose if you are home, you can just sit that one out and spend your day editing or engaging in life outside of photography. But when it happens during a long awaited trip to a dream destination, you want to make the best of it. So here are a few ideas of how to embrace that overcast light.

1) Seek Out Waterfalls or Other Moving Water ~ Overcast light is the perfect time to shoot waterfalls, rivers, or streams. Grab your 6 stop Neutral Density Filter and play with shutter speed and long exposures . The soft, overcast light helps to shrink the dynamic range and eliminates the dappled light and harsh shadows that come with bright sunlight. Bonus in the autumn, overcast light lets you bring out the fall colors without the harsh highlights.

WaterFall Glen Kristen Ryan Photography.jpg

2) Experiment with Slow Shutter and Panning ~ Experimenting with tree panning is a perfect activity for an overcast day. Panning can be done in any light, but in softer light, it will be easier to get a slower shutter speed and avoid bright highlights that come in full sun.

Meadow Panning-001.jpg

3) Fill the Frame ~ Look for some beautiful details in the foreground and fill your frame with them. For example, maybe a mix of fall colors in the foliage or fog floating through the trees. I often use a longer focal length for this kind of shooting.

Trees & Fog Kristen Ryan Photography.jpg

4) Minimize the Sky in the Frame ~ If the sky is not adding interest to the scene, make the foreground the majority of the frame. Place the horizon or tops of trees, mountains or hills near the upper line of the Rule of Thirds or even higher. Typically in these situations I will use a mid focal length or longer focal length rather than my wide angle.

Cannon Beach Fog-001.jpg

5) Underexpose the Sky ~ Sometimes the sky is a pure gray or white blanket over the scene, but other times you might be able to see some texture in the clouds. If you see texture, you can work with it in post processing. By underexposing, you capture more sky detail and can edit to create some moody atmosphere.

Cape Flattery Kristen Ryan Photography-001.jpg


So next time the clouds got you down, remember these tips and get creative. There is always some beauty to be found!


Kristen Ryan is an award winning and published landscape and fine art photographer and educator residing in the Midwest suburbs of Chicago. All images are available for purchase in the Fine Art Store or by request. Kristen leads ladies landscape photography retreats in the TetonsChicago, and the Canadian Rockies, offers private mentoring and teaches an online landscape photography workshop.

Creative Cloud Exposures

A couple weeks ago I shared all about photographing creative exposures of water and last week I offered thoughts on choosing a neutral density filter for various long exposure effects. So today I’m sharing all about creative long exposures of clouds. One of my favorite things to do on a day with pretty clouds is experiment with shutter speed for wispy cloud movement. Now, this is not to say that I don’t love an image of gorgeous clouds with a faster shutter speed, because I do.

1/160 Shutter Speed

1/160 Shutter Speed

But it is a lot of fun to grab my 10 stop Neutral Density filter and shoot exposures with shutter speeds of 30 seconds and longer. As mentioned in last week’s post, if the clouds are moving fast, a shutter speed of 15 seconds may get some movement, but most often if I am shooting for cloud movement, my shutter speed will be 30 seconds to several minutes.

Below is a sample of 3 exposures, the first a faster shutter speed showing the clouds as we see them, the second one is 60 seconds and the third is 120 seconds. You can see dramatically more cloud movement from the first to the second and somewhat more cloud movement from the second to the third image.

1/13 Second Exposure

1/13 Second Exposure

60 Second Exposure

60 Second Exposure

120 Second Exposure

120 Second Exposure

The following images are more examples of long exposures to show cloud movement. Exposure times are listed in the captions.

3 Minute Exposure

3 Minute Exposure

2 Minute Exposure

2 Minute Exposure

1 Minute Exposure

1 Minute Exposure

6 Minute Exposure

6 Minute Exposure

To experiment with exposures 30 seconds and longer, I encourage you to invest in a 10 stop Neutral Density Filter and perhaps also a 15 stop filter. My favorite filters are from Breakthrough Photography *.

And don’t forget to find your focus and composition before putting on the 10 or 15 stop filter and cover the viewfinder with a black cloth to prevent light leaks! For more tips on long exposures check out 9 Tips for Creative Long Exposures. Have fun shooting long exposures of the clouds!


Kristen Ryan is a landscape and fine art photographer residing in the Midwest suburbs of Chicago. All images can be purchased in the Fine Art Store. Kristen leads ladies landscape photography retreats in the TetonsChicago, and the Canadian Rockies, offers private mentoring and teaches an online landscape photography workshop twice a year.

Did you know that The World Around You is now open for registration for the October 7, 2019 run?! Join me for a month of exploring the scenery around you and learn to capture stunning landscape imagery at home and in your travels.

*Affiliate Link

Choosing a Neutral Density Filter

Neutral Density filters block light from the camera sensor.  There are many Neutral Density (ND) filters of varying strength which block anywhere from 2 stops to 15 stops of light. In landscape photography, we use ND filters to reduce the light coming into our camera sensor so that we can slow down the shutter speed for creative effect. The ND filters that I always carry in my bag are 6 stop, 10 stop and 15 stop filters from Breakthrough Photography. The one that I need at any given time depends on the light of the scene, the subject I am photographing and the creative effect I am envisioning in my frame. 

1 second exposure in Oahu using a 6 stop Neutral Density Filter from Breakthrough Photography

1 second exposure in Oahu using a 6 stop Neutral Density Filter from Breakthrough Photography

6 Stop Filter 

A 6 stop filter is perfect for a number of situations where you want to reduce your shutter speed in the .4 second to 5 second range.  I use my 6 stop filter when I want to create abstract photos of water or trees by using a panning technique. The 6 stop filter is perfect for photographing waves and water when I don’t want to freeze the motion but I want to keep some shape, texture and detail in the water. This is a technique I love to use at the ocean, lakes or rivers. It is also perfect for smoothing the water of waterfalls to create a soft flow. The longer exposures of 5-10 seconds will create a very smooth effect while less than 5 seconds leaves a little more texture in the water.  In very low light, the 6 stop can allow an exposure of 10 seconds or more, but in brighter light, the 10 stop will be needed. 

.4 second exposure with a 6 stop Neutral Density Filter

.4 second exposure with a 6 stop Neutral Density Filter

1 second exposure capturing the movement of the waves of Lake Michigan using the 6 stop Neutral Density filter

1 second exposure capturing the movement of the waves of Lake Michigan using the 6 stop Neutral Density filter

1 second exposure panning the autumn color in Grand Teton National Park using a 6 stop Neutral Density Filter

1 second exposure panning the autumn color in Grand Teton National Park using a 6 stop Neutral Density Filter

Shutter Painting at Crystal Cove State Park using a 6 stop Neutral Density Filter

Shutter Painting at Crystal Cove State Park using a 6 stop Neutral Density Filter

1.6 second exposure with a 6 stop Neutral Density Filter

1.6 second exposure with a 6 stop Neutral Density Filter

The 10 stop is my go to filter for exposures 15 seconds and longer. In daylight, the 10 stop is needed for these creative long exposures of water or clouds. Imagine those super smooth waters and wispy clouds. Those are when I pull out my 10 stop filter. 

2 minute exposure during sunset with a 10 stop Neutral Density Filter

2 minute exposure during sunset with a 10 stop Neutral Density Filter

3 minute exposure during very early sunrise with a 10 stop Neutral Density Filter

3 minute exposure during very early sunrise with a 10 stop Neutral Density Filter

30 second exposure at Oxbow Bend with a 10 stop Neutral Density Filter

30 second exposure at Oxbow Bend with a 10 stop Neutral Density Filter

The 15 stop filter is the filter I need for creating dynamic wispy clouds during the daylight. This filter will allow me to shoot 3-6 minutes of clouds and capture creative clouds even with slow moving clouds. 

4 minute exposure using a 15 stop neutral density filter from Breakthrough Photography

4 minute exposure using a 15 stop neutral density filter from Breakthrough Photography

Neutral Density filters are an incredible tool for adding creativity to your landscape, seascape and nature photography. I highly recommend Breakthrough Photography* filters for their great quality. Have more questions about choosing a filter, feel free to reach out and ask me! I’m always happy to help.


Kristen Ryan is a landscape and fine art photographer residing in the Midwest suburbs of Chicago. All images can be purchased in the Fine Art Store. Kristen leads ladies landscape photography retreats in the TetonsChicago, and the Canadian Rockies, offers private mentoring and teaches an online landscape photography workshop twice a year.

*Affiliate Link

Photographing Water With Creative Exposures

When first learning to shoot in manual mode, we learn that aperture, ISO and shutter speed create the exposure triangle. If we change one of these settings, we then have to alter another one to achieve proper exposure. In the beginning, when I was learning the exposure triangle, I was shooting more portraits of my kids and loving the beautiful blur that came from wide open apertures. In creating this blur and bokeh, my shutter speed was typically fast to counterbalance the wide apertures in the exposure triangle.

Over time and especially as I fell in love with landscape photography, I learned to consider shutter speed as not only a part of the exposure triangle and important in freezing the motion of my fast moving toddlers, but as a creative choice. In fact, creative shutter speed use is one of my favorite techniques when shooting moving water within a landscape.

There are 3 main choices when it comes to using shutter speed to capture water: 1) A fast shutter speed used to freeze the motion of the water and maintain texture. 2) A slower shutter speed in the range of say .4 seconds - 3 seconds which will smooth the water a bit but maintain some texture and shape and 3) a very slow shutter speed of at least 5 seconds or longer that will smooth the water completely and create a dreamy quality. Each of these exposure times creates a different texture of the water and mood in the overall image.

Chicago Skyline on a windy and wavy day. Captured with a 1/320 shutter speed.

Chicago Skyline on a windy and wavy day. Captured with a 1/320 shutter speed.

1) Fast Shutter Speed - The image above was captured on a very windy day in Chicago and the waves were crashing hard along the pavement below the steps outside Adler Planetarium. The fast shutter speed freezes the motion of the waves and shows the texture of the water. This exposure choice allows the viewer to see the rough water and feel the mood of the scene captured.

1 second exposure of the rough waves on a windy day in Chicago!

1 second exposure of the rough waves on a windy day in Chicago!

2) Slow shutter speed in the .4 second to 3 second range. This choice of exposure does not freeze the motion of the water and creates a smoother effect than a fast shutter speed. The blur of the movement still maintains some texture in the water and shape in the waves. This choice also maintains a bit of the actual mood of the windy and wavy scene but also adds a creative effect. A shutter speed in this range will typically require the use of a Neutral Density filter unless shot in very low light. This image was captured using a 6 stop Neutral Density filter from Breakthrough Photography *.

60 second exposure after the sun dipped below the horizon

60 second exposure after the sun dipped below the horizon

3) Long Exposure 5 seconds or more. These exposure times will smooth out the movement of the water and the longer exposures (15 seconds+) will create a dreamy and serene feel in the image. This moment felt very serene standing on the shores of Lake Michigan watching the beautiful sunset colors light up the sky. While the image does not show the rough waters that existed, it does represent my mood as I captured the scene. Sometimes creative exposures capture how we feel even if the scene appeared a bit different in reality.

Longer exposures in the range of 5 seconds to minutes require the use of a Neutral Density filter except when shooting in the dark. This 60 second exposure also used a 6 stop Neutral Density filter from Breakthrough Photography.* Quite often, exposures of this length will need a 10 stop ND filter.


Kristen Ryan is a landscape and fine art photographer residing in the Midwest suburbs of Chicago. All images can be purchased in the Fine Art Store. Kristen leads ladies landscape photography retreats in the TetonsChicago, and the Canadian Rockies, offers private mentoring and teaches an online landscape photography workshop twice a year.

*Affiliate Link

Seascape Panning

One of my favorite techniques to play with at the beach is horizontal panning. It is really simple and can create a beautiful dreamy effect of the water, sand, and sky in any combination. 

You will want to use a shutter speed between about 2 seconds up to around 1/30 of a second or so. To do this, you’ll need to set your ISO quite low and close down your aperture significantly. If during the day, you may need a Neutral Density Filter to block some light. A 6 stop or 3 stop filter would be best in this situation. A 10 stop filter will be more than you need and prevent you from being able to see through the viewfinder when the filter is on.   

You can use a tripod or shoot handheld. A tripod may keep you steadier horizontally but handheld works too so definitely don’t hesitate to try this without a tripod. In either case, you’ll want to frame your shot and focus on your scene and then after you press the shutter, or AS you press the shutter with the faster shutter speeds, just pan the camera to the right. When I shoot handheld I hold my arms close to my body and just turn my body to keep steady. If shooting around 1/30 of a second, you’ll need to move quicker to get the effect. With a second or two you can go slower as you have more time. 

Sometimes it helps to start moving and then press the shutter, or you can also try putting your camera on continuous mode and as you twist your body press the shutter and let it take several shots as you move left to right.

The fun thing is that you get a slightly different effect each time. You may get a bunch you don’t like along with one or two that you really love. The painterly effect is subjective so choose the ones that YOU love! 

Have questions, feel free to reach out!

Sunset panning in Dana Point.jpg
Crystal Cove Panning.jpg

Looking for a 6 stop filter to help you reduce the shutter speed? My favorite Neutral Density filters are from Breakthrough Photography! * I always have a 6 stop in my bag for capturing this effect and others!

Kristen Ryan is a fine art landscape photographer from the suburbs of Chicago. You can purchase prints in the Fine Art store or contact her for custom orders. She teaches an online landscape photography workshop, “The World Around You” and hosts in person ladies’ landscape photography retreats.

9 Tips for Creative Long Exposures

One of my very favorite things to do when shooting nature and landscapes is to experiment with long exposures   Anytime I have the opportunity to get a creative exposure of clouds or water, I try to take it.

60 seconds in Grand Teton National Park - using a 10 stop filter.

60 seconds in Grand Teton National Park - using a 10 stop filter.

Here are some tips to help you find success when experimenting with long exposures:

1)  A tripod is your best friend.  I know, I know, they are cumbersome and a pain to carry but are necessary so that you can keep your frame stable throughout the long exposure.  Make sure your tripod is steady and secure. 

2) Invest in good Neutral Density Filters. I recommend a 6 stop and/or 10 stop ND filter. In brighter light and to get 30 second or longer exposures, you will often need a 10 stop filter. In lower light and/or an exposure of just a couple seconds, a 6 stop filter may be sufficient. For even longer exposures in daylight you can use a 15 stop filter as well. There are many companies that make Neutral Density Filters in various price ranges.

4 seconds at Natural Bridge in Yoho National Park - using a 6 stop filter.

4 seconds at Natural Bridge in Yoho National Park - using a 6 stop filter.

3)  Compose your frame and focus for the desired depth of field BEFORE putting the filter in front of the lens. Once you put a 10 stop filter on,  you can't see through to focus and compose. 

4) Set the new exposure BEFORE putting the filter on the lens. Find your proper exposure without the filter on.  Then you can use a Long Exposure Calculator App to find the new shutter speed after you put on the filter. Usually you will need to max out your ISO and aperture unless you are shooting in really low light.  For example, say I set my ISO to 100 and aperture to f/22 and my base shutter speed is 1/80.  If I enter into the app a 1/80 shutter speed and tell it I am using a 10 stop filter, the app will then tell me that a 13 second shutter speed will give me the same exposure with the filter on.  So then I will change my shutter speed to 13 seconds before I put on the filter.  The less I touch my camera after putting on the filter, the better. 

4 minute exposure using a 15 stop ND filter in Grand Teton National Park.

4 minute exposure using a 15 stop ND filter in Grand Teton National Park.

5) Use a Shutter release remote. These are critical if you are using a shutter speed slower than 30 seconds as you must then turn to bulb mode. But even out of bulb mode, using a shutter release is one more way to eliminate the chances of bumping your frame and increasing sharp focus.  If you don’t have a shutter release you can also use your camera’s timer delay.

6)  Cover your eyepiece viewfinder to prevent light from coming into the frame as this creates undesirable light leaks. My Nikon D810 and D850 have a little door that covers the eyepiece. But otherwise, I would cover it with a black/dark cloth or anything else that will keep the light out. 

7) Check your histogram. Sometimes finding the right exposure with the filter can be a bit of trial and error. Don’t rely on the app or the LCD screen. Make sure the histogram is toward the right without climbing the right wall. If you need to bump exposure, lower that shutter speed, OR if your shutter speed is where you want it for creative effect, raise your ISO or open up your aperture. 

2 minutes with a 10 stop filter at Lake Louise in Alberta, Canada

2 minutes with a 10 stop filter at Lake Louise in Alberta, Canada

8) Consider the creative effect and mood of the image you want to create! When choosing your shutter speed length, think about your creative vision. For really streaked clouds, you may need a 60 second exposure or even a few minutes. If clouds are moving fast, 15-30 seconds may create the look you desire.  With water, you may want to create a really smooth effect with 20-60 seconds or perhaps you want to leave more texture in the water with a 1 second exposure or a fraction of a second.

2.5 seconds in Kauai

2.5 seconds in Kauai

9) Lastly, look at the other areas of your frame. Do you have unwanted blur in other areas of your frame…such as trees, grasses or other foliage?  If so, capture the exact composed frame with a faster speed so you can composite the two images later in post processing. 

3 minute exposure for the sky combined with a fast shutter for the foreground grasses. Shot in the prairie of Illinois.

3 minute exposure for the sky combined with a fast shutter for the foreground grasses. Shot in the prairie of Illinois.

It's a little addicting, so don't say I didn't warn you! Are you looking for filters for long exposure photography? Check out Breakthrough Photography filters!* They are the filters I always have in my bag!

Check out my online workshop, mentoring, or ladies’ landscape photography retreats for educational opportunities.

*Affiliate Link